How to Configure Storno Accounting in Odoo 18 Accounting?
Understanding Storno Accounting in Odoo 18
In the world of digital finance, precision is everything. For businesses using ERP systems like Odoo, the margin for error in accounting is slim. That’s why the introduction of Storno Accounting in Odoo 18 is more than just a technical upgrade; it’s a practical solution to one of the most common challenges in bookkeeping: clean and compliant reversal of transactions.
The word “storno” may sound unfamiliar to many. Still, in the world of accounting, especially in regions with stringent regulations, such as Germany or parts of Europe, it’s a powerful concept. Storno accounting is all about reversing previously posted journal entries, not by deleting them, but by creating a mirror image with exact details, opposite amounts.
In simple terms, Storno accounting is a financial method that reverses previously recorded accounting entries using negative entries, rather than deleting or modifying the original transaction. This ensures a transparent audit trail and is often required in jurisdictions with strict accounting compliance standards. With Odoo 18, storno accounting is now flawlessly integrated into your ERP platform.
Think about the last time you had to cancel an invoice or fix an incorrect vendor bill. You likely had to create a new adjustment entry, leave some explanatory notes, and hope that the trail made sense to your auditor. That’s no longer necessary with Odoo 18 reversal accounting. Instead, you click a few buttons, and an automatic storno journal entry in Odoo does the job, accurately.
This guide will walk you through the whole process of using storno in Odoo accounting, focusing on how to set up the configuration, enable storno journals, manage credit note reversals, and handle the impacts of storno entries across ledgers.
Whether you’re a financial controller, accountant, or Odoo consultant, this blog will equip you with everything you need to learn storno accounting in Odoo 18.
Odoo 18 Storno Accounting: A Fresh Perspective on Financial Reversals
In the latest version, Odoo 18 storno accounting introduces a dedicated system for reversal entries that do more than “cancel” a transaction; they explain it. Instead of manually correcting values or deleting mistakes (a dangerous path in the accounting world), Storno creates an exact copy of the original entry, but with opposite signs. Think of it as a financial mirror: what was credited is now debited, and what was debited is now credited, yet the entire structure of the original remains intact. This is not only aesthetically pleasing from an accounting standpoint but also necessary for companies seeking clear audit trails and full compliance with international standards.
Odoo has always supported reversals, but this storno method takes it to the next level. Where regular reversals tend to clutter the ledger or confuse the meaning of a correction, storno clarifies it. When applied right, this method changes reversals into transparent transactions that speak for themselves. It’s no wonder that more and more businesses are asking: how do we configure storno entries in Odoo 18?
Configure Storno Entries in Odoo 18 to Gain Total Control Over Mistakes
Mistakes in accounting aren’t just common, they’re inevitable. But how we correct them defines our professionalism. That’s why configuring storno entries in your system is not just a technical stage; it’s a strategic upgrade.
The process begins in Odoo’s settings, under the Accounting Configuration panel. By activating the storno feature, you’re enabling a structural change in how your ERP handles reversals. No more disconnected entries. No more last-minute explanations to auditors. Just accurate, automated, and visually mirrored corrections.
Once storno is activated, each journal’s sales, purchases, bank, and miscellaneous can be individually set to use the storno method for reversals. This flexibility enables accounting teams to apply STORNO only when necessary.
For example, it may be ideal for correcting posted invoices but unnecessary for petty cash adjustments. That’s the elegance of Odoo: you get control without complexity. And that’s precisely what modern financial teams crave.
Step-by-Step Guide to Configure Storno Accounting in Odoo 18
Storno accounting is a practice that involves using negative credits and debits whenever mistakes occur in transactions. This allows for easy identification and cancellation of transactions. Storno accounting allows you to reverse the journal entries that you have created. So, let’s get started and learn how to configure storno accounting in the Odoo 18 accounting module.
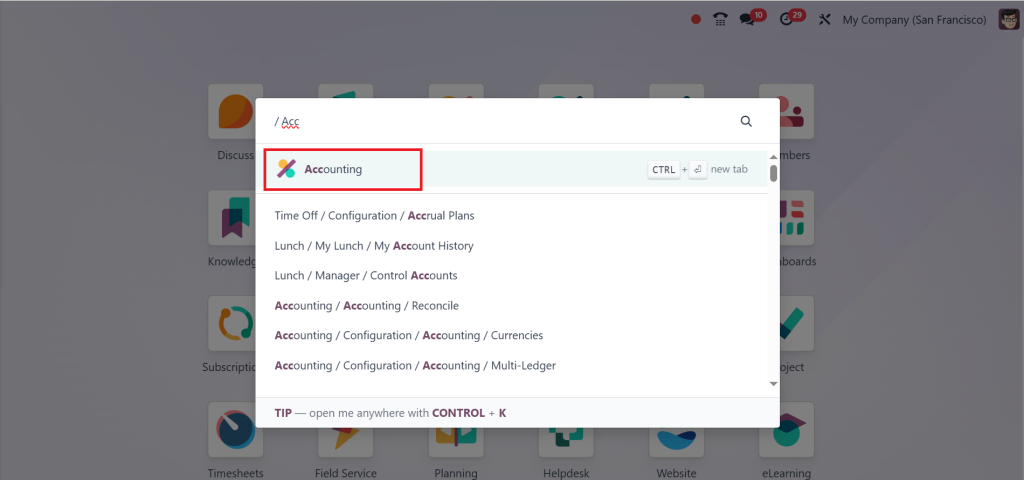
First, open the Accounting module from your Odoo dashboard.
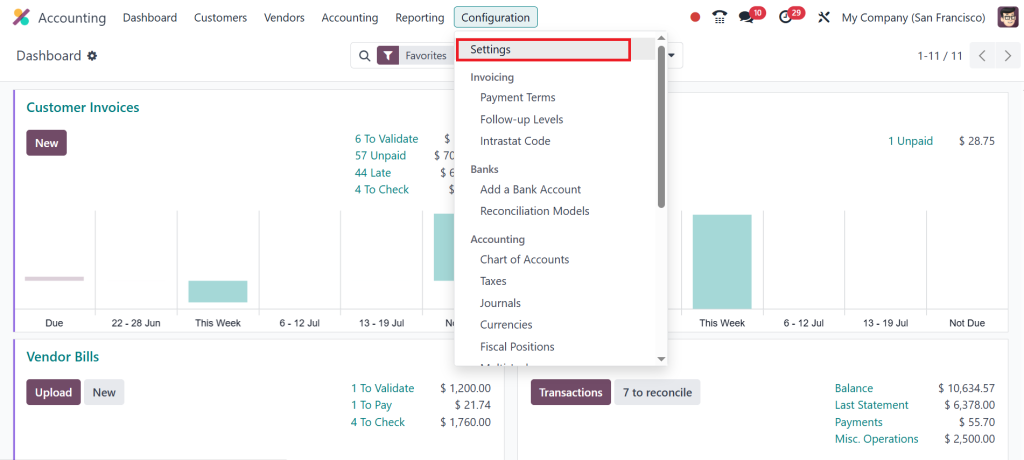
Go to Configuration > Settings.
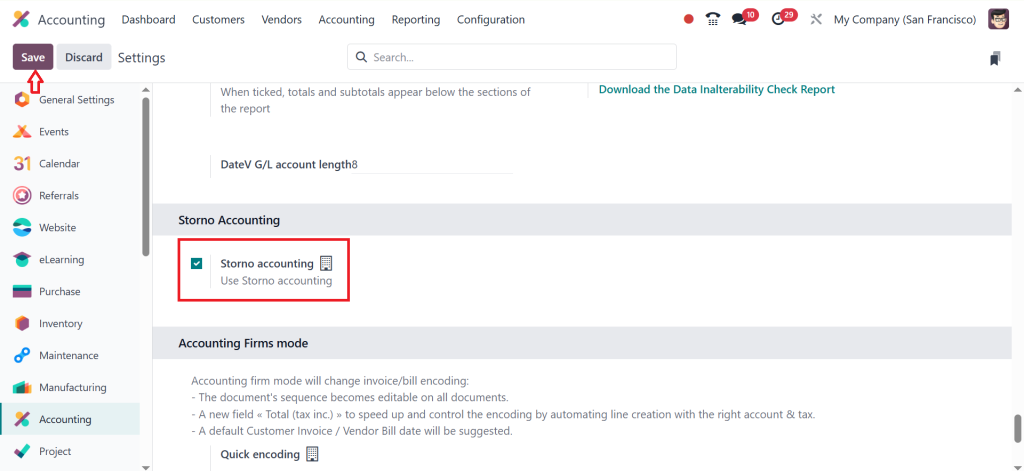
Enable the Storno Accounting feature and click on Save.
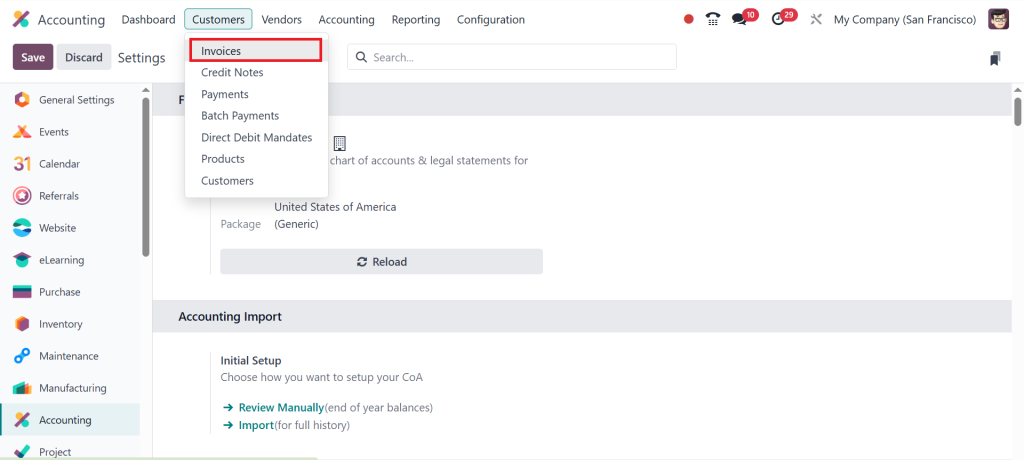
Storno accounting is a practice of using negative credit or debit. Whenever you make an error in your transaction, Storno accounting will notify you of the error by highlighting it in red and reversing the entry. Now, let’s move on to the Customers > Invoices.
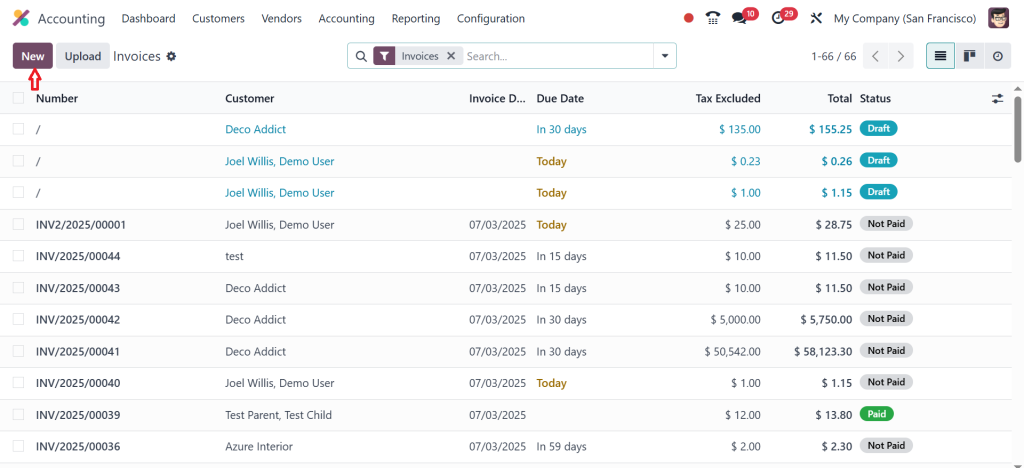
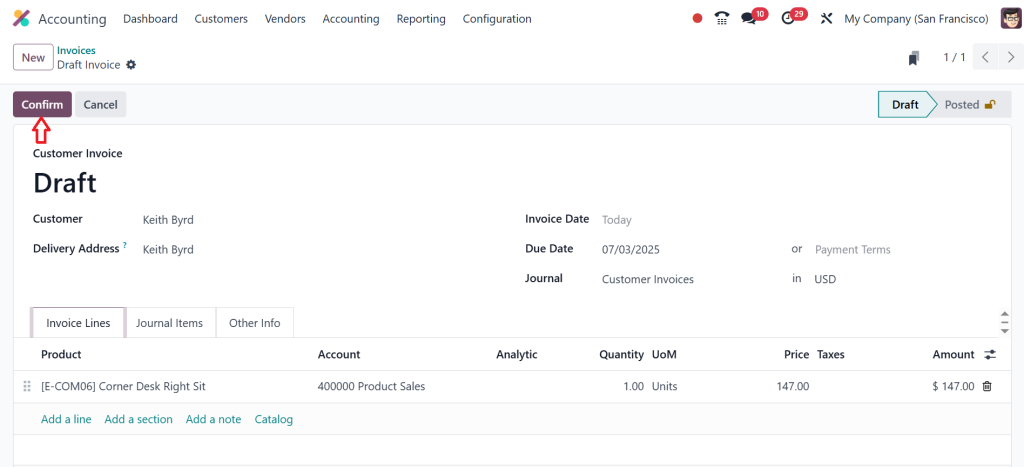
Create an invoice by clicking on the New button.
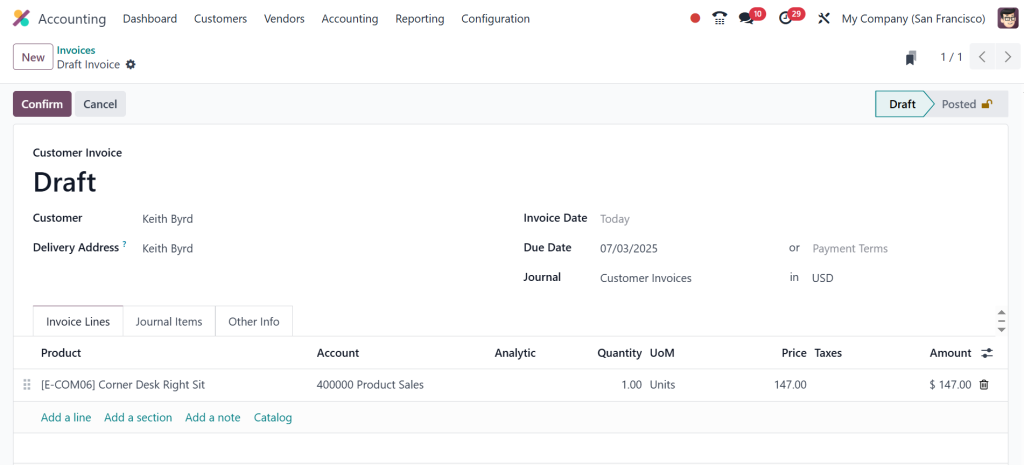
Fill out the Customer details, then add the product by clicking Add a Product or Line.
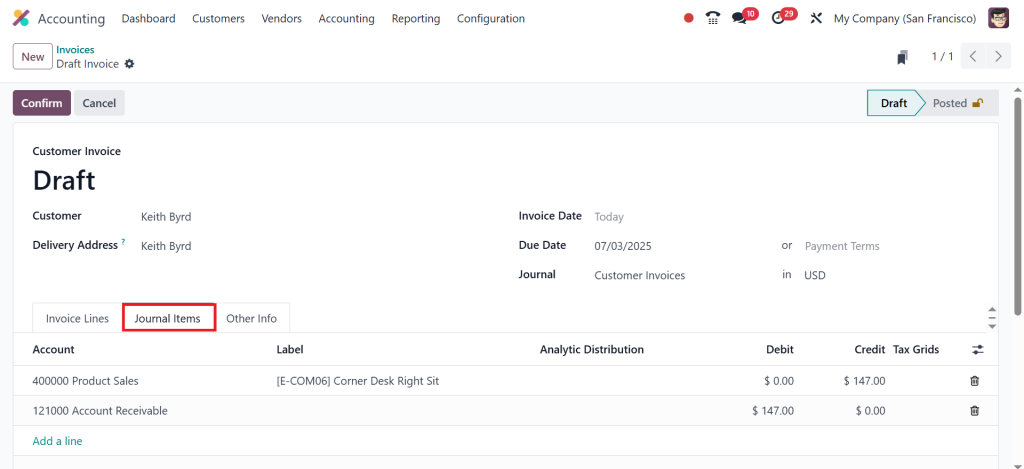
By clicking on the Journal Items tab, you can see that, as they are just dealing with the invoices in this case, the product will be reduced from the warehouses. We recognize the product as an asset because it is decreasing. So, whenever the asset is decreasing it will be marked under the credit side. When we just sell and alter to the customer we know we will be getting a monetization for that so in that case we are just receiving an income. In that case we know the income in the form of an asset so as asset increases it will be marked under the debit side which is clearly shown in the screenshot below.
Now, let’s click on the Confirm button and confirm the invoice.
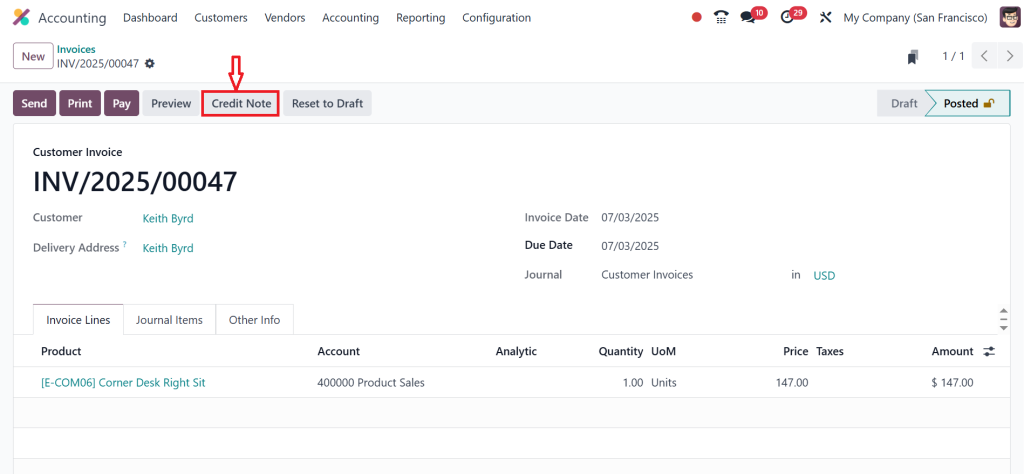
After confirming the invoice, I realized that I had made a pricing mistake for the product. The price has just been updated, and I need to reverse the entry. To reverse the entry, click the Credit Note button.
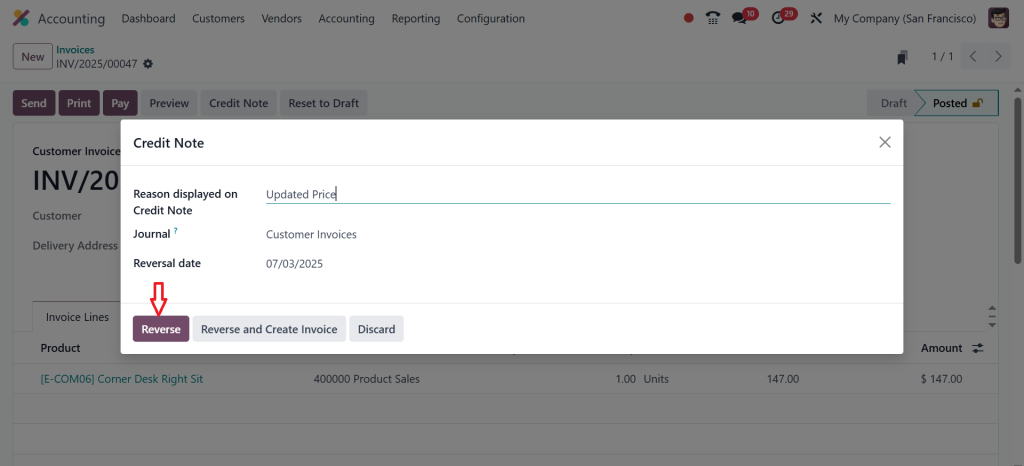
After clicking on the credit note, a new wizard appears, and here you can provide the reason displayed on the credit note. Let’s say we have an updated price. Since we’re only dealing with customer invoices, the journal will auto-populate with the customer invoices.
As shown in the screenshot below, you have two options: you can either reverse the entry or reverse it and create an invoice. I want to reverse the entry, so I’m clicking on Reverse.
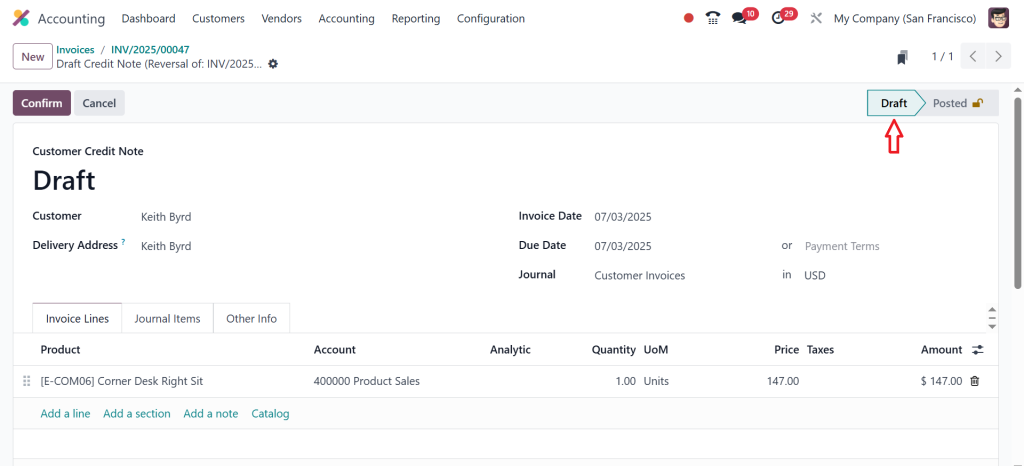
After reversing the entry, you can see in the screenshot below that the entry is currently in the Draft stage. This means that a customer credit note will be in a draft state, as we have not posted it.
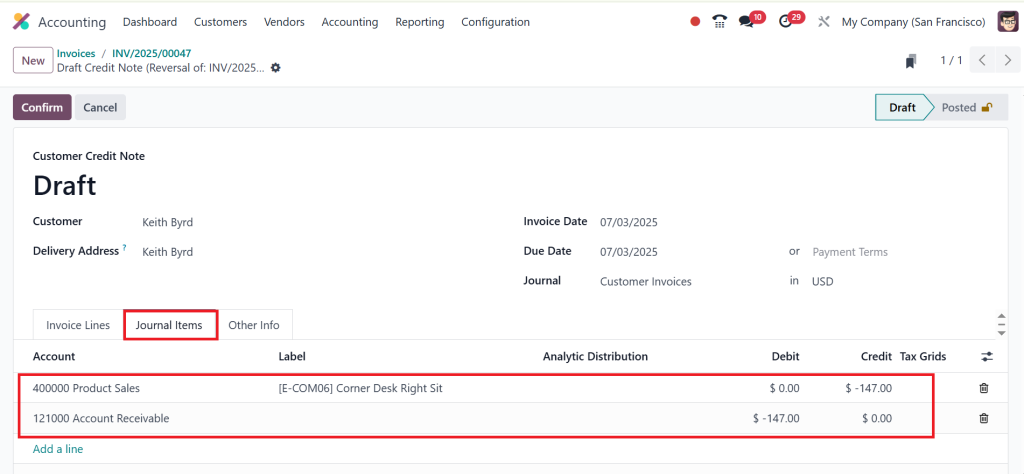
Now, let’s move on to the Journal Items tab, where you can see that the product sale has been adjusted to -$147, as we have reversed the entry. Additionally, under the accounts receivable, there is a $-147 indication. This is due to errors in the original entry, which we have since corrected by reversing it.
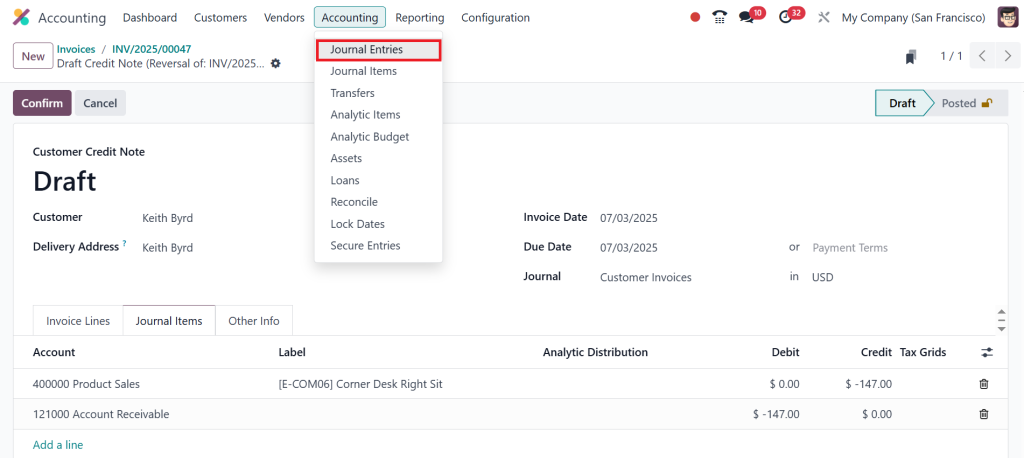
Now, click on Accounting > Journal Entries.
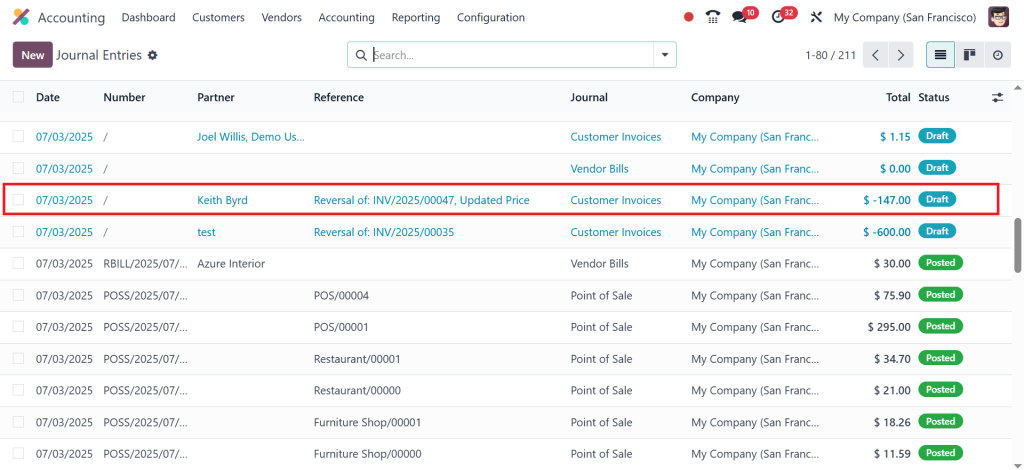
So, under the journal entries, since we haven’t posted the entry, you can remove this filtration and easily find the reversed entry.
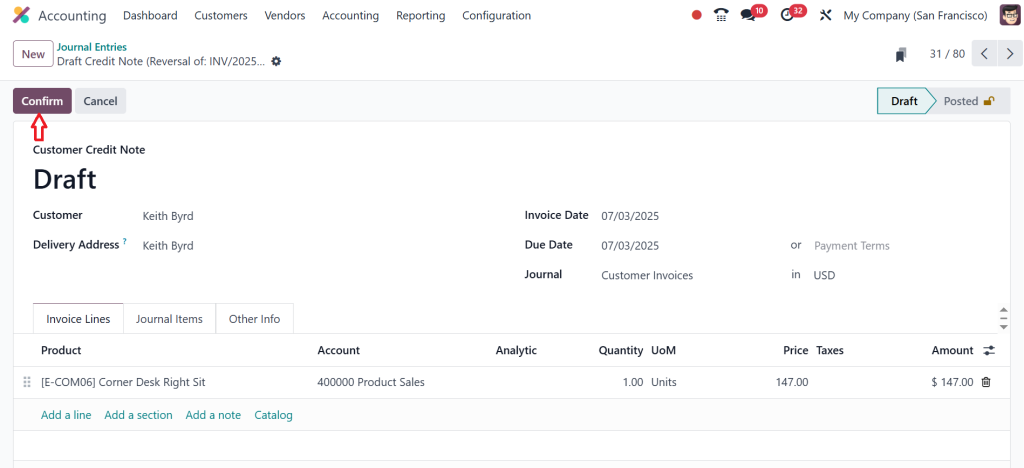
The reverse entry is in the draft stage, so let’s Confirm the reverse entry.
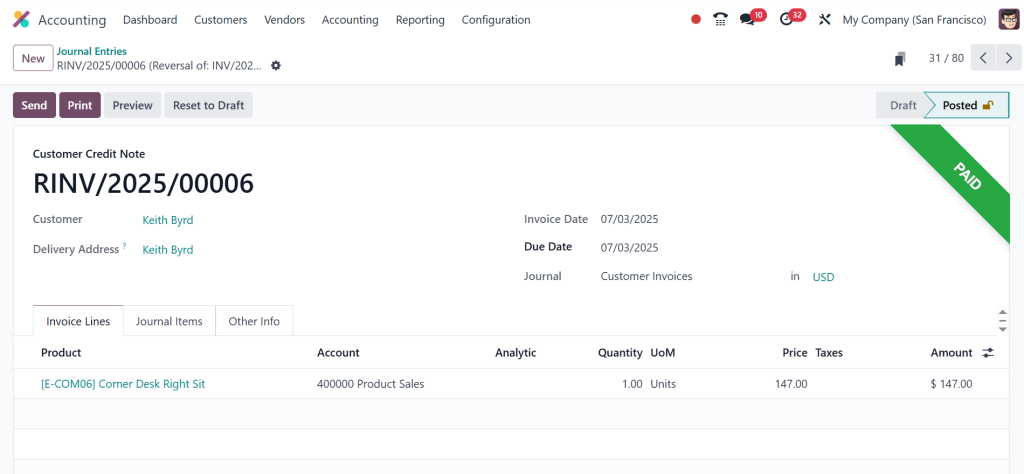
After making the reversal, as shown in the screenshot below, the status will change to Paid.
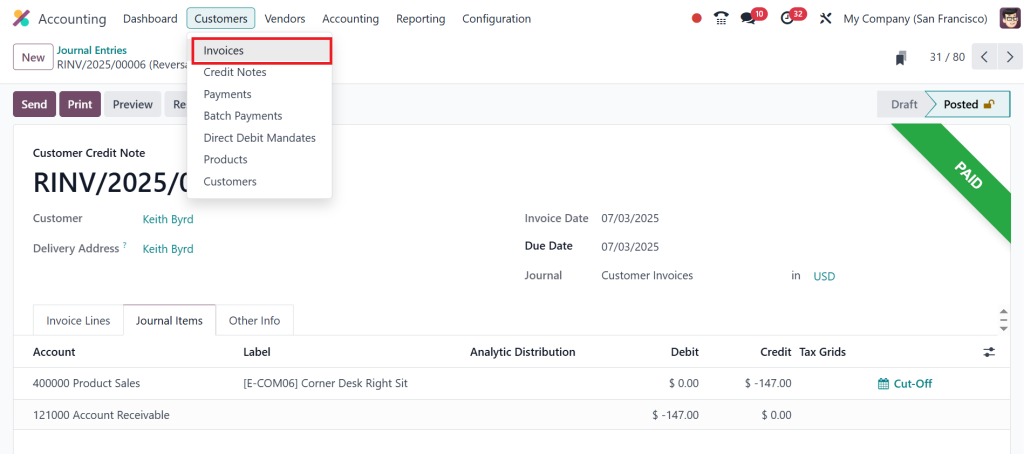
Moving on to the Journal Items tab, you will find no changes in the journal item. Now, we can also manage this by reversing the entry by creating a new invoice. Let’s click again on Customers > Invoices.
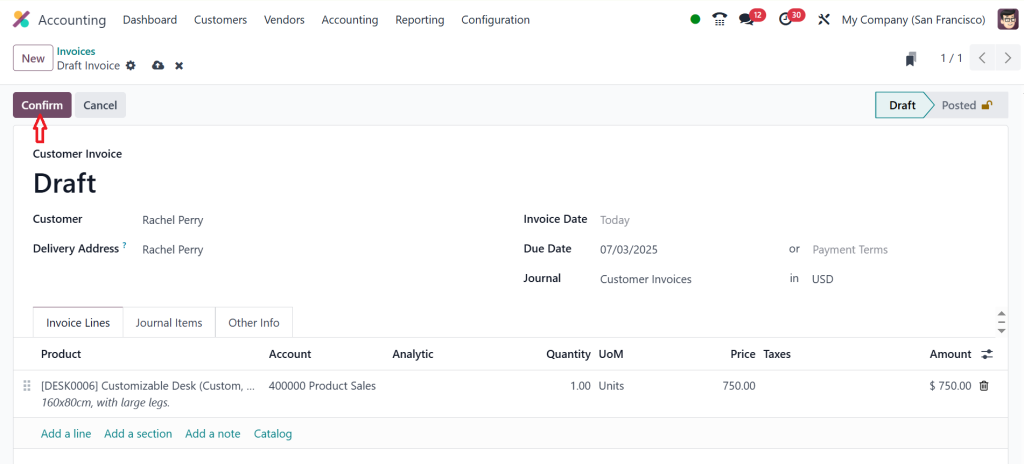
Click “New” to create a new invoice. Select the new customer, fill out all the details, choose the product, and then click the “Confirm” button.
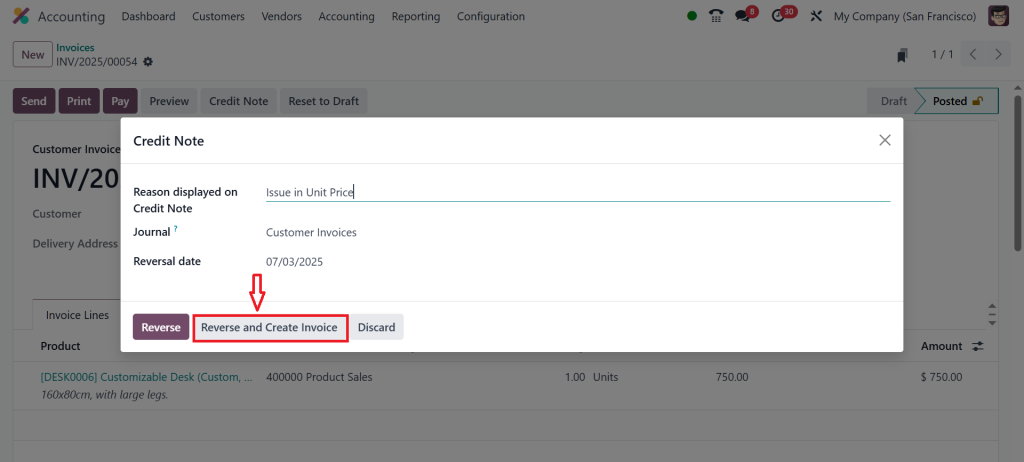
After confirming the invoice, we realized that there is an issue with the product’s price. So, we need to create the credit note to reverse this. Add the reason displayed on the credit note that is ‘‘Issue in Unit Price’’ then click on ‘‘Reverse and Create Invoice’’.
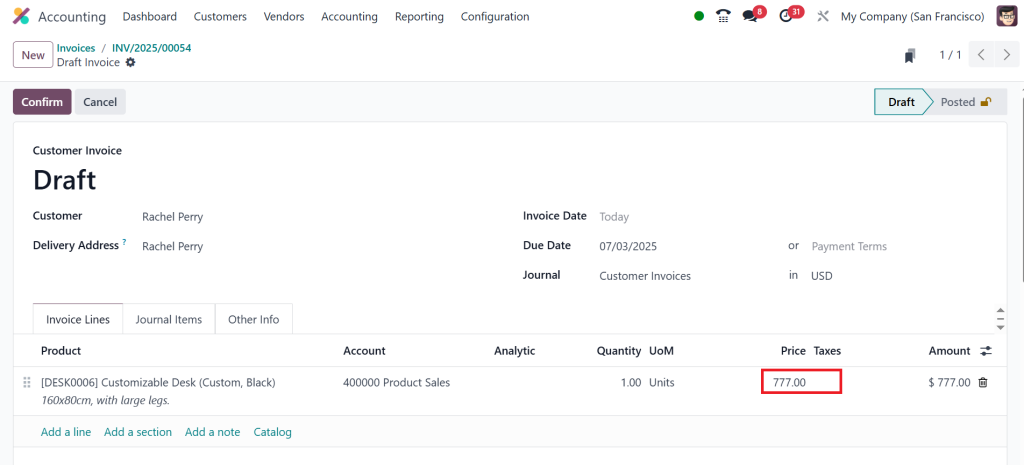
Here, I can change the price from $750 to $777.
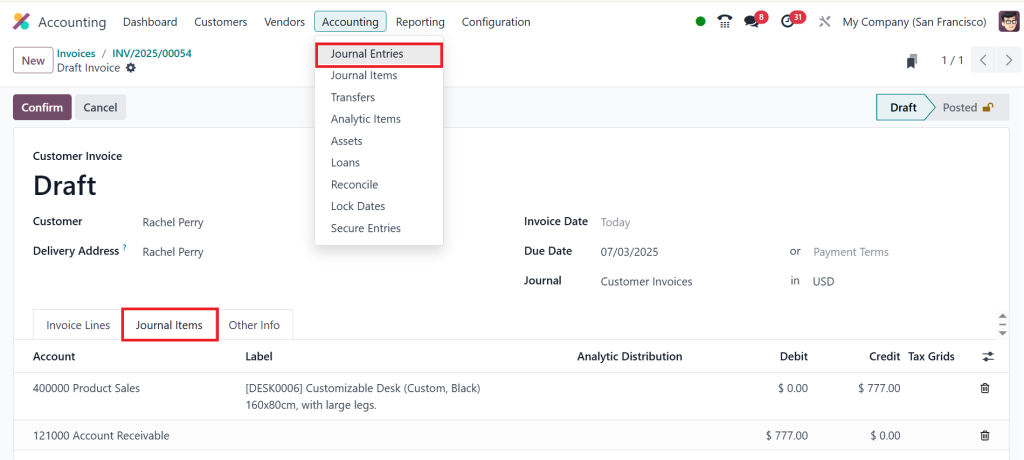
If we go to the journal items tab, you can see that the new price will be updated under the journal items. Since we haven’t posted this, the price remains unchanged. Let’s move on to the Accounting > Journal Entries.
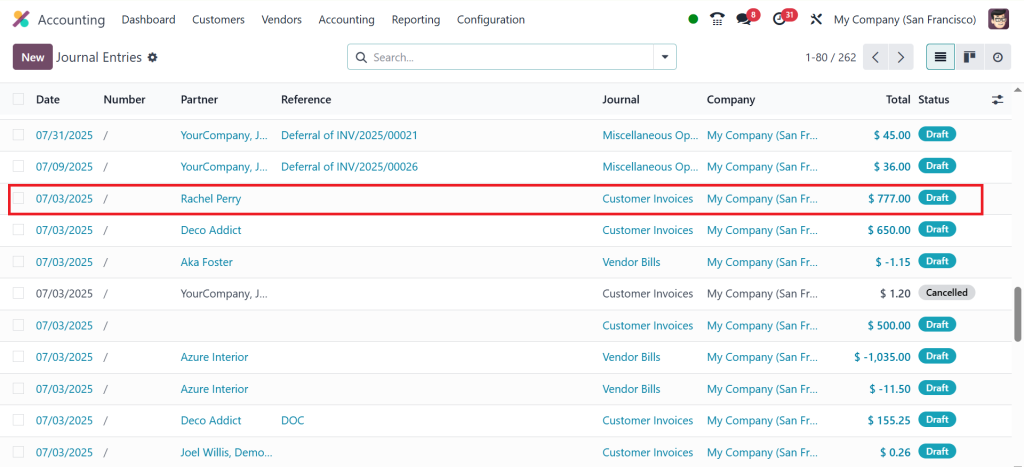
Under the journal entries, you can see that a reverse entry will be shown in the screenshot below. Click on that and open the reverse entry.
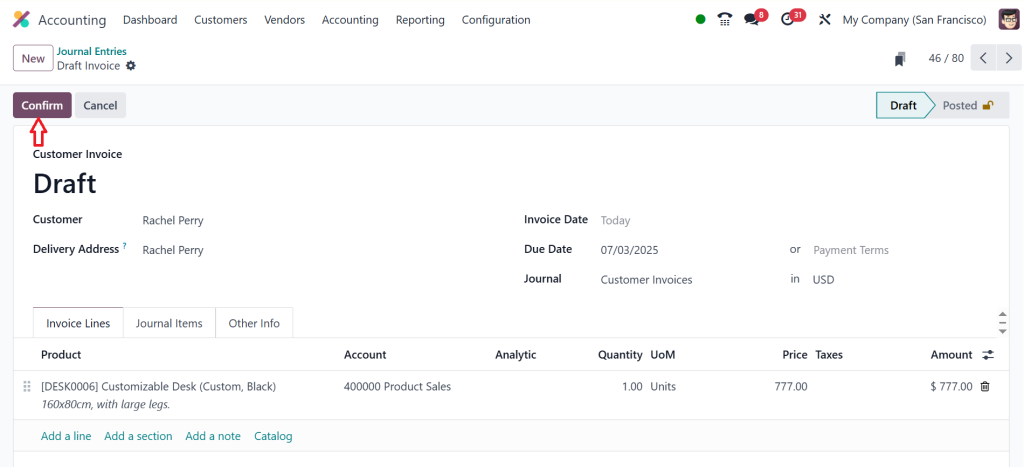
Then click the Confirm button, as we have not posted this yet.
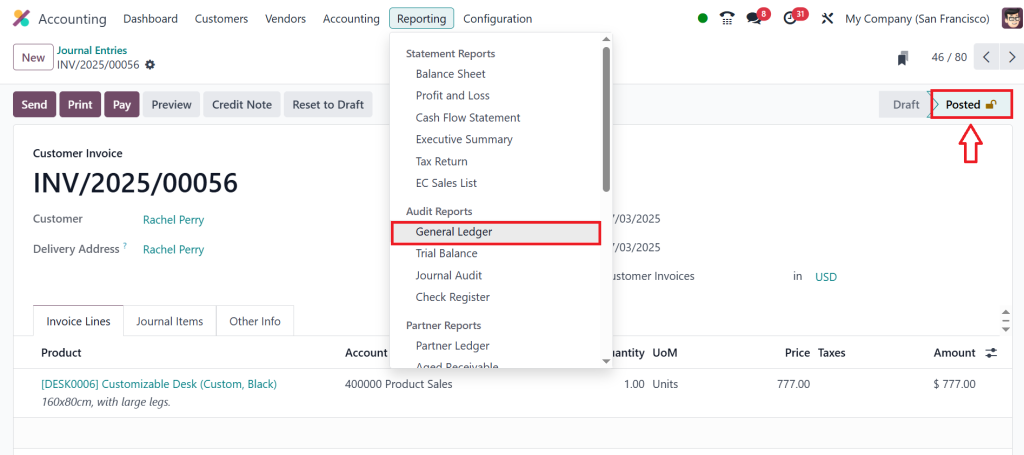
Now, this is in the Posted state because we have updated the price and made the reverse entry. To find this under Reporting, click on Reporting > General Ledger.
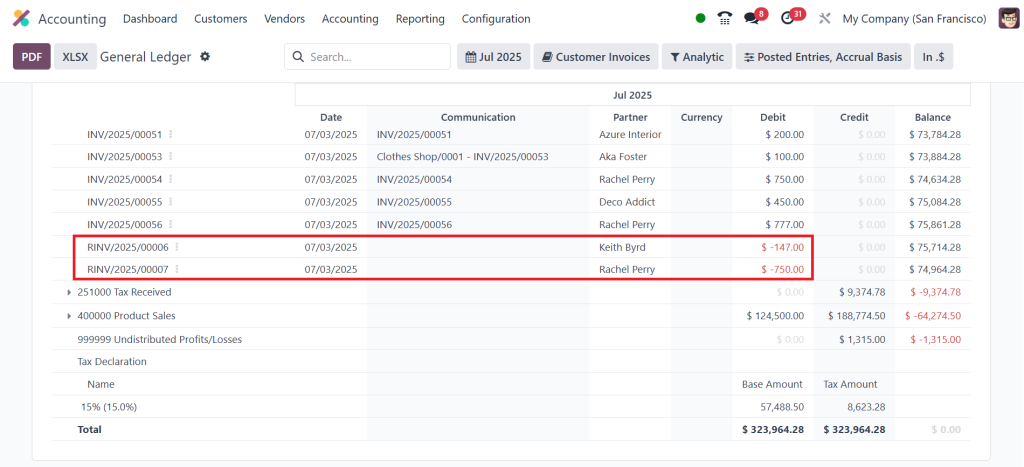
Here, you can view customer invoices, and under the accounts receivable, you can easily find reversed entries marked with a negative (-) symbol in Red color.
So, this is how you can easily deal with Storno accounting in the Odoo 18 accounting module.
Odoo 18 Reversal Accounting vs. Traditional Reversal: What Makes Storno Unique?
To appreciate Storno’s power, it’s essential to understand how it differs from standard reversal accounting. Traditionally, a reversal would generate a new entry to counteract the effects of the original, often without copying all the structure or references. This could lead to mismatched records, confusion in reporting, and gaps in documentation. However, Odoo 18 introduces reversal accounting changes. When storno is enabled, every reversal is a perfect negative copy. Every line, every account, every tag is identical, except for the direction of values.
This means your reports remain clean, your ledger becomes transparent, and your corrections are visibly and structurally sound. It’s no longer a patchwork of adjustments; it’s a smooth, story-like flow of data. That’s what makes STORNO not just a feature but a philosophy in modern accounting.
Creating a Storno Journal Entry in Odoo That Speaks for Itself
Suppose, a journal entry is so clear that it doesn’t require explanation. That’s what you get when you create a storno journal entry in Odoo. Let’s say you’ve posted an invoice with incorrect values. Instead of cancelling or modifying the invoice, you choose the “Reverse Entry” option and check the box that says “Use Storno.” In one click, Odoo produces an entry that mirrors the original in every way but with negative amounts. And because it retains all original metadata, including customer name, invoice reference, and product lines, it reads like a natural follow-up instead of an arbitrary correction.
Now, imagine this across hundreds of transactions. Your accounting becomes a well-documented journey, where each mistake tells its own redemption story. That’s the strength of Storno: it doesn’t hide errors; it makes them part of the audit-friendly narrative.
Odoo Storno Configuration: Where Simplicity Meets Precision
Setting up the Odoo storno configuration is straightforward but influential. Once developer mode is activated, head over to Journals, select one (e.g., Sales Journal), and set its reversal method to “Storno”. You’ve just authorized that journal with reversal intelligence. Now, every time someone reverses a posted entry in that journal, it follows the storno structure.
What makes this exciting is that the configuration doesn’t demand a considerable overhaul. You’re not re-learning how to reverse entries, you’re just doing it better. And when your entire team is aligned on using Storno, internal reviews, audits, and financial reporting become significantly more reliable. In an age where transparency is currency, this one configuration setting becomes a turning point.
Odoo 18 Credit Note Reversal Using Storno
Reversing customer invoices with a credit note is a common task, but doing it without confusion is rare. That’s why Odoo 18 credit note reversal with storno is a lifesaver. Instead of issuing a brand-new credit note with its structure, you click to add a credit note to the invoice, select a storno, and the system takes care of the rest. It replicates the original invoice line by line, but posts it as a negative transaction.
This is especially helpful when you want your reports to reflect exact matches between what went wrong and how it was corrected. There’s no more guesswork, no more discrepancies, and no more explaining why a credit note doesn’t match its corresponding invoice. It does match because it’s a negative clone of the original. This clarity reduces both customer disputes and internal confusion.
How to Use Storno in Odoo Accounting to Build Audit-Proof Books
If you want to build financial statements that stand up to scrutiny, you need more than just correct numbers; you need a clear and intelligible story. That’s precisely what you get when you master how to use storno in Odoo accounting. Every time an error is discovered, you’re not scrambling to fix it with manual edits. You’re opening the original transaction, clicking “Reverse,” choosing “Storno,” and letting the system handle the heavy lifting.
This method protects data integrity. Your original entry is untouched and frozen in time. Your reversal entry is linked and contextually matched. And together, they create a picture of not only what happened but how you responded to it. That’s what builds audit-proof books. That’s what earns trust from investors, tax authorities, and partners.
When you look back on your year-end statements, you don’t see a mess of crossed-out errors and scattered notes. You know the order. You see logic. You see accountability. All because you chose to use Storno.
Storno Accounting in Odoo 18: The Quiet Revolution in Finance
Let’s step back and look at the bigger picture. Why does storno accounting in Odoo 18 matter so much? Because it addresses a broken narrative in finance: that corrections are messy, reversals are confusing, and transparency comes at the cost of complexity.
Storno flips that on its head. It says, “Yes, mistakes happen, but here’s how to fix them properly.” And it does so by offering a framework that doesn’t break your rhythm. You’re not learning a whole new process. You’re enhancing the one you already use with more structure, more clarity, and more control.
In truth, storno is a quiet revolution. It’s not flashy. It doesn’t make headlines. But once you see what it does to your ledgers, you’ll never want to go back. It’s for those who care deeply about their financial records, for those who believe every entry should have meaning. For those who know that true professionalism lies in how we handle the unexpected.
Make the Smart Move with Odoo 18 Storno Accounting
So, here’s the question: Are you still manually adjusting errors in your ERP? Are your reversals leaving a trail of confusion instead of clarity? Are you wasting time trying to explain why a refund doesn’t match the original invoice?
Then it’s time to stop patching mistakes and start managing them properly.
Configure storno entries in Odoo 18 today and take control of your financial reversals. Use Odoo 18 reversal accounting not just as a function, but as a philosophy. Create self-explanatory storno journal entries in Odoo. Utilise Odoo 18 credit note reversal to eliminate confusion. Finalise your Odoo storno configuration and train your team on how to use storno in Odoo accounting like professionals.
And if you need help making it happen, we at Netilligence are just one call away. We’ve helped countless businesses implement STORNO, train teams, and simplify reversals because finance should be clean, correct, and confidently compliant.
Start your journey into smarter accounting. Choose clarity. Choose Storno. Choose Odoo 18.
Hi, I'm Ilsa Shabbir, an Odoo ERP content writer specializing in functional blogs on Odoo modules. I simplify complex Odoo features, creating clear and engaging content to help businesses understand and optimize their ERP solutions.
We use cookies to ensure that we give you the best experience on our website. If you continue to use this site we will assume that you are happy with it.