

Odoo 18 Website Builder
The Odoo 18 Website Builder makes it simple to design professional websites using an intuitive drag-and-drop interface. With its collection of built-in snippets, users can quickly add banners, text blocks, images, buttons, forms, and other website elements without writing code. However, there are many situations where the default snippets are not enough to meet specific business requirements.
For example, you may want to display a custom promotional banner, a company introduction section, service highlights, product features, or a branded call-to-action that matches your organization’s design. Instead of recreating these sections every time you build a new page, Odoo allows developers to create custom static snippets that can be reused anywhere on the website.
A static snippet contains fixed content that does not rely on database records or dynamic data. Once it has been registered in the Website Builder, website administrators can simply drag and drop it onto any page, making website management faster, more consistent, and easier to maintain.
In this tutorial, you’ll learn how to create a custom static snippet in Odoo 18, register it in the Website Builder, and make it available for drag-and-drop use. Along the way, we’ll also explain the purpose of each XML element, so you understand not just what to do, but why it works.
Why Create a Custom Static Snippet?
Many businesses display the same type of information across multiple pages of their website. These sections often include:
- Company highlights
- Service descriptions
- Promotional banners
- Customer testimonials
- Contact information
- Product features
- Call-to-action sections
Recreating these sections manually for every page can be repetitive and time-consuming. It also increases the chances of inconsistent formatting or outdated content.
By creating a reusable Odoo 18 custom snippet, you only need to design the section once. After registering it in the Website Builder, content editors can simply drag and drop it wherever it’s needed, ensuring a consistent design while saving valuable development time.
This approach is particularly useful for businesses that frequently update their website or publish new landing pages, as it allows non-technical users to build pages without modifying code.
Business Use Case
Businesses often need to display the same information across multiple website pages, such as:
- Company highlights
- Service descriptions
- Promotional banners
- Customer testimonials
- Contact information sections
- Product feature showcases
Instead of recreating the same content repeatedly, a custom snippet can be created once and reused across different pages. This improves consistency, reduces maintenance effort, and enables website administrators to build pages quickly using the drag-and-drop editor.
Step 1: Create the Snippet Template
Create a template that contains the HTML structure of the snippet.
File: basic_snippet_template.xml
					<?xml version="1.0" encoding="UTF-8"?>
<odoo>
   <template id="basic_snippet_template" name="Basic Snippet">
   	<section class="s_basic_snippet">
       	<div class="container py-4">
           	<div class="row">
               	<div class="col-12 text-center">
                   	<h2>Basic Snippet</h2>
                   	<p>
                       	This is a simple static snippet created in Odoo 18.
                       	You can use it to display fixed content on your website.
                   	</p>
               	</div>
           	</div>
       	</div>
   	</section>
   </template>
</odoo>
Explanation
The snippet template defines the structure and content that will be displayed on the website. In this example, a section containing a heading and description is created using Bootstrap classes for responsive design.
Step 2: Register the Snippet in Website Builder
Now that the snippet template has been created, the next step is to register it with the Odoo 18 Website Builder. Without this step, Odoo knows the template exists, but it will not appear in the Website Editor for users to drag and drop onto a page.
Snippet registration connects your XML template with the Website Builder interface. Once registered, the snippet becomes available alongside Odoo’s built-in snippets, making it easy for website administrators and content editors to use it without writing any code.
Create the following file: .
File: snippet_registry.xml
					<?xml version="1.0" encoding="UTF-8"?>
<odoo>
   <template id="category_highlight_snippet" inherit_id="website.snippets" name="Category Highlight Snippet">
   	<xpath expr="//snippets[@id='snippet_groups']/*[1]" position="before">
       	<t snippet-group="basic_snippet"
          	t-snippet="website.s_snippet_group"
          	string="Basic Snippet"
          	t-thumbnail="/website/static/src/img/snippets_thumbs/s_text_image.svg"/>
   	</xpath>
   	<xpath expr="//snippets[@id='snippet_structure']/*[1]" position="before">
       	<t t-snippet="website_basic_snippet.basic_snippet_template"
          	string="Basic Snippet"
          	group="basic_snippet"/>
   	</xpath>
   </template>
</odoo>
Explanation
A new snippet group named Basic Snippet is created and the custom snippet template is registered under that group. Once registered, the snippet becomes available in the Website Builder sidebar.
Manifest Configuration
To load the custom snippet into Odoo, the module manifest file must include the required dependencies and XML files.
File: __manifest__.py
					{
   'name': 'Website Basic Snippet',
   'version': '18.0.1.0.0',
   'category': 'Website',
   'summary': 'Adds a static custom snippet to the website builder',
   'depends': ['website'],
   'data': [
   	'views/basic_snippet_template.xml',
   	'views/snippet_registration.xml',
   ],
   'installable': True,
   'auto_install': False,
   'license': 'LGPL-3',
}
Why Is the Manifest Important?
The manifest serves as the entry point for your module. It contains information such as the module name, dependencies, and the XML files that Odoo should load.
In this example:
- The website module is listed as a dependency because snippet functionality belongs to the Website application.
- Both XML files are included in the data section so Odoo can load the template and register it with the Website Builder.
- Without these entries, your custom snippet will not appear in the Website Editor.
Step 3: Upgrade the Module
After creating the XML files and updating the manifest, you must load the changes into Odoo.
Follow these steps:
- Restart the Odoo server.
- Upgrade your custom module.
- Open the Website application.
- Open any website page.
- Click Edit to launch the Website Builder.
During the upgrade process, Odoo reads the XML files, creates the template, and registers the snippet so it becomes available in the editor.
Step 4: Verify the Snippet
Once the module has been upgraded successfully, it’s time to test the implementation.
Open the Website Builder and check the snippets panel. You should now see a new category named Basic Snippet.
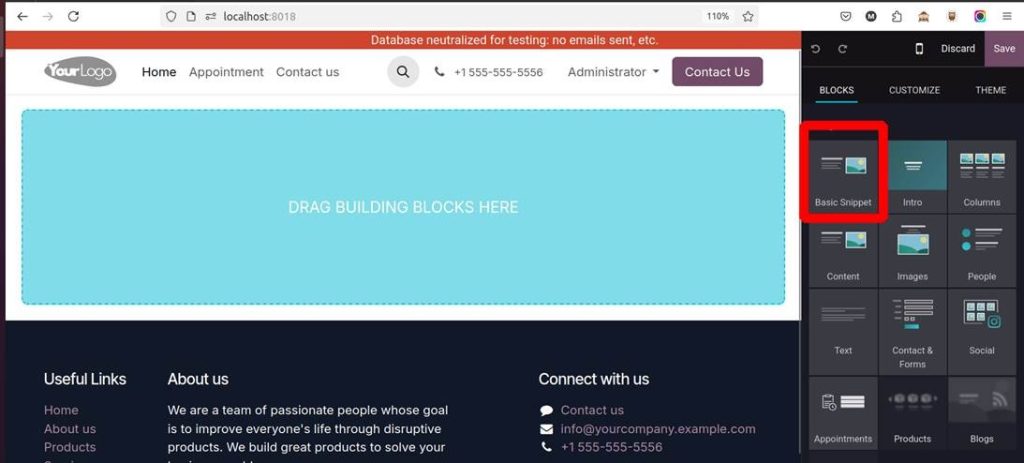
Select the category and drag the snippet onto any page.
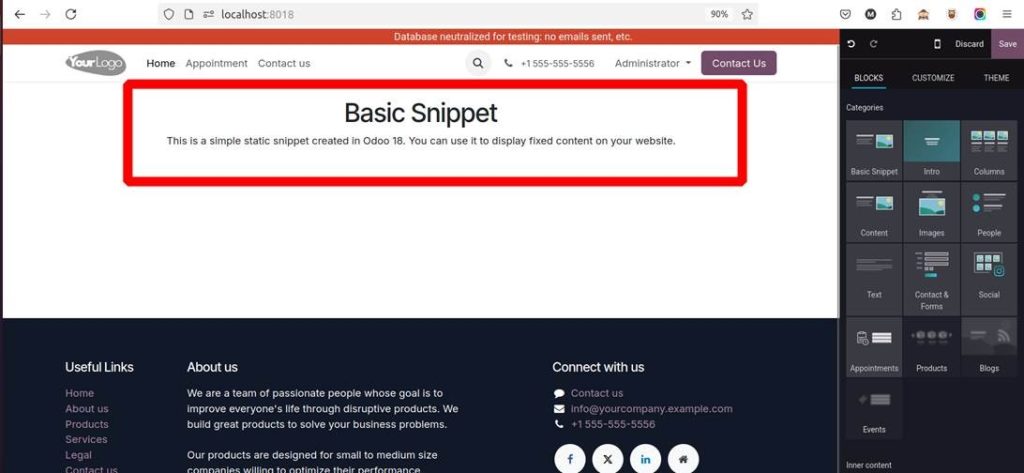
If everything has been configured correctly:
- The snippet will appear on the page.
- The heading and paragraph will be displayed.
- The Bootstrap layout will remain responsive across different screen sizes.
- The snippet can be reused on any website page without creating it again.
This confirms that your custom static snippet has been successfully integrated into the Website Builder.
Best Practices for Creating Custom Snippets
As your website grows, following a few best practices will make your snippets easier to maintain and reuse.
- Use meaningful template IDs and CSS class names to keep your code organized.
- Follow Bootstrap’s grid system to ensure responsive layouts.
- Keep each snippet focused on a single purpose instead of combining multiple unrelated sections.
- Store custom CSS and JavaScript in separate asset files instead of embedding styles directly into the XML template.
- Group related snippets under custom categories to keep the Website Builder organized.
- Use descriptive names so content editors can easily identify the correct snippet.
Following these practices improves maintainability and makes future enhancements much easier.
Take Your Odoo Website Further
Creating a custom static snippet in Odoo 18 is an excellent way to extend the capabilities of the Website Builder while making website management more efficient. Instead of recreating the same sections across multiple pages, you can build a reusable component once and make it available through Odoo’s intuitive drag-and-drop interface.
In this tutorial, we created a custom XML template, registered it in the Website Builder, configured the module manifest, upgraded the module, and verified that the snippet appeared correctly in the editor. We also explored how key XML elements such as inherit_id, xpath, t-snippet, and snippet-group work together to integrate custom snippets into the website.
Whether you’re building promotional banners, service highlights, testimonials, or branded call-to-action sections, custom snippets provide a scalable and maintainable approach to website customization. They not only improve consistency across your website but also empower content editors to create professional pages without modifying code.
As your Odoo projects become more advanced, you can build upon this foundation by creating dynamic snippets, adding custom styling, integrating JavaScript, or connecting snippets with backend data. Mastering static snippets is the first step toward developing more interactive and feature-rich websites in Odoo 18.




