
If you’re a Flutter developer, you’ve probably encountered various issues while working with Android Studio, especially when integrating Flutter with the native Android module. One of the common problems that developers face is when the “Open for Editing in Android Studio” option is missing from the Tools > Flutter menu. This can be frustrating, especially when making changes or building your Android app bundle (AAB).
In this post, I’ll walk you through the steps to fix this issue, even if you’ve never encountered it. The problem is related to missing configuration files when cloning Flutter projects, but don’t worry – this guide will help you restore the missing functionality in no time. Whether you’re an experienced or beginner Flutter developer, these simple steps will help you get back on track.
Why Does This Happen?
So, let’s discuss the reason first.
The answer lies in how Flutter projects are cloned. When you clone a Flutter project using Git, there’s a chance that specific project configuration files, specifically the .iml file, don’t get included in the project. This file is crucial for Android Studio to recognise the Android module of your Flutter project.
Without the .iml file, Android Studio cannot correctly load the Android module. As a result, the option to open the Android module for editing disappears from the Tools > Flutter menu.
While this ‘Open for Editing in Android Studio’ may seem complicated, but the solution is simple and requires only a few easy steps. Let’s resolve this problem.
Now, to solve this issue, we have to follow a few steps:
Step 1: Create a New Flutter Project
First, create a new Flutter project. You can do this in Android Studio by going to File > New > New Flutter Project. Follow the prompts to create a basic Flutter project. This step will give you a reference project with all the necessary files, including the .iml file.
Step 2: Go to the Android module of that new Flutter project
Once your new Flutter project is created, go to the Android module of this project. This part of the Flutter project deals with Android-specific configurations, such as Gradle files, AndroidManifest.xml, and the .iml file.
Open the Android directory in the new project. The newProjectName.iml file is in this directory. Android Studio uses this file to recognise and work with the Android module of your Flutter project.
Step 3: Find the newProjectName.iml file and copy the code inside
Next, open the .iml file in the new project. This file may contain many XML tags and project-specific information, but for our purposes, we’re interested in copying the entire content of the newProjectName.iml file.
Step 4: Create a New.iml File in Your Existing Project
Now that you have the content of the .iml file from the new project, return to your existing project where you’re experiencing the issue. Navigate to the Android directory in your existing Flutter project.
Please create a new file and name it projectname_android.iml (where project name is the name of your existing Flutter project).
Step 5: Copy and Paste the Code into the New.iml File
Once the new projectname_android.iml file is created, open it, and paste the code you copied from the new project’s .iml file. This should match the structure and configuration of the Android module for your project.
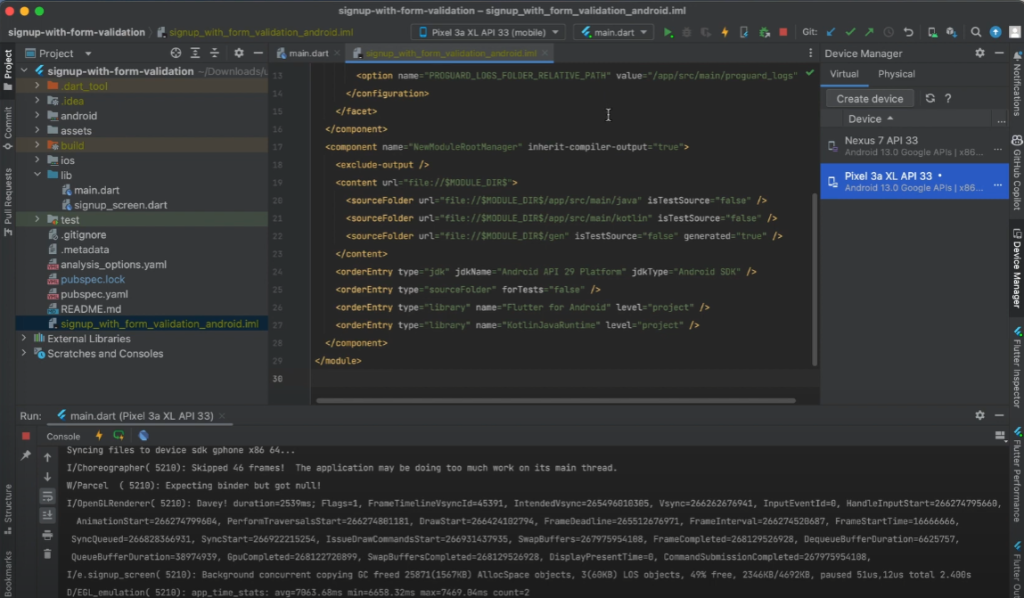
Step 6: Restart Android Studio
After saving the newly created .iml file in your existing project, restart it in Android Studio. You can also invalidate the cache by going to File > Invalidate Caches / Restart. This ensures that Android Studio reindexes the project with the updated configuration files.
That’s it.
Verify the Solution
Now that you’ve completed the steps, the issue should be resolved. Here’s how you can verify:
- Hover your mouse over the Tools menu at the top of Android Studio.
- Click on Flutter from the dropdown.
- You should now see the option to open for editing in Android Studio.
When you select this option, Android Studio should open the Android module in a new window, allowing you to make Android-specific changes or build the AAB (Android App Bundle) file.
Why This Works
This solution for ‘Open for Editing in Android Studio’ works because the .iml file is a project configuration file that Android Studio uses to understand the structure of your Flutter project. Without it, Android Studio cannot identify the Android-specific files in the project, such as the build.gradle and AndroidManifest.xml. Creating a new .iml file and copying the content will restore the missing configuration, allowing Android Studio to recognise and work with the Android module again.
Additional Tips
Version Control
If you work with version control systems like Git, include the .iml file in your repository. This will prevent issues from arising in the future when cloning or checking out different branches.
Android Studio Updates
If this issue persists after these steps, ensure your Android Studio is updated to the latest version. Sometimes, bugs or glitches in older versions can also cause problems with project configuration.
Gradle Sync
If you still encounter issues after following these steps, try syncing your Gradle files again by clicking File > Sync Project with Gradle Files in Android Studio. This can help resolve any lingering configuration problems.
This easy guide will fix the 'Open for Editing in Android Studio' issue!
Fixing the “Open for Editing in Android Studio” option that is not showing in Flutter is straightforward once you understand the root cause. By creating a new Flutter project, copying the .iml file from that project, and pasting it into your existing project, you can restore the functionality and continue working without interruptions.
This blog guide will help you fix the issue and save valuable time. Feel free to comment below if you have any questions or encounter any difficulties.
I hope it saves you time. Thanks for reading. I’ll see you in the next post. Happy coding!