Outgoing Payments in Odoo Accounting
Outgoing Payments in Odoo Accounting are an important part of managing a company’s day-to-day finances. Businesses regularly make payments to vendors, suppliers, service providers, landlords, employees, and other parties. If these payments are recorded manually or across different systems, accounting teams can quickly lose track of what has been paid and what is still due.
Odoo Accounting provides a centralised way to manage these transactions. With Odoo outgoing payments, businesses can register payments directly from vendor bills, select the appropriate payment journals, manage Odoo vendor payments, and track transactions awaiting bank reconciliation.
If you are wondering how to manage outgoing payments in Odoo, the process starts with a vendor bill, continues with payment registration, and, when applicable, includes bank reconciliation. Odoo keeps these activities connected, making it easier for accounting teams to understand the status of their vendor payments.
Understanding how to register outgoing payments in Odoo is especially useful for businesses that process many supplier invoices. Instead of manually updating spreadsheets after every payment, users can record payments against the relevant bills directly in Odoo.
Odoo also supports different Odoo payment methods, depending on the company’s configuration. Payments can then be tracked as Odoo outstanding payments when they have been recorded but still need to be matched with the corresponding bank transaction.
Finally, Odoo bank reconciliation payments help accounting teams match recorded payments with transactions appearing on bank statements.
In this guide, we will explain the complete workflow, including how to create and confirm vendor bills, register outgoing payments in Odoo, handle partial payments, review payment records, manage outstanding payments, and reconcile payments with bank transactions.
What Are Outgoing Payments in Odoo?
Outgoing payments are amounts paid by a business to settle its financial obligations. In Odoo Accounting, these payments are commonly associated with vendor bills.
For example, a company may receive a $5,000 bill from a supplier. Once the bill is posted, the amount becomes payable in accordance with the configured accounting and payment terms. When the company pays the supplier, the accounting team can register that payment against the bill.
This creates a clear connection between:
Vendor → Vendor Bill → Payment → Bank Transaction → Reconciliation
The benefit is that finance teams do not have to maintain separate records for every stage of the payment process.
Why Businesses Need a Structured Payment Workflow
A payment workflow helps businesses avoid common accounting problems such as:
- Paying the same invoice twice
- Forgetting to pay a due bill
- Recording the wrong payment amount
- Losing track of partial payments
- Leaving bank transactions unreconciled
- Showing incorrect vendor balances
- Spending too much time checking spreadsheets
Odoo helps bring these activities into a single accounting environment. However, the system needs to be configured correctly so that the payment workflow matches the company’s actual banking and accounting practices.
How to Register Outgoing Payments in Odoo
If you want to understand how to register outgoing payments in Odoo, the easiest approach is to start from the vendor bill.
The following steps describe the typical Odoo Accounting workflow.
Step 1: Open Vendor Bills
Log in to your Odoo database and open the Accounting application.
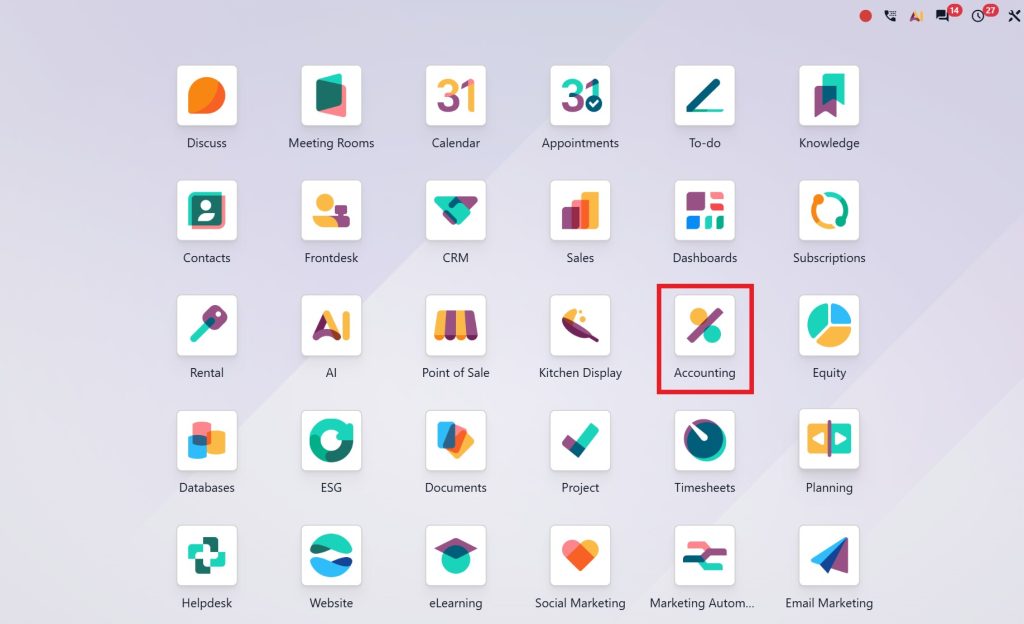
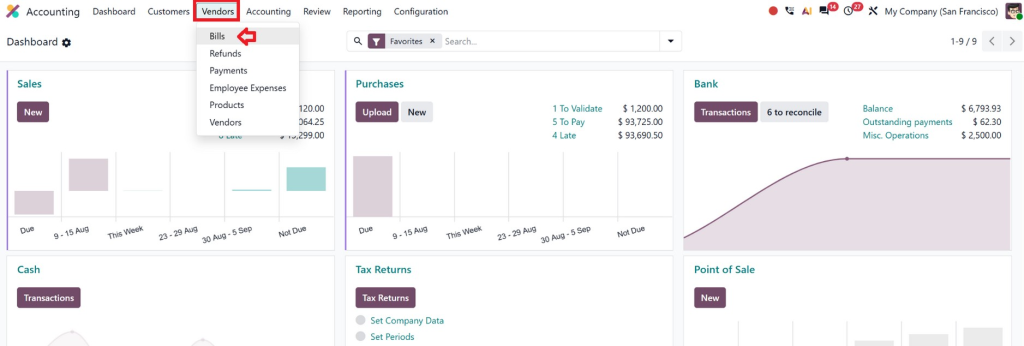
From the Accounting application, go to:
Vendors → Bills
You will see the vendor bills available in the system.
Find the vendor bill you want to pay, then open it.
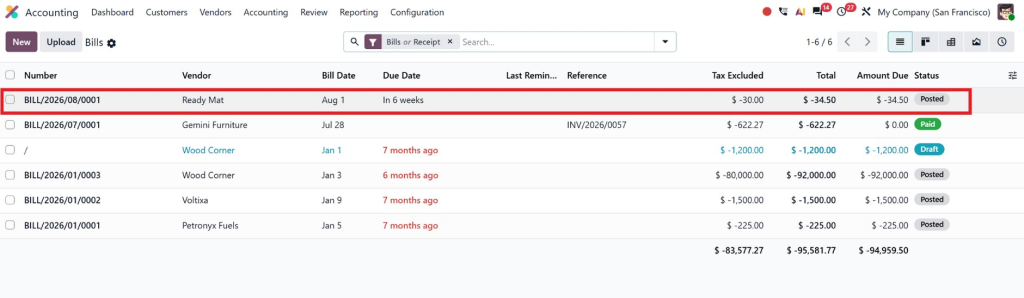
If you have a large number of bills, you can use Odoo’s search and filter options to locate the required bill more quickly.
Step 2: Check the Vendor Bill
Before registering a payment, review the bill carefully.
Check the:
- Vendor
- Invoice date
- Due date
- Invoice reference
- Products or services
- Taxes
- Total amount
- Payment terms
The bill should be properly confirmed or posted before you register the payment.
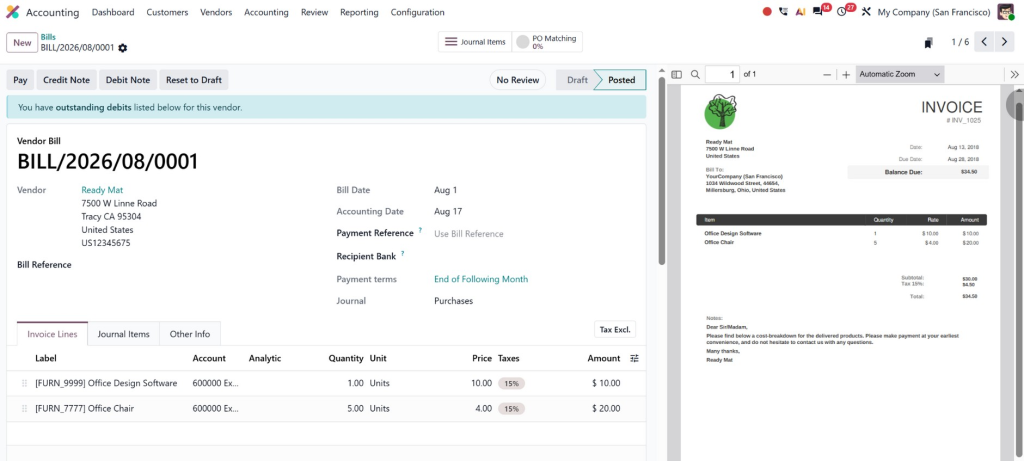
This check is important because registering a payment against the wrong vendor bill can create problems later during reconciliation and reporting.
Step 3: Click Register Payment
Once the vendor bill is ready, click the Register Payment button.
Odoo opens a payment registration window where you can enter payment-related information.
This is the main screen used for registering an Odoo outgoing payment from a vendor bill.
Step 4: Select the Payment Journal
In the payment registration window, select the appropriate Payment Journal.
The available journals depend on your Odoo configuration.
For example, your company may have:
- Bank journal
- Cash journal
- Separate journals for different bank accounts
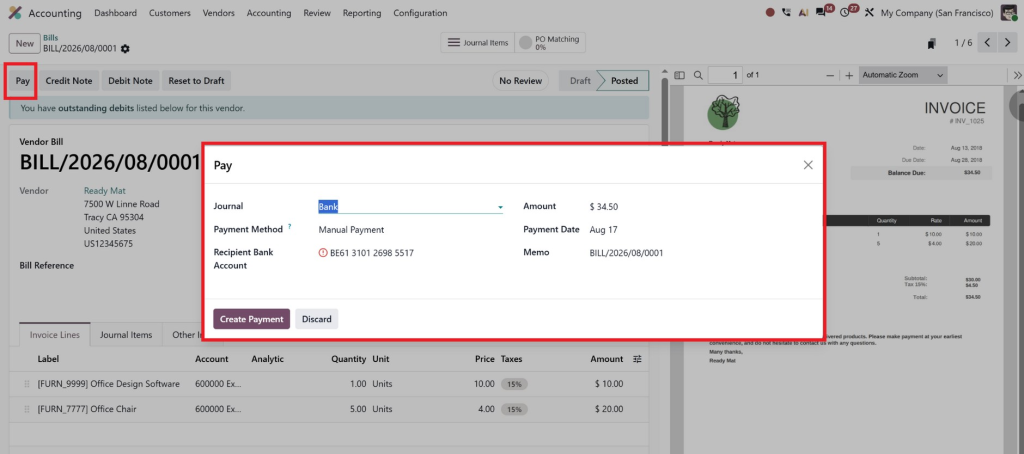
If the vendor is being paid from the company’s bank account, select the relevant bank journal.
Choosing the correct journal is important because the payment needs to be associated with the appropriate financial account.
Step 5: Select the Payment Method
Next, review the available payment methods.
The options depend on the payment journal and configuration in your Odoo database.
This is where Odoo payment methods come into play.
For example, your business may use bank transfers or other payment methods depending on its setup.
The payment method should represent how the company is actually making the payment.
Step 6: Enter the Payment Amount
Odoo will generally populate the payment amount based on the vendor bill.
Check the amount before confirming the payment.
If the company is paying the complete bill, the payment amount should match the amount due.
If the company is making a partial payment, change the amount to the amount actually being paid.
For example:
Vendor Bill: $10,000
Payment Made: $6,000
Remaining Amount: $4,000
In this situation, register the $6,000 payment rather than entering the full $10,000.
Step :7 Set the Payment Date
Select the date on which the payment is being made.
The payment date is important for accounting records and reporting, particularly when businesses review payments by month, quarter, or financial year.
Make sure the date reflects the company’s actual payment process and accounting policy.
Step :8 Add a Payment Reference
Depending on the company’s process, you may also add a useful payment reference or memo.
A clear reference can make it easier to identify the transaction later, particularly when reviewing payment records or reconciling bank transactions.
For businesses making many payments every day, consistent payment references can save accounting teams considerable time.
Step 9: Confirm the Payment
After reviewing all the information, confirm the payment using the payment confirmation option available in your Odoo version.
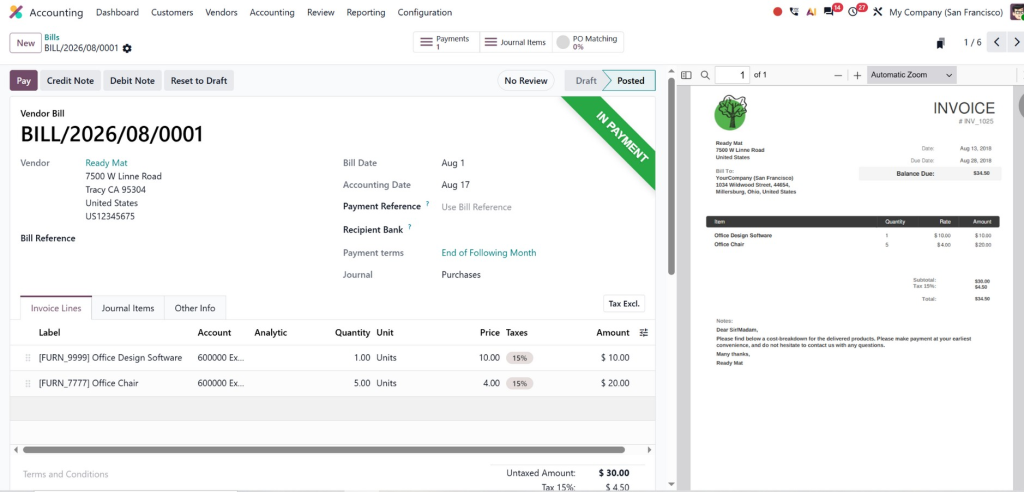
Odoo will register the payment and link it to the vendor bill.
The bill’s payment status will update based on the amount paid.
If the entire amount has been paid, the bill can be shown as paid. If only part of the amount has been paid, the remaining amount stays due.
This completes the basic how to register outgoing payments in Odoo workflow.
How to Manage Odoo Vendor Payments
Odoo vendor payments can be reviewed from the Accounting application after they have been registered.
Go to:
Accounting → Vendors → Payments
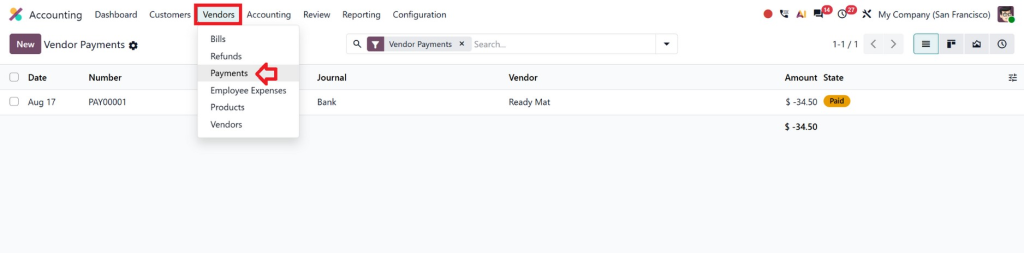
Here, you can review payment records and use available search and filtering options to locate specific transactions.
You may need to check vendor payments when:
- A supplier asks about a payment
- Finance needs to confirm a transaction
- A payment needs investigation
- The company is reviewing cash outflows
- A bank transaction needs to be reconciled
- Management needs payment information
Because the payment is connected with the vendor and accounting records, it is easier to trace the transaction back to its source.
Reviewing Payment Details
Open a payment record to review its details.
Depending on your Odoo configuration and version, the payment record can provide information such as the vendor, amount, date, journal, payment method, and related accounting information.
This creates a useful audit trail for the finance team.
Lorem ipsum dolor sit amet, consectetur adipiscing elit. Ut elit tellus, luctus nec ullamcorper mattis, pulvinar dapibus leo.
How to Handle Partial Vendor Payments in Odoo
Businesses do not always pay the full amount of a vendor bill at once.
Odoo can also be used to record partial payments.
Suppose a supplier sends a bill for $20,000. Your company decides to pay $12,000 initially and the remaining $8,000 later.
Open the vendor bill and click Register Payment.
Enter $12,000 as the payment amount and confirm the payment.
Odoo records the payment while keeping the remaining balance outstanding.
When the company later pays the remaining $8,000, another payment can be registered against the outstanding amount.
This is useful for businesses that work with instalment payments, negotiated payment schedules, deposits, or staged supplier payments.
Why Partial Payments Need Attention
Finance teams should regularly review partially paid bills.
An outstanding balance may be completely valid, but it could also indicate:
- A missed payment
- A disputed invoice
- A payment that has not yet been processed
- An incorrect payment amount
- A difference between the invoice and payment
Odoo gives accounting teams a central place to monitor these balances.
How Odoo Outstanding Payments Work
Odoo outstanding payments are an important part of the payment and reconciliation workflow.
When a payment is recorded, the accounting record may need to be matched with the corresponding bank transaction later.
For example, suppose you register a $3,000 payment to a vendor today. The bank transaction may not appear in the imported bank statement until later.
This creates a timing difference.
The payment can remain identifiable as an outstanding transaction until the corresponding bank transaction is available for reconciliation, depending on the company’s accounting configuration.
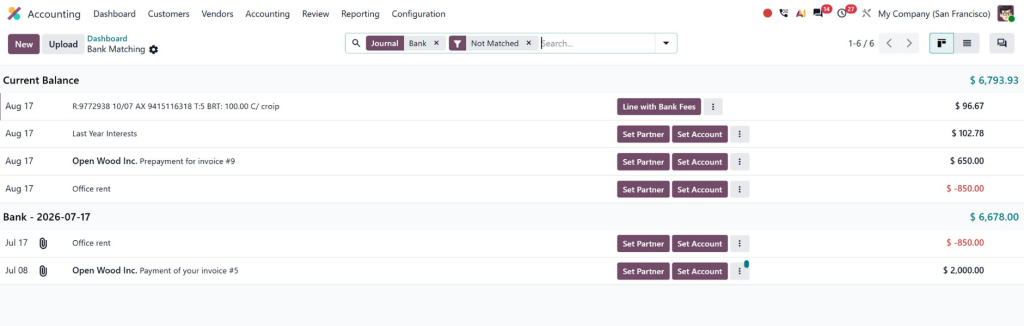
How to Reconcile Outgoing Payments in Odoo
Recording a payment is not necessarily the end of the process.
The next step can be bank reconciliation.
To work with bank transactions, go to:
Accounting → Dashboard
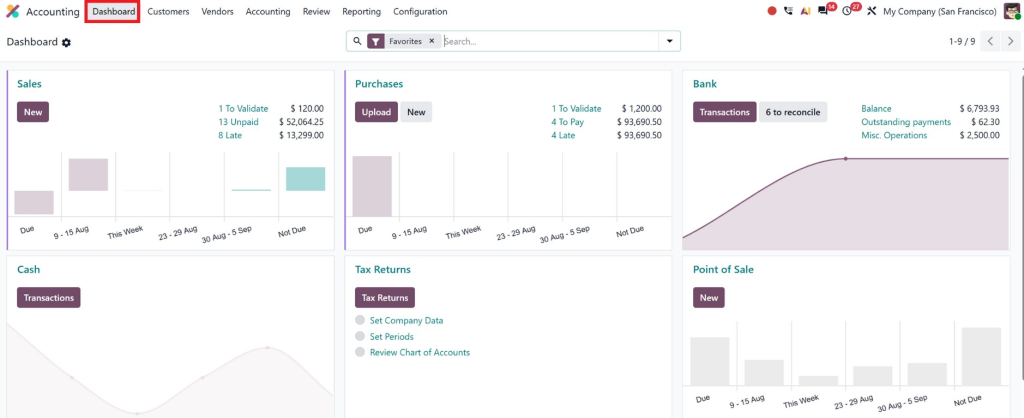
Open the relevant Bank journal.
Depending on your Odoo setup, bank transactions may be imported automatically via a bank synchronisation service or through supported bank statement options.
When transactions are available, Odoo displays them for review and reconciliation.
Step 1: Open the Bank Journal
From the Accounting dashboard, open the bank journal connected to the account from which the payment was made.
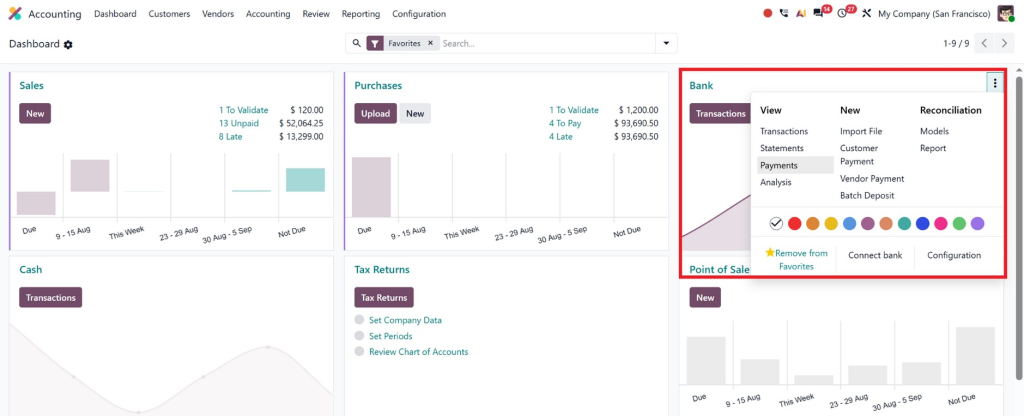
Review the available bank transactions.
Step 2 Find the Matching Payment
Look for the bank transaction that corresponds to the vendor payment.
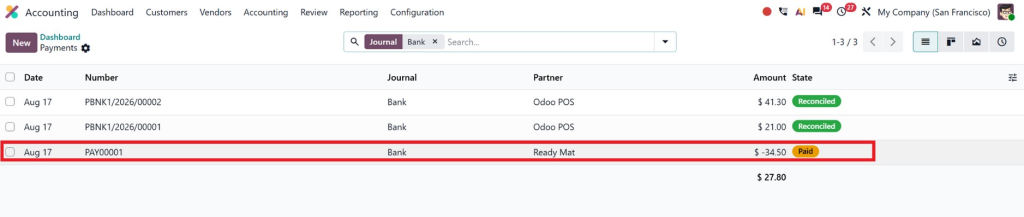
Odoo may suggest a matching accounting entry based on available transaction information.
Step 3: Review the Suggested Match
Before confirming the match, check:
- Amount
- Date
- Vendor
- Reference
- Related payment
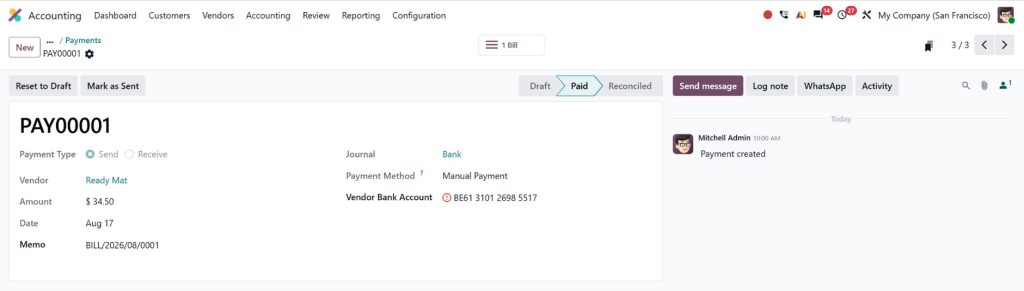
Do not reconcile a transaction simply because the amount looks similar. Make sure it is actually the correct payment.
Step 4: Reconcile the Transaction
Once you confirm that the bank transaction corresponds to the recorded payment, use the available reconciliation option to match the transactions.
After reconciliation, the bank transaction and accounting payment are connected.
This is the core workflow for Odoo bank reconciliation payments.
Best Practices for Managing Outgoing Payments in Odoo
Once the basic workflow is configured, businesses can improve their payment management with a few practical habits.
Review Vendor Bills Before Paying
Always verify the vendor, invoice amount, due date, and payment details before registering a payment.
Avoid Duplicate Payments
Check whether a bill has already been paid or partially paid before creating another payment.
Use Consistent References
Use meaningful payment references where appropriate. This can make future searches and reconciliation easier.
Reconcile Bank Transactions Regularly
Do not leave bank transactions unreconciled for long periods. Regular reconciliation helps identify problems earlier.
Monitor Outstanding Balances
Review unpaid and partially paid vendor bills regularly to understand the company’s actual obligations.
Control Payment Access
Businesses should consider appropriate user permissions and internal approval procedures, particularly when multiple employees use the accounting system.
Why Netilligence Can Help With Odoo Accounting
Odoo Accounting provides the tools required to manage vendor bills, outgoing payments, payment journals, and bank reconciliation. But getting the best results depends on configuring those tools correctly.
This is where professional Odoo implementation can make a difference.
At Netilligence, we help businesses implement and configure Odoo to meet their specific accounting and operational requirements. Instead of forcing your finance team to adapt to an unsuitable workflow, we can help design an Odoo environment around your business processes.
Our Odoo services can support areas such as:
- Odoo Accounting implementation
- Vendor bill workflows
- Payment configuration
- Bank reconciliation
- Accounting customization
- Odoo integrations
- Reporting and dashboards
- User access and workflow configuration
- Ongoing Odoo support
Whether you are moving from spreadsheets, replacing an existing accounting system, or improving your current Odoo setup, the right configuration can make everyday accounting work easier to manage.
Build a More Organised Accounting Workflow with Odoo
Outgoing Payments in Odoo Accounting provide businesses with a structured way to record, monitor, and reconcile payments made to vendors and other parties.
The workflow starts with a vendor bill. After reviewing and posting the bill, users can click Register Payment, select the appropriate payment journal and payment method, enter the payment amount and date, and confirm the transaction. For partial payments, only the amount actually paid needs to be registered, while the remaining balance stays outstanding.
After payments are recorded, accounting teams can review Odoo vendor payments, monitor outstanding payments, and reconcile them with corresponding bank transactions through the Accounting dashboard.
This connected approach can reduce manual work, improve payment visibility, and help finance teams maintain more accurate accounting records.
However, the quality of your Odoo payment workflow depends on how the system is configured. The right journals, payment methods, reconciliation process, access controls, and accounting structure can make a significant difference.
If your business wants to get more from Odoo Accounting, Netilligence can help you configure an Odoo solution tailored to your business processes.
From payment management and accounting configuration to customisation, integration, and ongoing support, our team can help you build an Odoo environment that works for your finance team today and supports your business as it grows.