What Are Tags And How to Configure Tags in the Odoo 18 Sales App?
The Story of Odoo 18 Sales Tags
Once upon a time, a sales team needed help managing their leads, opportunities, and orders in the bustling business world. Their once-promising sales pipeline was buried under disorganized records, missed follow-ups, and cluttered spreadsheets. Frustration grew as sales managers spent hours searching for critical information. The team needed a solution to bring order to their chaos. That’s when they discovered how to configure tags in the Odoo 18 sales app, which is the magic of Odoo 18 Sales Tags.
Enter the World of Odoo 18 Sales Tags
The Odoo 18 Sales Tags system was like a breath of fresh air. With Odoo 18’s power to manage sales tags, the team could efficiently label, categorize, and filter their records. It wasn’t just a tool but the solution they had been waiting for.
Sales manager Sarah decided to take charge. She gathered her team and explained how the Odoo ERP sales module tags worked. “These tags will save us time, improve our workflows, and help us close more deals,” she said excitedly. From that day forward, Sarah and her team began to explore how to configure tags in Odoo Sales, Odoo sales app tag setup, and utilize them to the fullest.
The Problem Before Odoo 18 Tag Configuration
Before discovering Odoo 18 ERP Sales Tags, the sales team faced numerous challenges:
Missed Opportunities: Important leads should have been noticed in the clutter.
Disorganized Data: Orders and opportunities need to be correctly classified.
Slow Filtering: Finding specific sales records became a nightmare.
Inefficient Reporting: Without a proper system like Odoo 18, managing sales tags and generating reports took hours.
Sarah knew it was time to change. She researched the powerful features of the Odoo sales tagging system and realized that Odoo 18 ERP Sales Tags were the key to reshuffling their workflow.
Configuring Tags in Odoo Sales – A New Beginning
To implement the new system, Sarah followed a simple guide to configure tags in Odoo Sales:
Step 1: Setting Up Tags
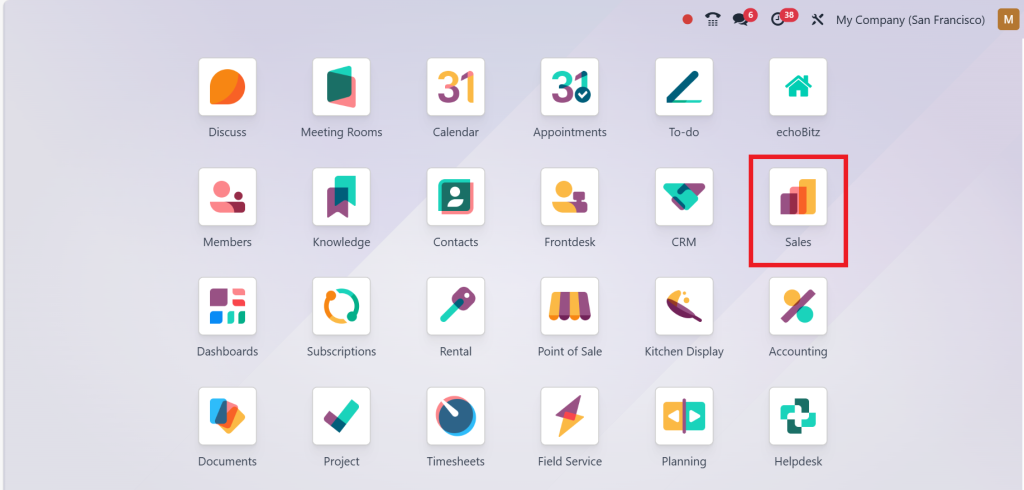
Sarah logged into the Odoo 18 and opened the ‘‘Sales Module’’.
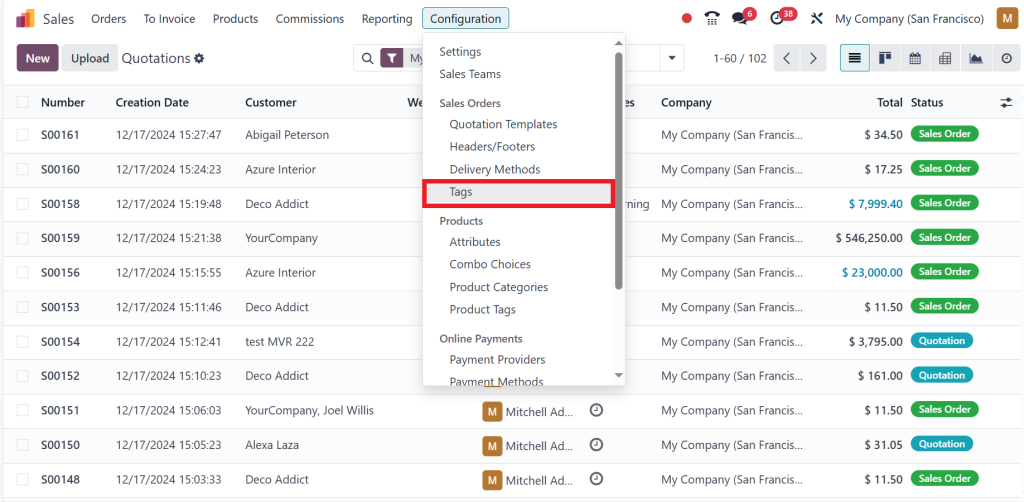
After that, she directed to Configuration > Tags.
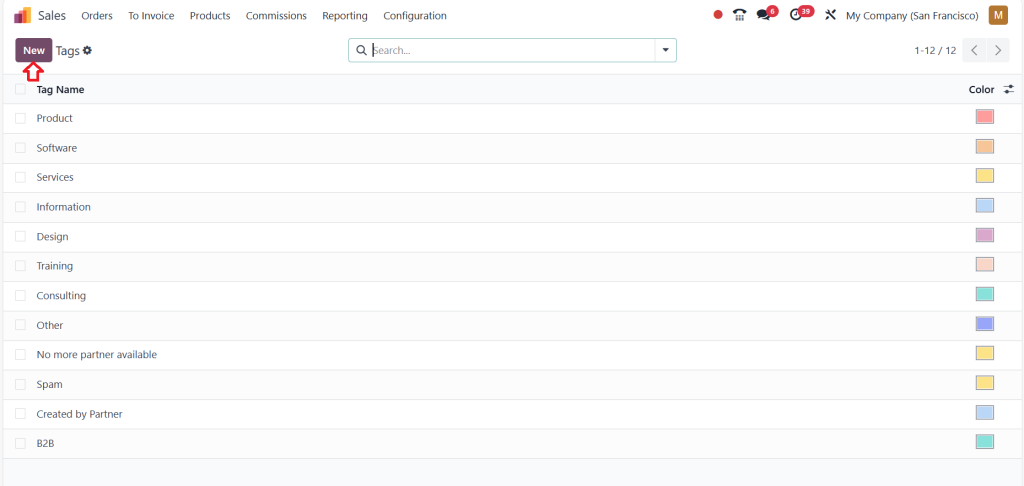
And then she clicked the “New” button.
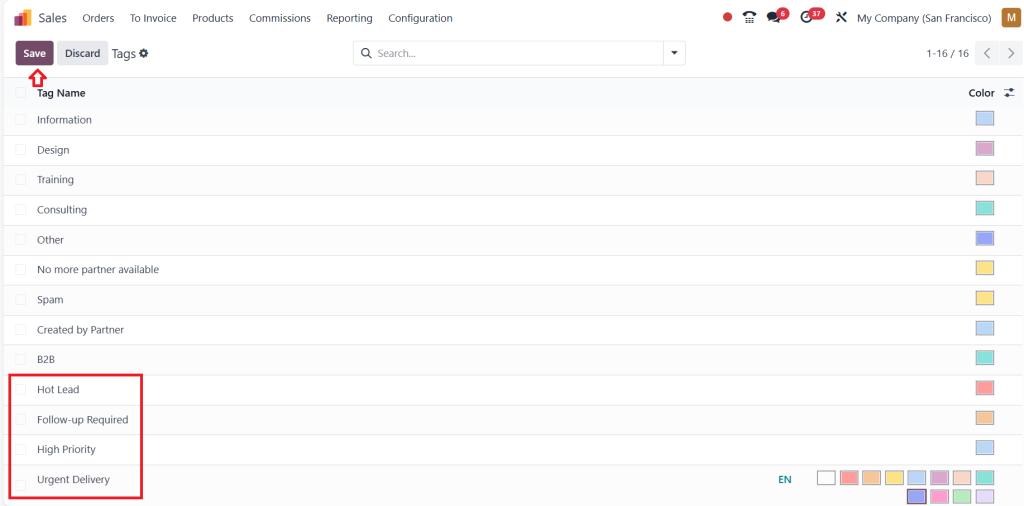
From there, by simply clicking on ‘‘New,’’ she created new tags like:
“Hot Lead”
“Follow-up Required”
“High Priority”
“Urgent Delivery”
She chose different colours for each tag, ensuring quick identification and clicking on ‘‘Save’’.
Step 2: Use of Tags
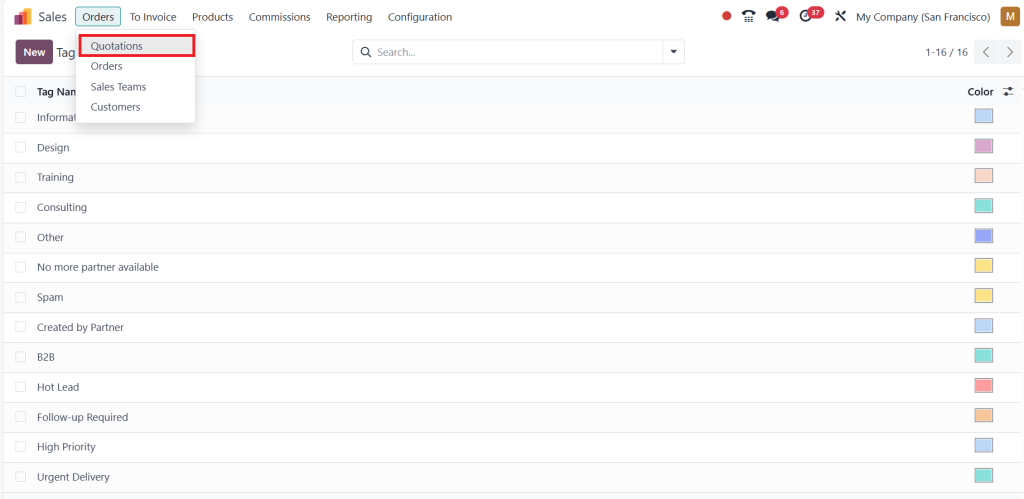
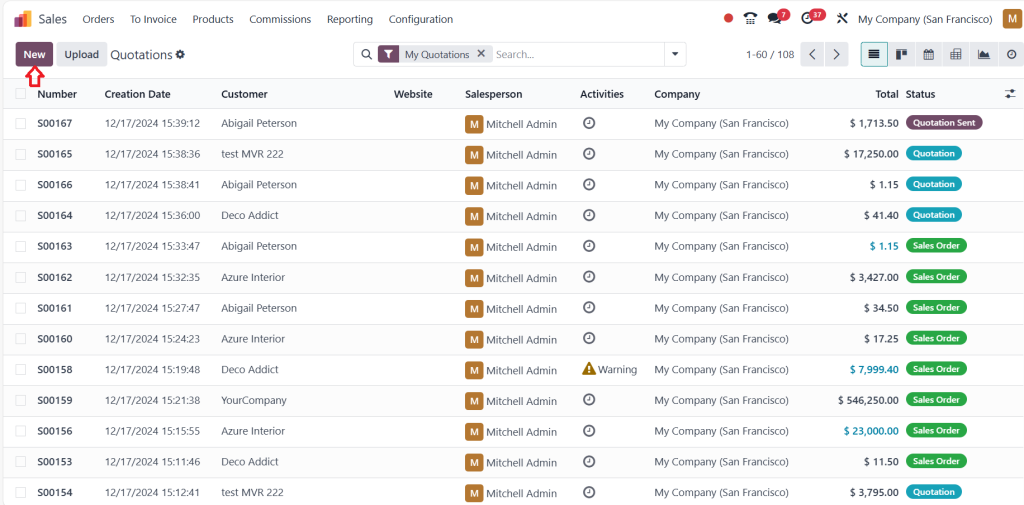
Now, let’s see where Sarah uses these tags. First, she goes to “Quotations” and creates a new one.
By clicking on ‘‘New’’.
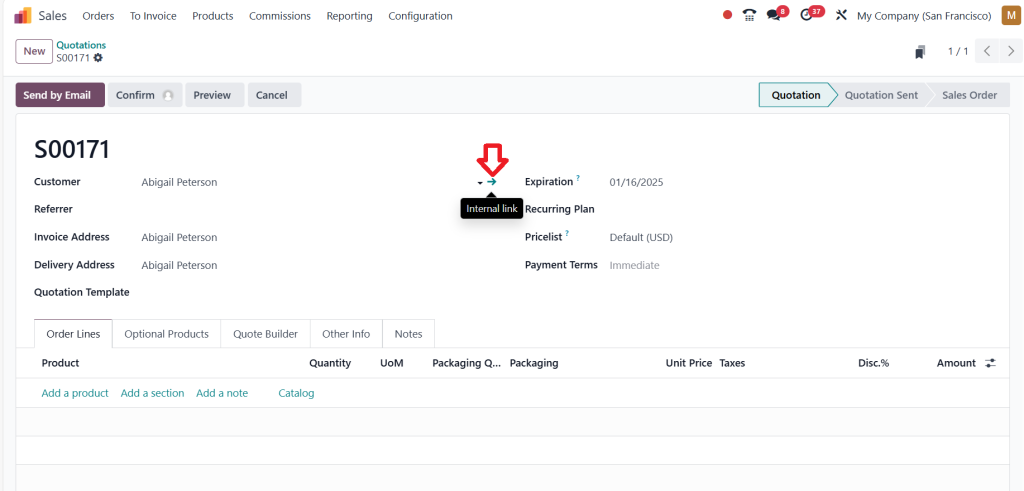
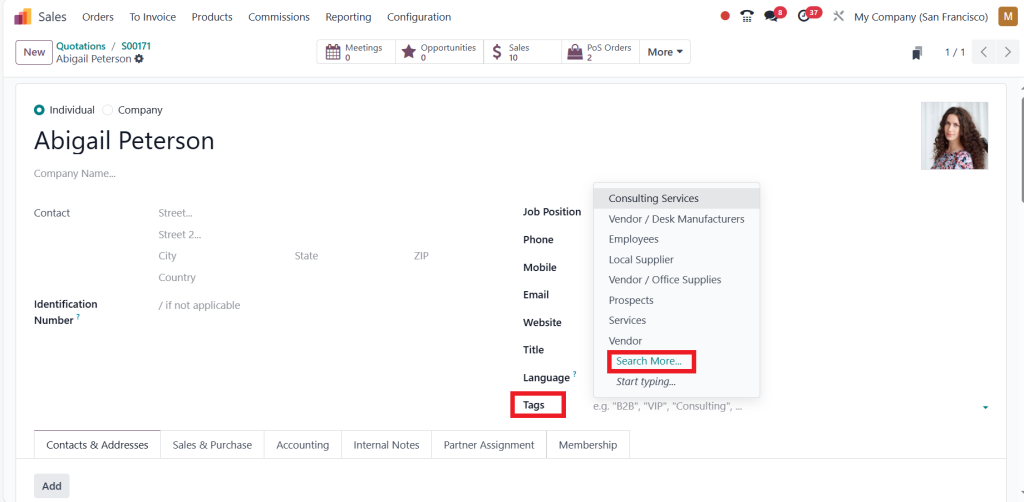
So, here, Sarah added a customer ‘‘Abigail Peterson’’.
After that, she goes to the customer’s ‘‘Internal link,’’ and here, she can see ‘‘Tags.’’ So, from here, the customer’s tags have been used. Then she goes to the ‘‘search more’’ option.
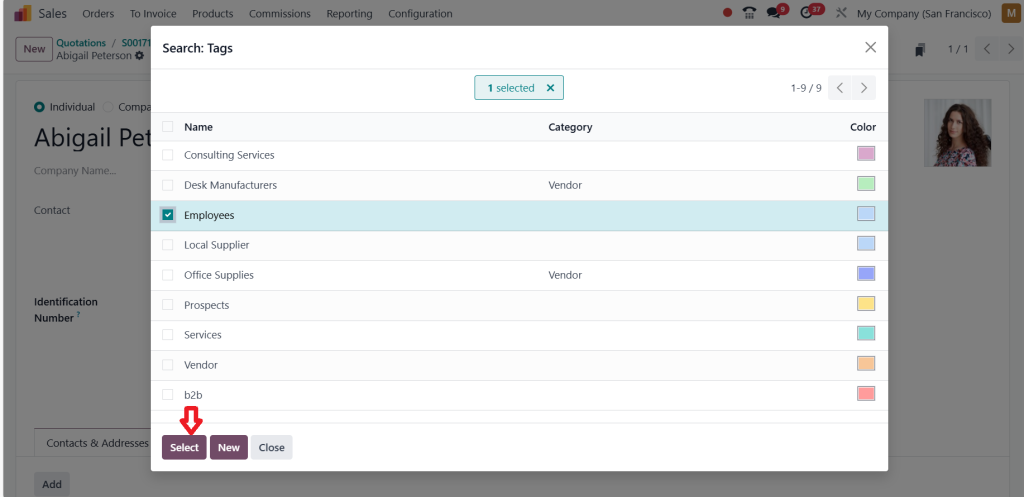
Here, she can see different tags. She adds the ‘‘Employees’’ tag and clicks on ‘‘Select.’’
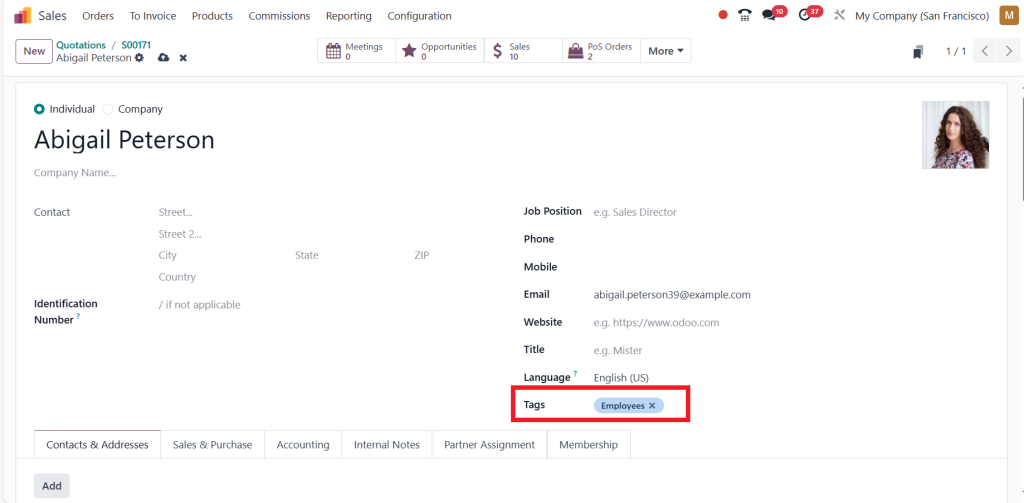
So, as we can see, a tag was added over here.
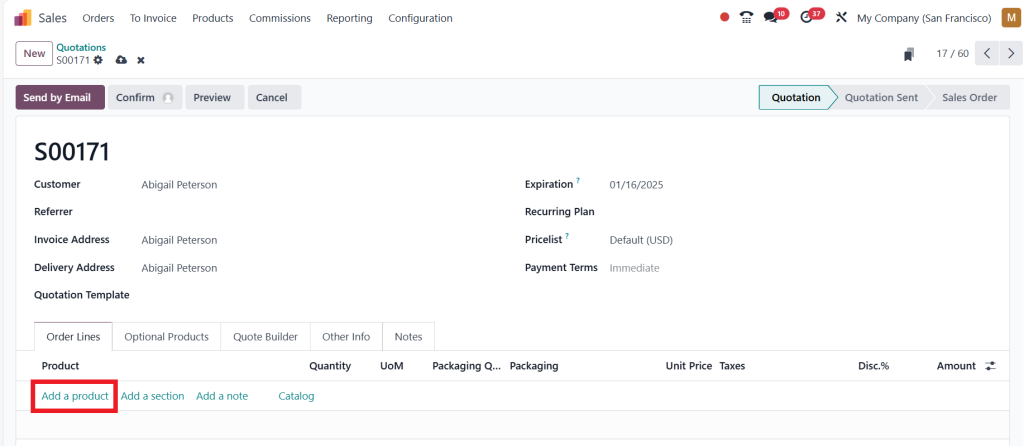
Now Sarah can return to the quotation and ‘‘Add a Product’’.
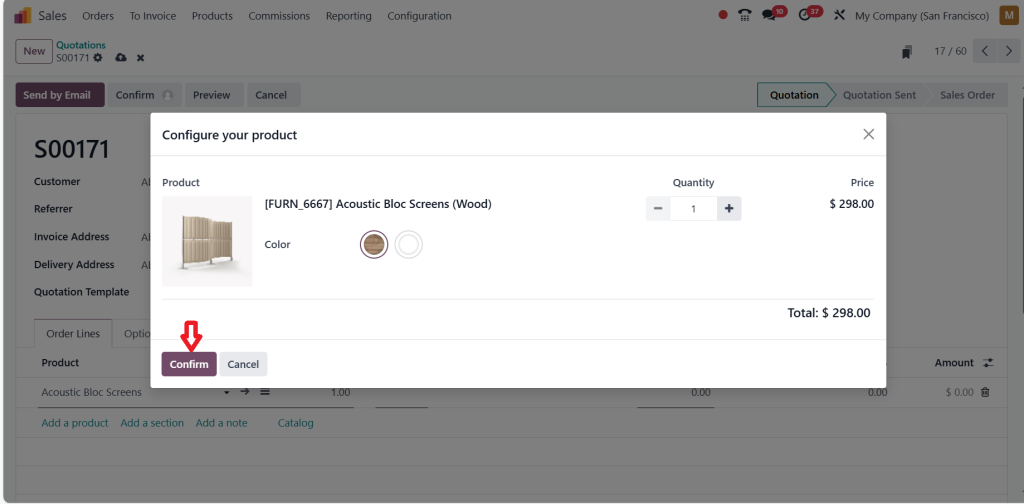
These tags can also be found inside the product button. Next, she clicks on the “Confirm” option.
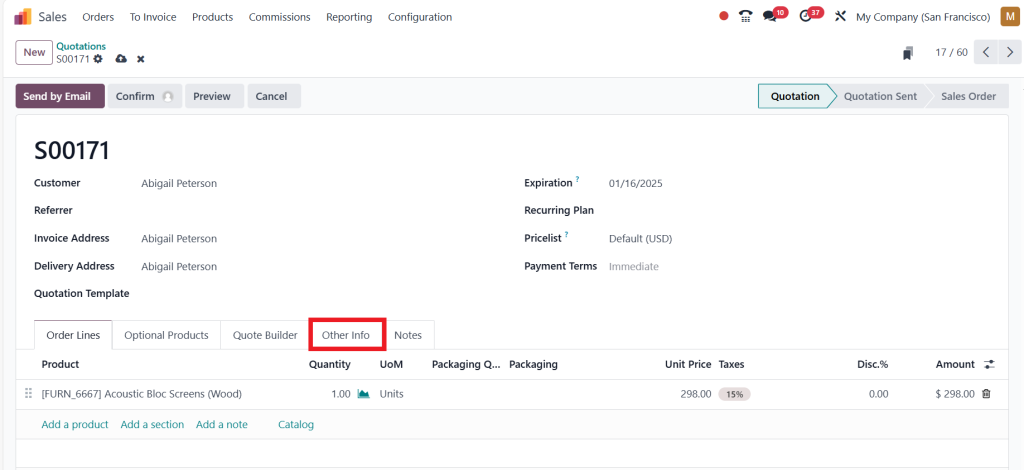
Sarah can see the ‘‘Other Info’’ tab here.
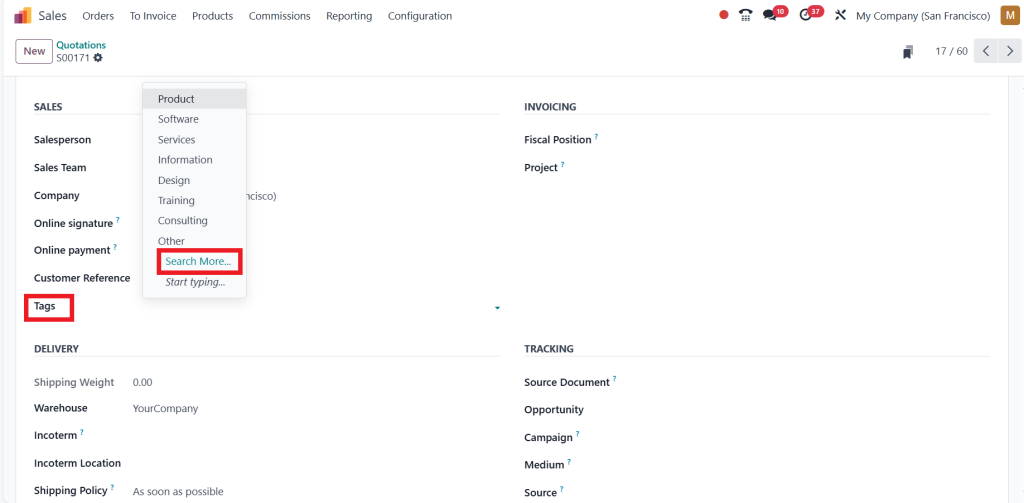
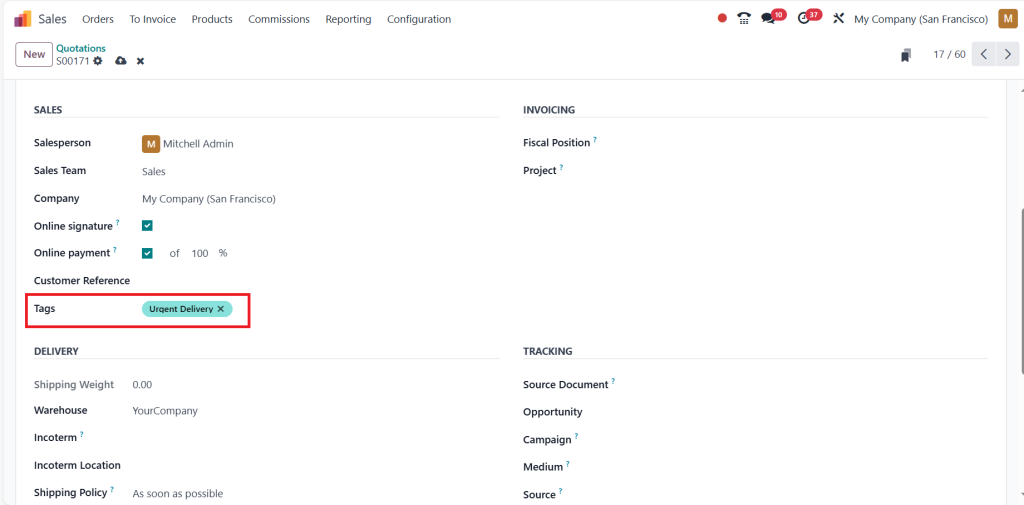
By clicking on this tab, Sarah scrolls down and can see the ‘‘Tags’’ option.
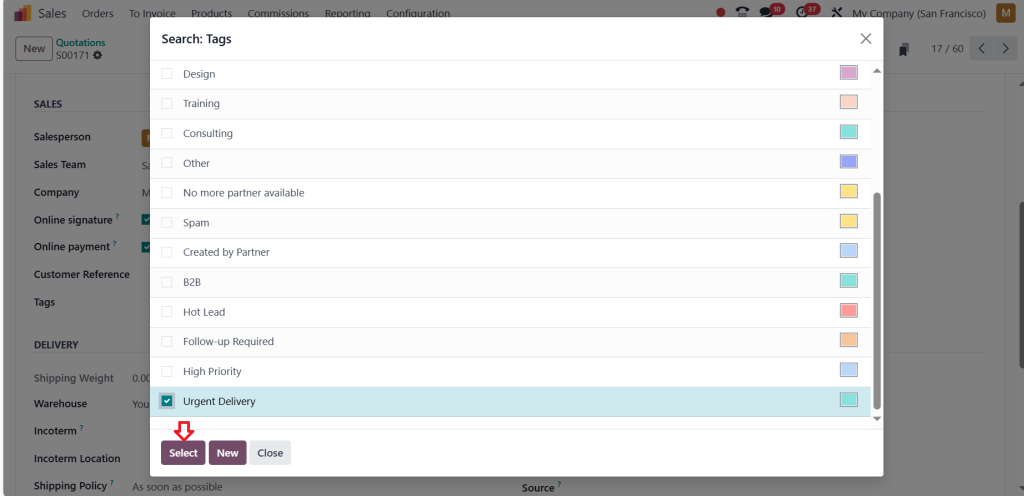
Now, Sarah can use the tags She created above. Here is ‘‘Urgent Delivery.‘‘ She is going to use that here and click on ‘‘Select.’’
Now, we can see Sarah’s tag has been created and used here, and then she saves it.
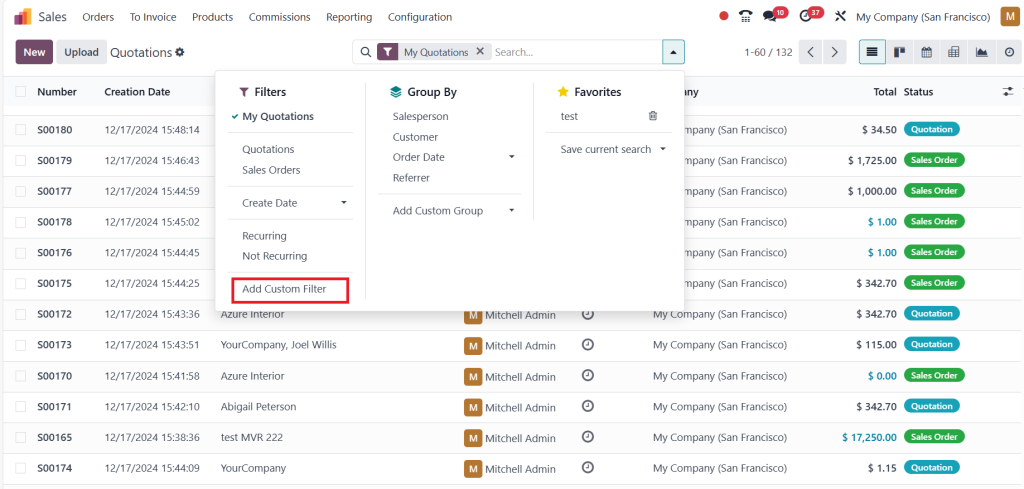
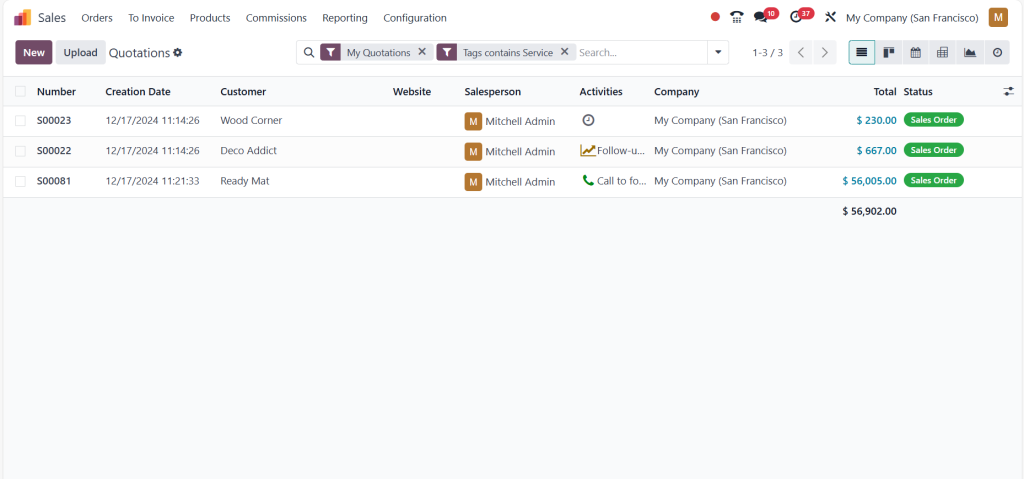
Then Sarah goes back to the quotations, and here we can see how she can easily filter data based on the tags she has created. Sarah had to go to the filter and could not find a name called “Tags.” So Sarah clicks on “Add Custom Filter.”
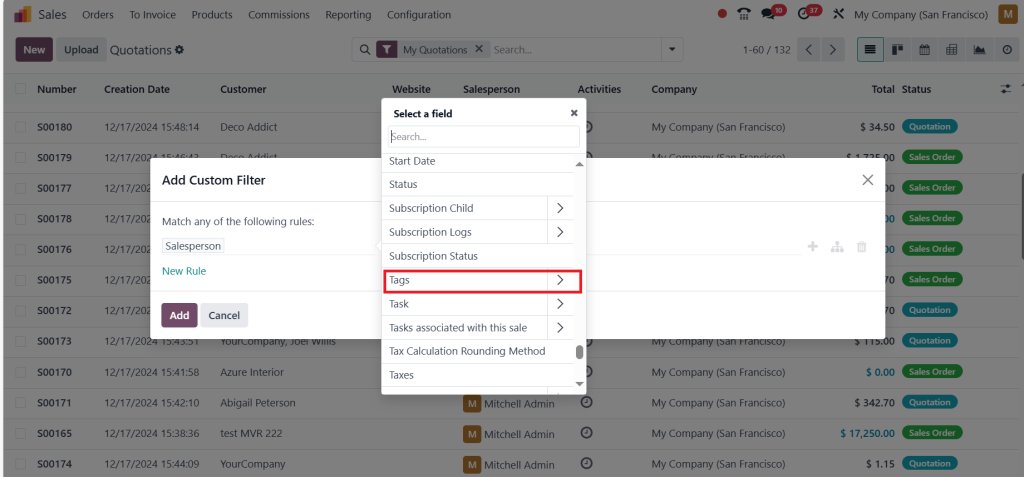
It’s a salesperson by default, so Sarah changes it to “Tags” by simply searching for it.
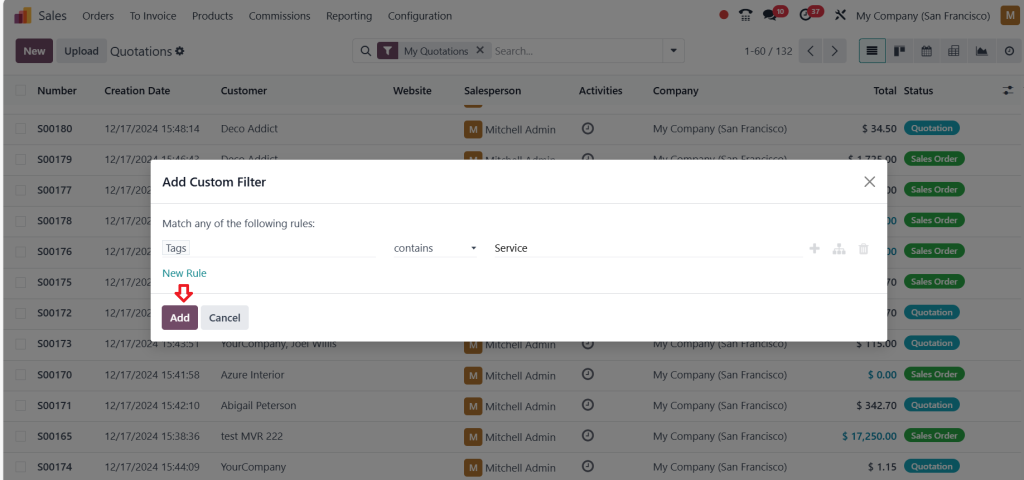
She then sets the condition to ‘‘contains’’ and gives service because she needs all the quotations where the ‘‘Service’’ tag is used. Then, she clicks on the ‘‘Add’’ button.
And now, we can see all the quotations using the tag ‘‘Service’’.
The team watched in awe as opportunities were instantly organized. For example:
A ‘‘Urgent Delivery’’ tag highlighted the urgent product delivery required.
A “Hot Lead” tag highlighted high-potential opportunities.
A “Follow-up Required” tag ensured nothing was left unattended.
The Odoo 18 tag configuration was working wonders.
Life with Odoo 18 ERP Sales Tags
As days turned into weeks, the team saw incredible improvements with the Odoo sales module tags. Here’s how their workflow transformed:
Organized Leads and Opportunities
The clutter disappeared. Leads were labelled with precise Odoo 18 ERP Sales Tags, making prioritizing and tracking them more straightforward.
Efficient Search and Filtering
With the Odoo sales tagging system, Sarah could search for specific orders in seconds. Filtering based on tags like “High Priority” or “Urgent Delivery” simplified her tasks.
Modernized Reporting
Reports became faster and more accurate. Using the Odoo 18 tag configuration, Sarah generated insights by analyzing sales records grouped by tags.
Customized Workflow
Odoo 18’s sales tag management flexibility allowed Sarah to modify tags to fit their unique processes. Rigid systems no longer constrained them.
How Odoo 18 ERP Sales Tags Changed the Game
Sarah’s team began achieving record-breaking results. Their use of Odoo 18 ERP Sales Tags brought structure and clarity to their operations:
Better Follow-Ups: Leads tagged as “Follow-up Required” received timely attention.
Priority Management: Urgent tasks were labelled and resolved quickly.
Improved Collaboration: The team shared tagged records, ensuring everyone stayed on the same page.
Faster Decision-Making: Insights from the Odoo sales tagging system allowed Sarah to make strategic decisions.
The benefits of the Odoo sales module tags became more apparent every day. Odoo 18 manage sales tags was no longer just a feature but a necessity.
Tips for Mastering Odoo 18 Tag Configuration
Sarah shared her secrets for mastering the use of Odoo 18 ERP Sales Tags with the team:
Keep Tags Simple: Avoid overcomplicating. Clear and concise tags work best.
Use Colors Strategically: Assign different colors to make tags visually impactful.
Regular Review: Periodically update and clean up old tags for efficiency.
Team Training: Train everyone on configuring tags in Odoo Sales and using them effectively.
A Happier, More Productive Team
Thanks to the Odoo 18 ERP Sales Tags, Sarah’s team transformed into a well-oiled machine. Their sales pipeline was organized, opportunities were no longer missed, and collaboration was never better. The power of Odoo 18 to manage sales tags brought efficiency and success to their sales processes.
The story of Sarah’s team proves that with the right tools, like the Odoo sales tagging system and proper Odoo 18 tag configuration, any business can overcome chaos and achieve updated success.
From small companies to large enterprises, Odoo 18 Sales Tags has become the cornerstone of efficient sales operations worldwide. So, whether you are a sales manager like Sarah or part of a growing team, it’s time to configure and harness the power of Odoo 18 to manage sales tags.
Squeeze the Future with Odoo 18 ERP Sales Tags
In the end, Sarah and her team celebrated their newfound success. The once chaotic workflow had turned into an updated, efficient process. The simple act of learning how to configure tags in Odoo Sales revealed their true potential. With Odoo 18 ERP Sales Tags at your disposal, businesses can:
Organize leads and sales records effortlessly.
Filter, search, and track opportunities with ease.
Generate actionable insights using the Odoo sales tagging system.
Take charge of your sales workflow today. Learn how to configure and master Odoo 18 ERP Sales Tags, and watch your business thrive.
Sarah’s journey proves that small changes can yield significant results. The power of Odoo 18 ERP Sales Tags is just a click away. Are you ready to hold the future and transform your sales process? Start your Odoo journey now!
Hi, I'm Ilsa Shabbir, an Odoo ERP content writer specializing in functional blogs on Odoo modules. I simplify complex Odoo features, creating clear and engaging content to help businesses understand and optimize their ERP solutions.
We use cookies to ensure that we give you the best experience on our website. If you continue to use this site we will assume that you are happy with it.