Managing vendor payments and bills can be tedious, especially when done manually. But what if I told you there’s an easy way to make this job smooth, fast, and even a little enjoyable? If you’re using Odoo 19, then you’re already halfway there. In this blog, we’ll discuss how to create a bill in Odoo 19 Purchase App, highlighting why this process is a turning point for anyone involved in purchases, accounting, or finance.
The Odoo 19 Purchase App is more than just a tool; it’s like having an intelligent assistant that handles all your purchase bills, vendor invoices, and payments. Whether you’re new to Odoo or have been using it for some time, this blog will help you learn the skill of billing without the boring stuff.
By the end of this article, you will not only know how to create a bill in Odoo 19 Purchase, but you will also have a firm grasp of all related functionalities, such as vendor bill management, purchase order billing, and document uploads in Odoo. Let’s get started!
Create a Bill in Odoo 19 Purchase App Without Any Hassle
So, you’ve just bought something for your company, and now the vendor has sent you the bill. What do you do? In most systems, you’d have to type everything manually, match it with the purchase order, and hope there are no mistakes. But in Odoo 19, things are way easier. To create a bill in Odoo 19 Purchase, you need a confirmed purchase order. Once you receive the items, Odoo gives you an option to generate the bill automatically. No need to write things twice. No need to worry about calculation errors. You click a button, and the bill is ready to go.
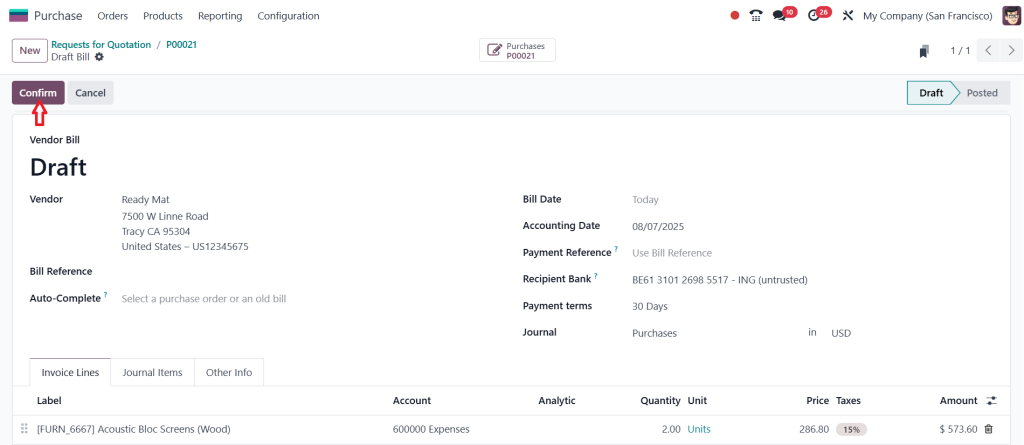
You can even see all the details from the purchase order copied into the bill: product name, quantity, price, taxes, everything! This way, you’re not just saving time but also avoiding mistakes. And if you’re dealing with multiple vendors and hundreds of products, this becomes a real lifesaver.
How Vendor Bill in Odoo 19 Makes Everything Easier
When you receive a bill from your vendor, it’s crucial to enter it accurately in your system. That’s where the vendor bill in Odoo 19 comes in. It’s a digital version of the paper invoice your vendor gives you. Once you receive goods and create a purchase order, Odoo lets you generate the vendor bill with just a click. You can review all the details before saving it, and even upload a scanned copy of the bill to keep a record.
One of the coolest parts? Odoo also warns you if there’s something fishy, like a duplicate bill or mismatched amounts. It’s like having an extra pair of eyes checking everything for you. Plus, all your bills are stored in one place, making them easy to search, sort, and access when needed.
Generate an Odoo 19 Purchase Invoice in a Few Simple Steps
Once you’ve created the vendor bill, you’re ready for the next big step: generating the Odoo 19 Purchase invoice. In traditional systems, this would be another long and tiring process. But not in Odoo. When you validate the vendor bill, the system automatically generates the purchase invoice based on it. You don’t need to enter the numbers again.
You can choose the payment journal, select the payment method, and even schedule payment dates all from the same screen. The Odoo 19 Purchase App helps you stay organized, pay on time, and keep your vendor relationships strong.
Also, if you ever need to look back at what you paid and why, everything is right there in the invoice linked to the purchase order, the bill, and the vendor details.
Odoo 19 Purchase Order Billing That Works Like Magic
Let’s say you have a big purchase order with lots of products. Usually, you’d have to sit with the bill and manually check if everything matches. But with Odoo 19 Purchase Order Billing, this process becomes magical. As soon as you confirm the purchase order and receive the goods, Odoo links the order with the vendor bill. It matches every product, price, and quantity. If something doesn’t add up, it lets you know immediately.
This matching feature not only saves time but also avoids overpayments or missed items. You don’t have to do this manually or hire extra staff. The system handles it easily, and you stay in control.
Easy and Accurate Odoo 19 Bill Creation Steps
You might be thinking, “Okay, this sounds great. But how do I create a bill?” Don’t worry, here’s a super simple version of the Odoo 19 bill creation steps you can follow:
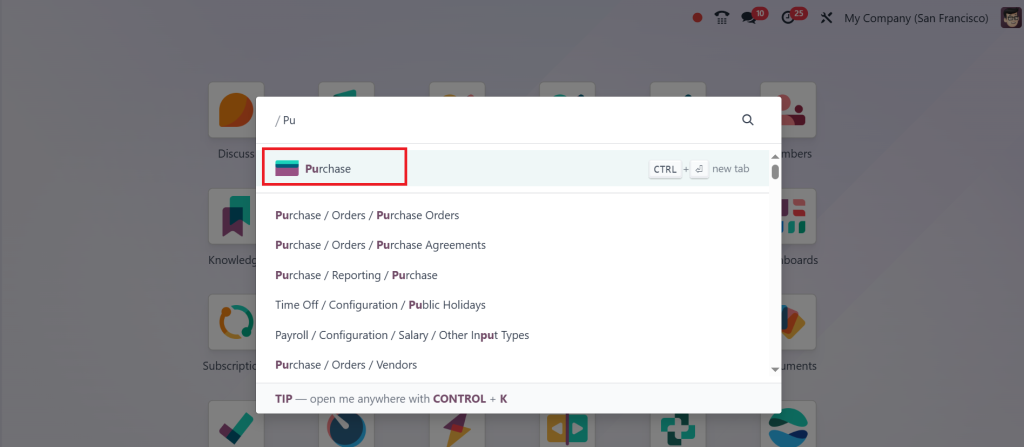
Go to the Purchase App.
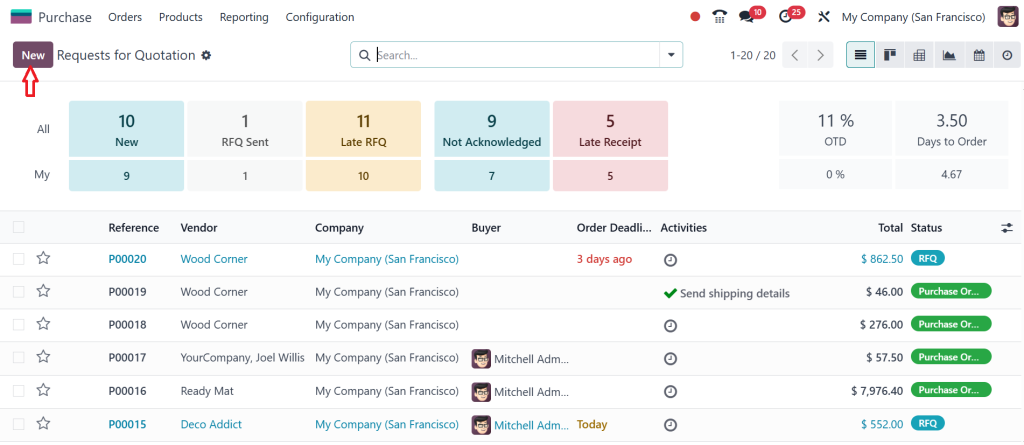
Click on “New.”
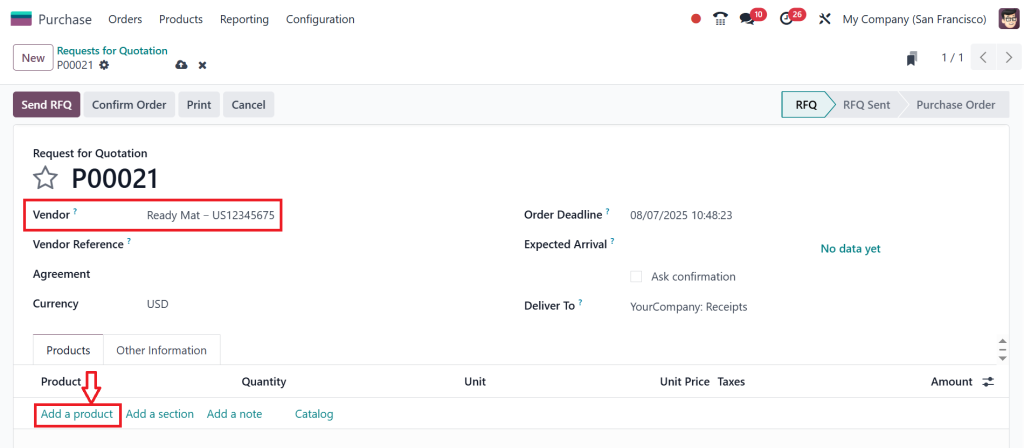
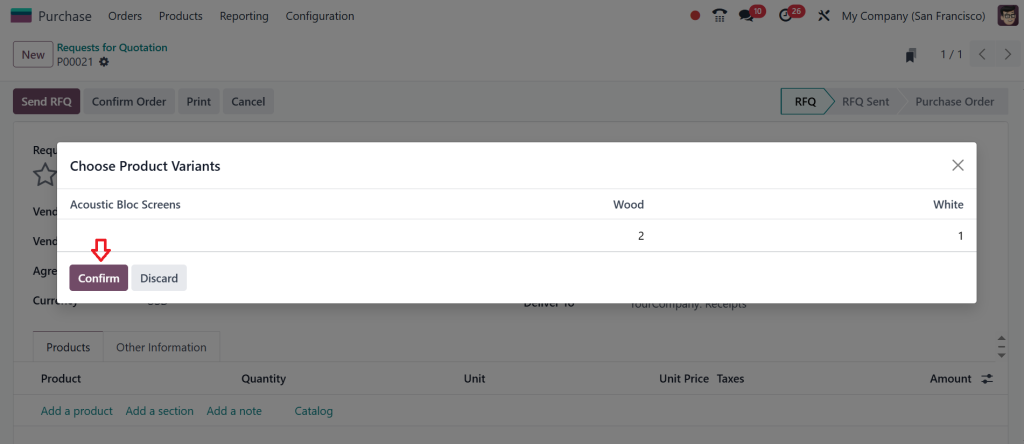
Add your Vendor and click on Add a Product.
Choose the Product and Click on Confirm.
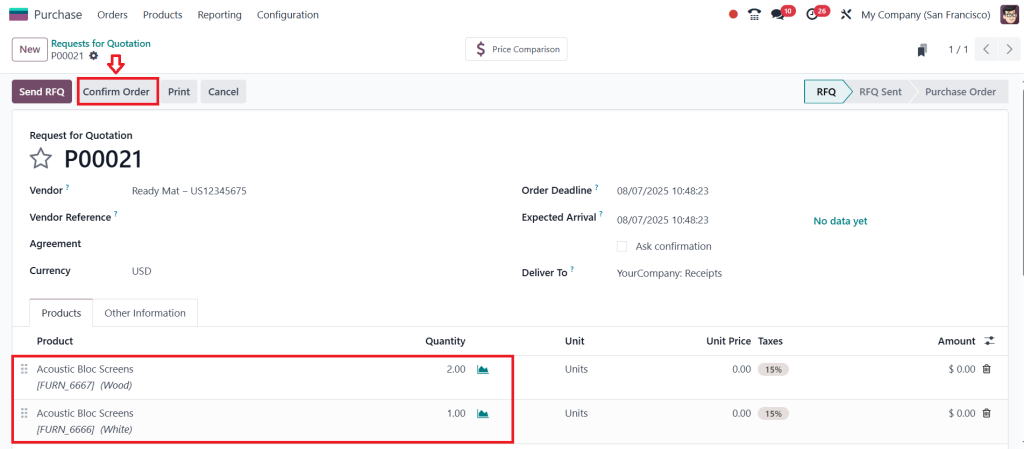
The products will be added to the product line. Then, click on Confirm Order.
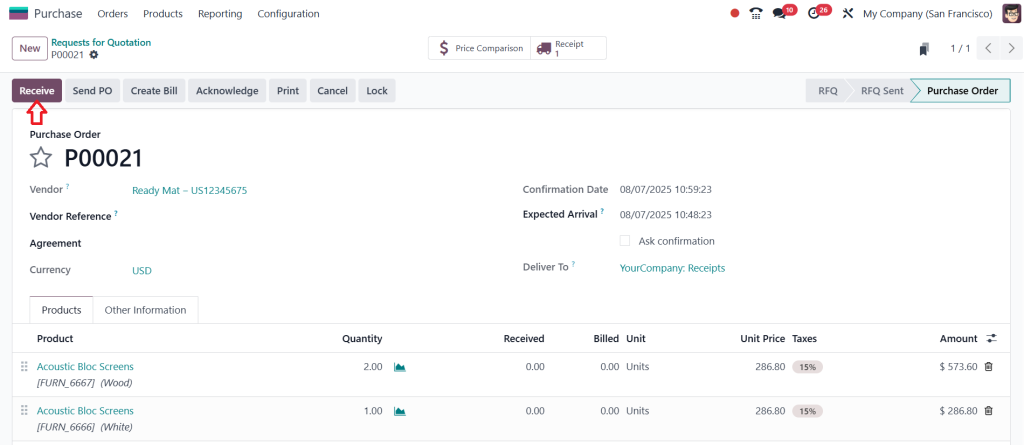
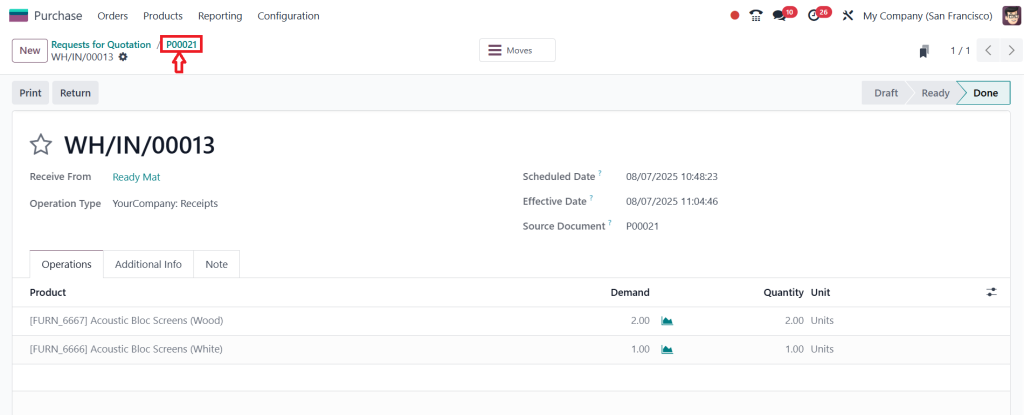
Receive the goods by clicking on the Receive button.
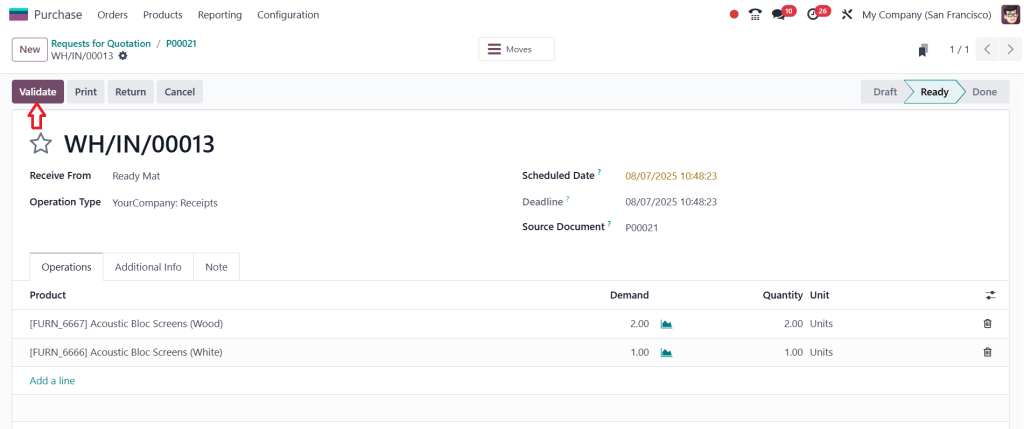
Click “Validate”.
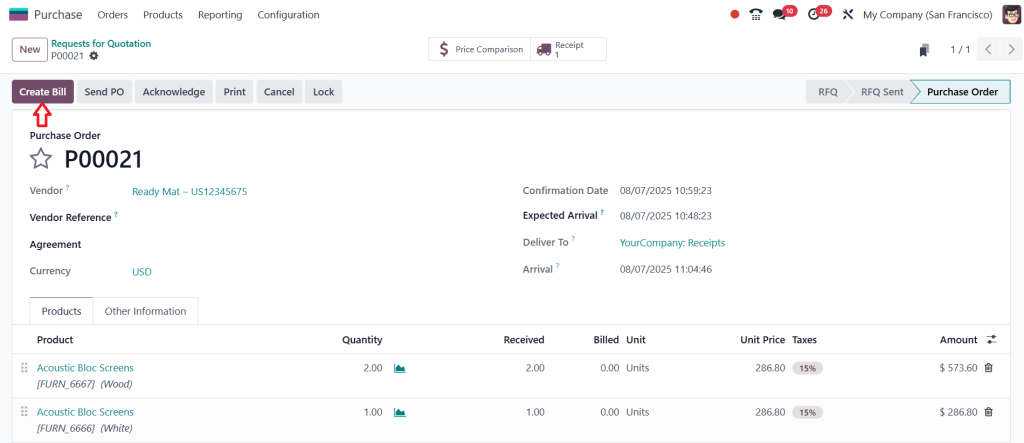
After that go back to the Purchase order.
Click “Create Bill.”
Review the bill details and click “Confirm” to finalize it.
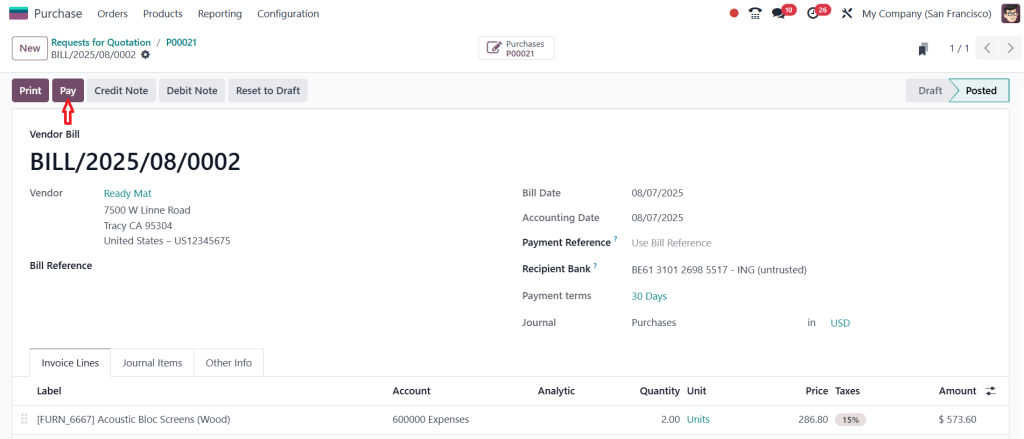
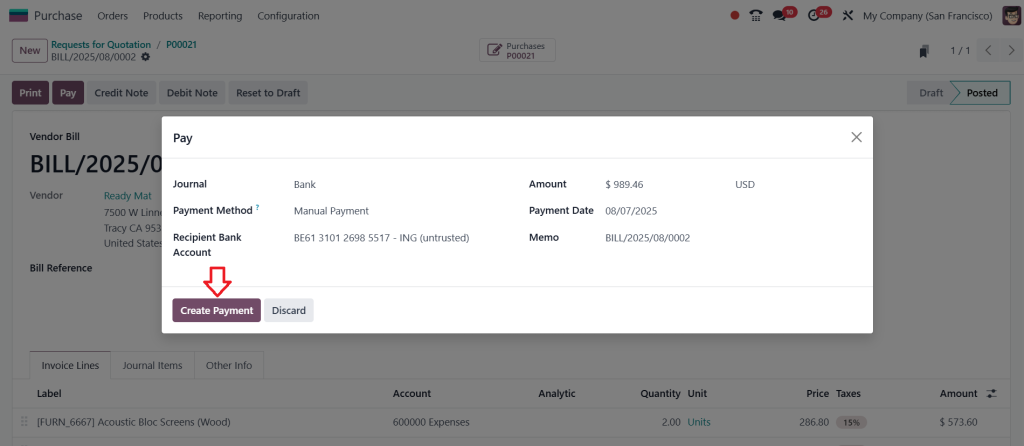
Then, click on Pay.
Here, we have the option to make the payment. Let’s click on Create Payment.
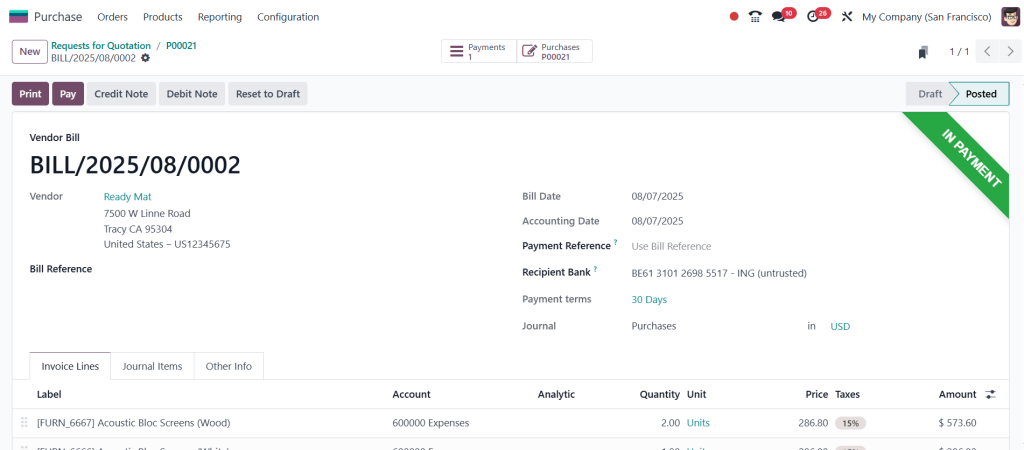
As shown in the screenshot below, the payment is currently in a Payment State, and after reconciliation, it will be transferred to the bank.
That’s it. No complicated steps. No confusing buttons. It’s all designed in a way that makes sense even if you’re using Odoo for the first time.
Upload Purchase Bills Easily in Odoo 19
Now, let’s talk about documents. Most vendors will send you a scanned or PDF copy of the bill. You don’t want to lose it. Odoo simplifies the process with the purchase bill upload in Odoo 19. When you’re on the bill page, you’ll see a little paperclip icon. Click it, choose your file, and upload it. That file is now linked to the bill, and you can download or view it anytime.
This feature helps you keep your records clean, reduces paper clutter, and saves you from searching through emails or folders when audit time comes.
Handle Every Vendor Invoice in Odoo 19 Purchase Without Stress
When you’re dealing with multiple vendors, the process of entering, tracking, and managing bills can become complicated. However, this is not the case if you’re using a vendor invoice in Odoo 19 Purchase. Each vendor invoice is tied directly to the purchase order and delivery receipt. So, you always know what’s going on.
Do you need to check which bills are unpaid? Go to the “Bills” section and apply a filter. Want to see how much you’ve spent with a particular vendor this year? Odoo shows you that too. It’s all very intuitive, and it helps you make better business decisions.
You don’t have to rely on spreadsheets or sticky notes anymore. Everything is digital, innovative, and secure.
Take Charge Today & Make Billing Effortless with Odoo 19 Purchase App
If you’ve made it this far, you now know how easy it is to create a bill in Odoo 19 Purchase App. You’ve seen how simple the steps are, how intelligent the system is, and how much time you can save by switching to a better way of managing bills. From the vendor bill in Odoo 19 to the purchase invoice and order billing, and even the smooth upload of purchase bills, everything works together beautifully.
And let’s not forget how organized your vendor records and vendor invoice Odoo 19 Purchase files will be. This is more than just billing. It’s about working smarter, staying in control, and focusing on things that grow your business.
So, whether you’re running a small shop or a large enterprise, it’s time to let go of the old ways and hold the simplicity of Odoo 19. Try it yourself and see the difference!
Need help getting started with Odoo or want someone to set it up for you the right way?
Netilligence is here to help. We turn your billing headaches into smooth, automated flows. Reach out today, we’ll make your Odoo experience unforgettable!
Hi, I'm Ilsa Shabbir, an Odoo ERP content writer specializing in functional blogs on Odoo modules. I simplify complex Odoo features, creating clear and engaging content to help businesses understand and optimize their ERP solutions.
We use cookies to ensure that we give you the best experience on our website. If you continue to use this site we will assume that you are happy with it.