

Odoo’s Point of Sale (POS) module is built on top of the OWL (Odoo Web Library) framework, which makes it highly flexible and customizable. In real-world business scenarios, you may need to extend the standard POS flow with custom screens, for example:
- Showing additional product details.
- Managing loyalty or rewards programs.
- Collecting extra customer information before completing an order.
This is where custom screens come into play. In Odoo 18, creating a custom screen in POS follows a structured process that ensures flexibility without compromising on maintainability. Let’s walk through this step by step.
The Process of Adding a Custom Screen
In Odoo 18, adding a new screen to POS follows a structured process:
- Extend the Control Buttons to add a new button on the POS product screen.
- Register your custom screen in Odoo’s registry under the “pos_screens” category.
- Create the screen template (XML) to define its layout and design.
- Build the screen logic (JavaScript/OWL Component) to handle interactions, data, and navigation.
- Link everything together using this.pos.showScreen(“CustomScreen”) so the new screen can be displayed on button click.
How the Flow Works
Let’s break down what happens behind the scenes:
1. Button Click
- User clicks your custom button in the POS product screen.
- Button has t-on-click=”() => this.onClick()”.
2. onClick() Triggered
- The patched ControlButtons class runs onClick().
- Inside, it calls this.pos.showScreen(“CustomScreen”).
3. Registry Lookup
- POS has a registry of all screens (pos_screens).
- It searches for “CustomScreen”.
4. Screen Found & Loaded
- Your registered OWL component (CustomScreen) is matched.
- Odoo links it with the XML template (custom_pos.CustomScreen).
5. Rendering the Screen
- The screen layout is rendered (HTML/XML → UI).
- User sees your custom design (message, form, table, etc.).
6. Interaction & Logic
- Any action (buttons, inputs) inside the screen triggers your JS functions.
- Example: closeCustomScreen() calls this.pos.closeScreen().
7. Back to Main Screen
- Once finished, POS closes your screen.
- User returns to the main product screen.
Basic Module Structure
Here’s how your module directory should be structured:
					custom_pos/
+-- static/
¦   +-- src/
¦       +-- js/
¦       ¦   +-- custom_button.js
¦       ¦   +-- custom_screen.js
¦       +-- xml/
¦           +-- custom_button.xml
¦           +-- custom_screen.xml
+-- __init__.py
+-- __manifest__.py
This clean, modular setup keeps everything organized and upgrade-safe.
Implementation Steps
Step 1: Creating the Custom Screen Template
The XML file defines the visual structure of your custom screen:
       <div class="screen h-100 bg-100">
           <div class="content">
               <div class="custom-message screen-full-width d-flex w-100 h-100">
                   <h1>This is our custom screen</h1>
               </div>
           </div>
       </div>
In Odoo POS, XML templates define the visual structure of a screen or component, such as headings, buttons, or containers.
They act like a blueprint for the UI, ensuring the layout follows Odoo’s POS styling and is later connected to logic via JavaScript.
The t-name=”custom_pos.CustomScreen” uniquely identifies this template, which will be linked to the corresponding JavaScript component so it can be displayed when triggered in the POS
Step 2: Creating the JavaScript Component
Next, we need a JavaScript component to handle the screen’s logic:
					import { Component } from "@odoo/owl";
import { _t } from "@web/core/l10n/translation";
import { registry } from "@web/core/registry";
import { usePos } from "@point_of_sale/app/store/pos_hook";
export class CustomScreen extends Component {
   static template = "custom_pos.CustomScreen";
   setup() {
       super.setup();
       this.pos = usePos();
   }


   closeCustomScreen() {
       this.pos.closeScreen();
   }
}
registry.category("pos_screens").add("CustomScreen", CustomScreen);
This component:
- Extends Odoo’s base Component class
- Specifies our XML template as its visual representation
- Accesses the POS store via usePos() hook
- Includes a method to close the screen (though not currently used in the template)
- Registers itself in the POS screens registry
Step 3: Adding a Custom Button to Trigger the Screen
To make our screen accessible, we’ll add a button to the POS interface:
Button template (custom_button.xml):
<button> this.onClick()">
<i class="fa fa-link me-1" role="img" aria-label="Set Custom Message" title="Set Custom Message" />
Custom Control Button
</button>
Template Inheritance
We extend the existing point_of_sale.ControlButtons template using t-inherit with extension mode, so we can add our custom button without overriding the whole template.
XPath Targeting
The xpath expression locates the position right after the OrderlineNoteButton, ensuring our new button is inserted in the correct place.
Custom Button Definition
A new <button> element is added with a dynamic class (t-att-class=”buttonClass”) and an onClick() event handler linked to our JavaScript logic.
Button Content
Inside the button, we include a FontAwesome link icon (fa-link) and the text label “Custom Control Button” for clear identification.
Button JavaScript (custom_button.js)
					import { _t } from "@web/core/l10n/translation";
import { ConfirmationDialog } from "@web/core/confirmation_dialog/confirmation_dialog";
import { patch } from "@web/core/utils/patch";
import { ControlButtons } from "@point_of_sale/app/screens/product_screen/control_buttons/control_buttons";
patch(ControlButtons.prototype, {
   onClick() {
       // Open our custom screen
       this.pos.showScreen("CustomScreen");
   },
});
patch → Used to extend or override existing Odoo components without modifying the core code.
import { ControlButtons } → Brings in the POS Control Buttons class so we can add our custom button logic.
this.pos.showScreen(“CustomScreen”) → Triggers navigation to our newly registered custom screen when the button is clicked
Step 4: Adding the Manifest
We can add manifest like this:
					{
   'name': 'Custom POS Screen',
   'version': '18.0.1.0.0',
   'category': 'Point of Sale',
   'summary': 'Adds custom button and screen to POS',
   'description': """
This module adds a custom button to POS that opens a custom screen.
   """,
   'depends': ['point_of_sale'],
   'data': [],
   'assets': {
       'point_of_sale._assets_pos': [
           'create_custom_screen/static/src/js/custom_button.js',
           'create_custom_screen/static/src/js/custom_screen.js',
           'create_custom_screen/static/src/xml/custom_button.xml',
           'create_custom_screen/static/src/xml/custom_screen.xml',
       ],
   },
}
After implementing the custom POS screen module, you should see the following results in your Odoo 18 Point of Sale interface:
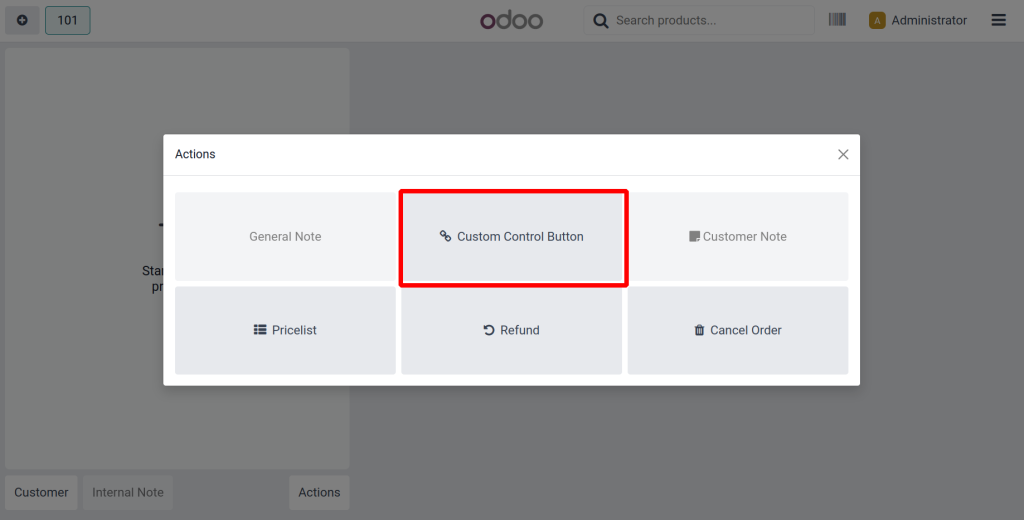
By clicking on the custom control button, you can see the following:

From here, you can manage any extra workflow (like loyalty, custom forms, or additional product data).
Final Thoughts on Custom Screens in Odoo POS
Creating a custom screen in Odoo 18 POS allows developers to extend the system with new workflows, UI elements, or custom logic. By combining XML templates (for layout), JavaScript/OWL components (for logic), and registry integration (to register the screen), you can flawlessly add new functionality without touching core code. This modular approach keeps your customizations clean, upgrade-friendly, and easy to maintain.
At Netilligence, we specialize in building smarter Odoo POS experiences personalised to your business. Whether it’s designing custom screens, automating workflows, or extending POS features, our team ensures your system stays flexible and future-ready. Get in touch with us today, and let’s create a POS solution that truly fits your business.




