If you are thinking about creating your first event using Odoo 19 events app, then I want to tell you something: you can do it, even if you have never used any event software before. When we hear about event setup or online tools, it feels like a long, complex process with too many screens, settings, and things to understand. But when I started exploring the Odoo 19 events app, I noticed something interesting.
The more I clicked around, the more I realized that the whole system has been designed so that even your very first event using the Odoo 19 events app feels straightforward. And today, through this blog, I’m talking directly to you, as if you’re sitting with me, planning your event step by step.
Many people feel confused when they hear about event management tools. Some think it requires tech experience, while others fear they might click the wrong button. But through this guide, I want you to feel relaxed because we are going to walk through every step together.
So, take a breath, get comfortable, and let this blog guide you through the entire journey of creating your first event using the Odoo 19 Events app.
Your First Event Using Odoo 19 Events App Starts with Understanding the Tool
Before you click anything, it helps to understand how the Odoo 19 events app actually works. If you think of it like a messy tool with too many features, your mind automatically gets stressed. But if you think of it like a clean dashboard that asks you a few questions about your event, everything becomes easier. And this is precisely how Odoo 19 feels.
Whether your event is online or at a physical location, whether it is small or large, the system guides you step by step. When I used it for the first time, it felt like the app was gently guiding me forward rather than overwhelming me. And now I want you to experience the same comfort.
The Odoo 19 events app basically lets you create, manage, publish, promote, and track your event without opening any other software. No switching tabs. No scattered files. Everything sits inside one clean space. And that is why starting your first event with the Odoo 19 Events app becomes something you look forward to, not something you fear.
How to Create an Event in Odoo – The First Step of Your Event Setup Experience
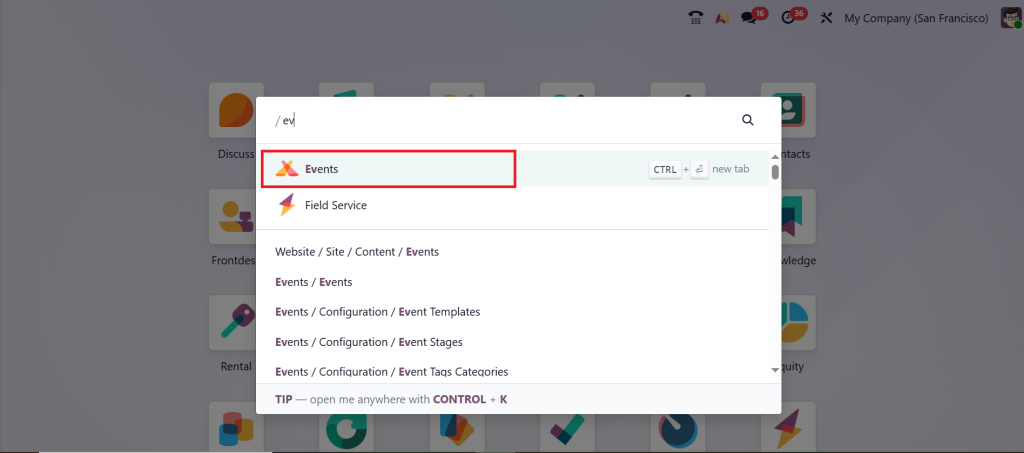
When you begin thinking about how to create an event in Odoo, you only need to remember one thing: every event starts with a single click. You open the Odoo 19 Events app.
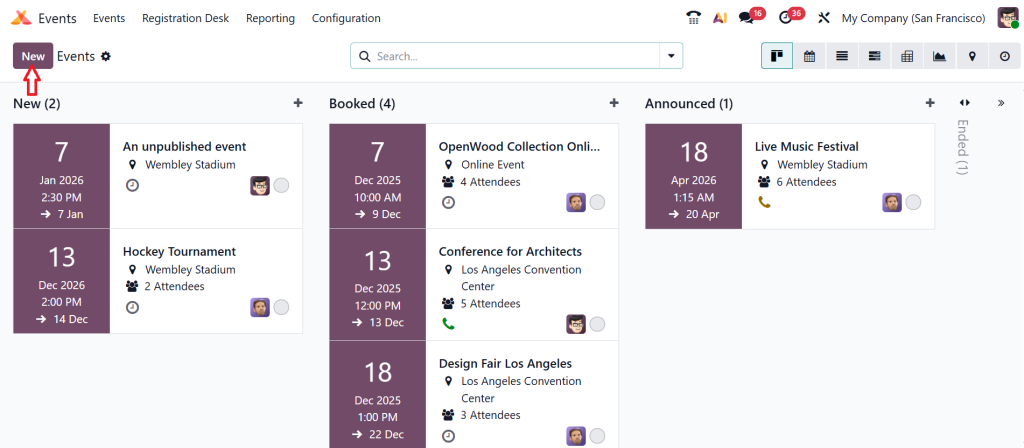
In the top-left corner, click the New button.
Now you will see a clean event creation form. This is where your Odoo 19 event setup begins. Fill in the following fields:
Event Name: This will appear on your website, registration pages, tickets, and emails. For example, “Digital Marketing Masterclass 2025”.
Event Location: Add your venue or select “Online Event” if it’s virtual.
Event Date & Time: Select the start and end dates and times.
Tags: You can add tags like: Workshop, Free Event, Business, Webinar, Training, etc.
Organizer: Select who is organizing the event.
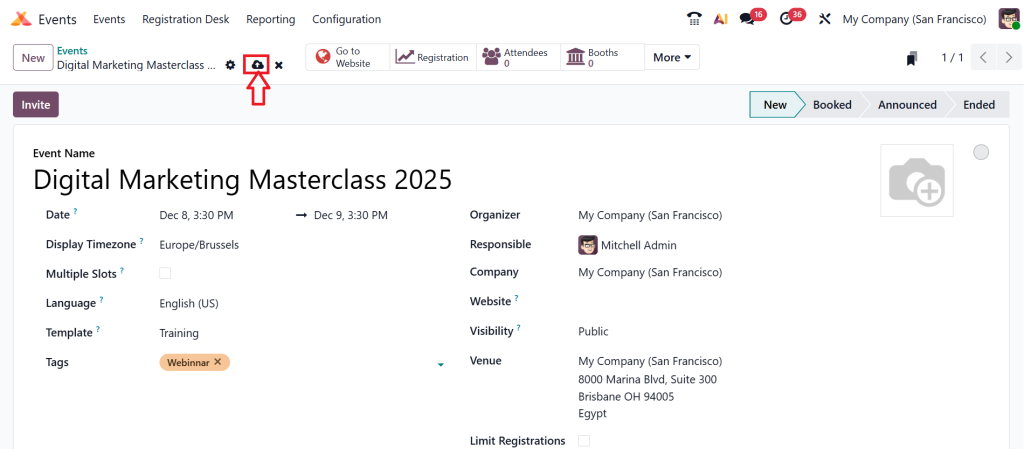
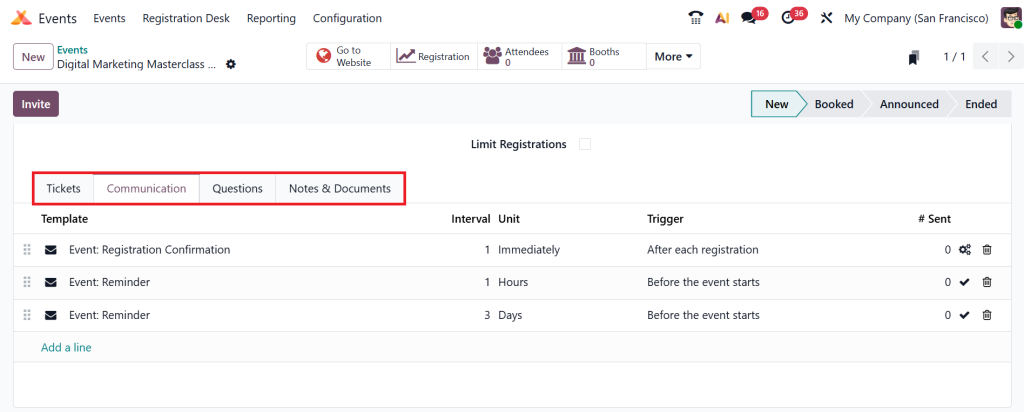
These fields form the foundation for your first event using the Odoo 19 Events app. Scroll down to view additional options like:
- Tickets
- Communication Settings
- Questions
- Notes & Documents
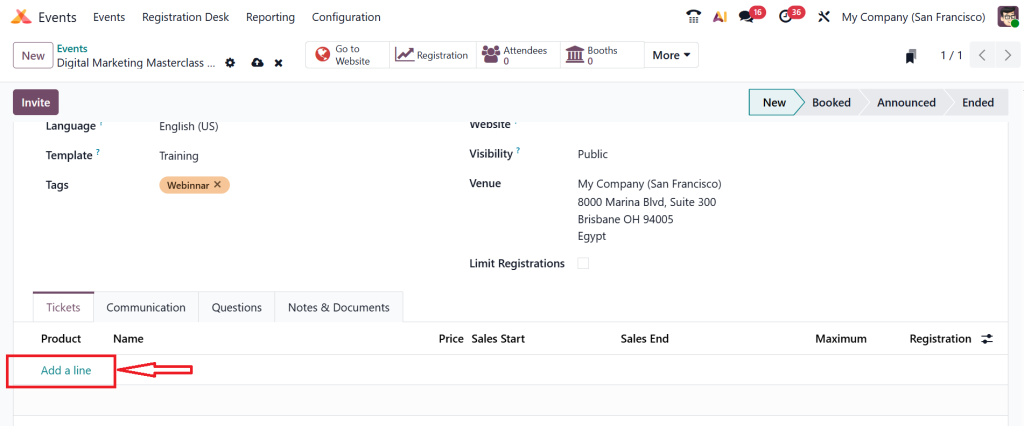
This is where the Odoo 19 Events App becomes powerful. This step is key to your Odoo events app tutorial experience. Inside the Tickets tab, click Add a Line and configure:
- Ticket Name
- Price
- Sales Start & End date
- Maximum attendees
- Registeration
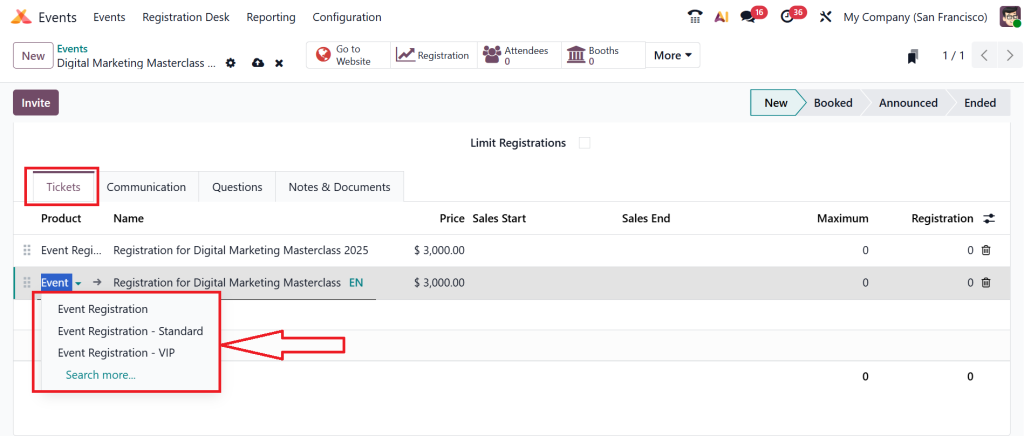
Your event can have one or multiple ticket types. For example,
- Free Ticket
- Standard Ticket
- VIP Ticket
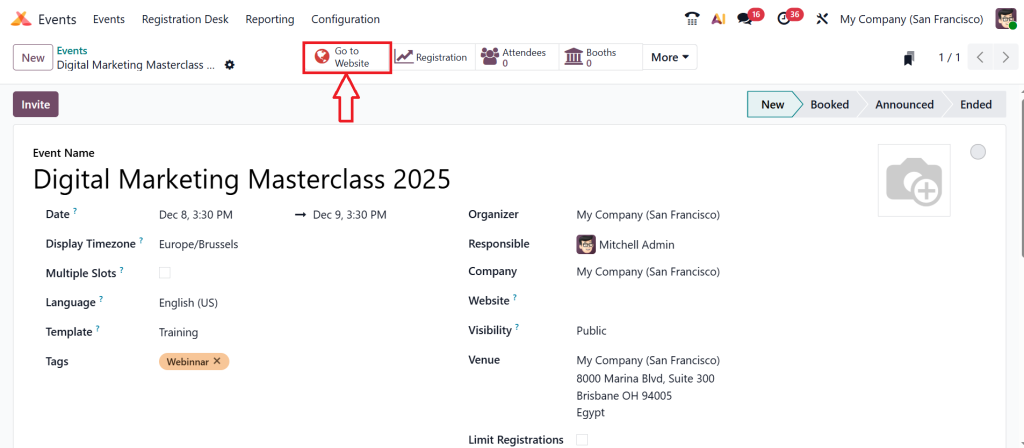
After setting everything, click Go to Website.
Open your event page, edit it, and click Publish. Once you publish, your event is live.
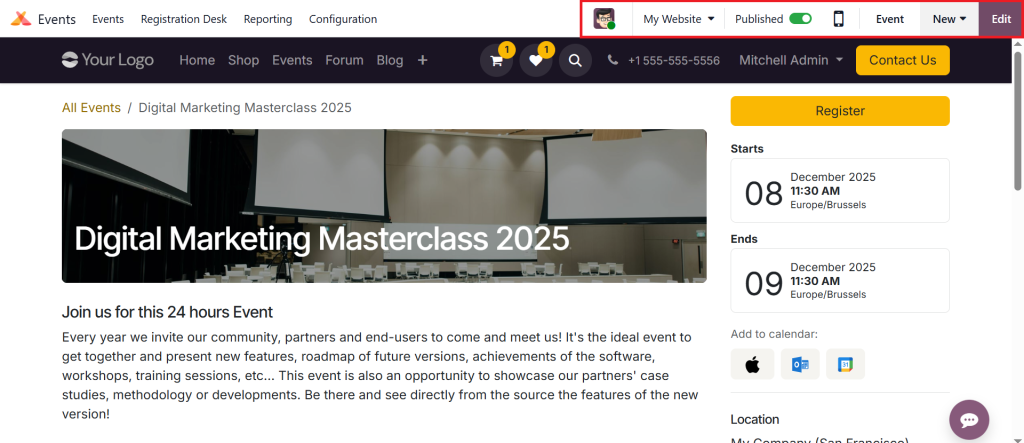
People can now:
- View details
- Register
- Buy tickets
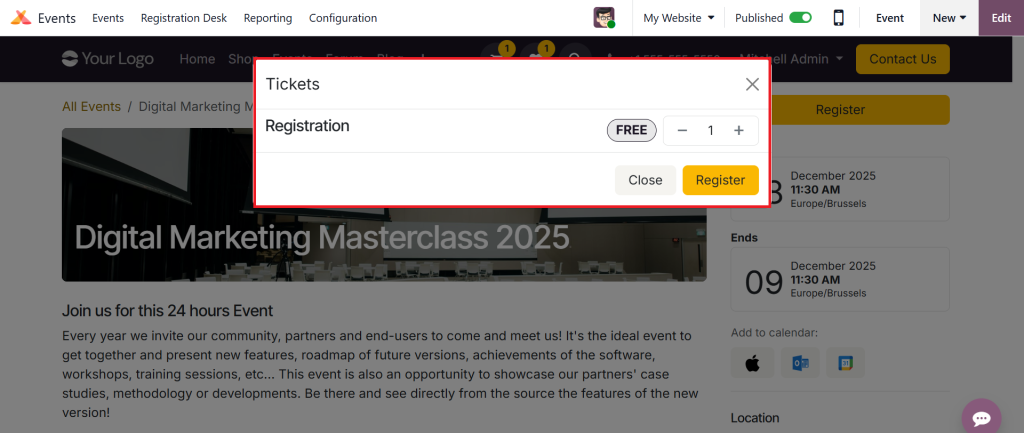
This completes your create event process in Odoo 19. This is what makes people feel comfortable even during their first event using the Odoo 19 events app.
Odoo Events App Tutorial – A Simple Walkthrough for Your First Event
Think of this section as your personal Odoo events app tutorial, written in the simplest way possible. The goal here is not to impress you with technical words but to make you feel like you’re walking through the screen with me.
Once you open the event form, you add the description of your event. This is the part where you can talk to your audience. Why are you hosting this event? What problem will it solve for the people attending it? When I create events in Odoo, this part always excites me because it gives the event meaning.
Next comes the agenda. This is where you add your schedule. It can be a single session or numerous sessions. You can add speakers, time slots, topics, and any special notes. And everything you enter appears beautifully on your public event page.
By this point, you start feeling more confident with the Odoo 19 event setup. You can see your event taking shape. And I promise you, when you see your event layout on the screen for the first time, you will feel a sense of achievement, realizing you’ve created your first event with the Odoo 19 Events app, without any stress.
Create Event Odoo 19 – Adding Tickets to Make Your Event More Organized
If your event includes ticketing, this part will be beneficial. You go to the tickets tab and start setting up your ticket types. This is where the Odoo events ticketing feature becomes very useful.
You can create a free ticket, a standard ticket, a VIP ticket, or any custom ticket category you want. You set the prices, quantities, and dates when the tickets should be available. And the best part is that once you save this, your attendees can register instantly.
Sometimes people feel scared when they hear about ticketing features because they imagine calculations, payment issues, or complicated settings. But the Odoo 19 ticketing flow for creating an event is surprisingly simple. It feels like adding items to a list rather than configuring a system.
Once again, this shows how comfortable it is to create your first event in the Odoo events app without any confusion.
Odoo 19 Event Setup – Publishing Your Event and Making It Live
Once you complete the form, the agenda, and the tickets, you move to the next most significant step in your Odoo 19 event setup: publishing your event.
When you click “Go to Website,” Odoo opens your event page exactly how your visitors will see it. This moment always feels special because you see all your effort come together into a real event page. And the best thing is that you can edit anything on the spot.
- Want to change the banner? Done.
- Want to adjust the text? Done.
- Want to add a speaker photo? Done.
- Want to highlight your ticket rates? Done.
And once you feel satisfied, you press “Publish.” That single click brings your event live on the internet. Now, anyone can register on your website.
And just like that, you complete your first event using the Odoo 19 events app.
First Event Odoo Events App – Managing Attendees and Understanding Their Journey
After publishing your event, the real experience begins. People start registering. You get notifications. You see new attendees in your dashboard. You can track how many people are joining, which tickets are being selected, and how your promotion is performing.
This part feels very exciting because you watch your event grow step by step. The Odoo 19 events app also gives you options for automated email confirmations, reminders, and follow-up messages. This means your attendees stay informed without you having to check every few minutes.
If your event is happening physically, you can use the check-in feature. Attendees can show their QR code, and you can mark their attendance with one tap. If your event is online, you can share joining links, documents, or recordings directly through the system.
This is why the first event using the Odoo 19 events app feels smooth from creation to completion. You never feel lost. You always know what to click next.
How to Create Event in Odoo with Confidence for Future Events
Once you complete one whole event, you will feel a new level of comfort with the system. Suddenly, you will realize that the next time you create an event, it will take half the time. And then your third event will take even less.
When you follow this guide, your first event in the Odoo 19 events app becomes the foundation for many more. You will experiment with more ticket types, agenda layouts, speaker profiles, and designs.
And every time you use the Odoo 19 events app, your confidence grows. This is how event management becomes enjoyable instead of stressful.
Your First Event Using Odoo 19 Events App Can Start Today
I wrote this entire blog as if I were standing beside you, showing you where to click, how to think, and how to move step by step. If you follow this guide, your first event using the Odoo 19 events app will feel simple, clear, and entirely achievable. Events are not only about screens and settings; they are about people, plans, and ideas. And Odoo 19 provides a calm, friendly space to bring your idea to life.
If you need help with setup, customization, or Odoo implementation, Netilligence is always here to support you. Your first event can begin today, and it can start with confidence.