Accounting with the Chart of Accounts in Odoo 19
Business accounting requires both a structured organization and clear presentation methods to function correctly. The Chart of Accounts in Odoo 19 serves as the fundamental framework that supports financial management operations. Configuring the Odoo 19 Chart of Accounts requires knowledge, as it enables both precise financial reporting and streamlined business operations.
In this guide, we’ll walk you through everything, from creating accounts manually to importing your company’s existing records. By the end, you’ll have complete control over your financial structure in Odoo.
If you’re looking for an Odoo accounting setup tutorial that’s simple, practical, and aligned with real business needs.
Throughout this blog, we’ll explore how to:
✅ Configure the Chart of Accounts in Odoo 19
✅ Customize account types for better financial tracking
✅ Import an existing chart of accounts Odoo ERP file
✅ Connect your setup with journal entries, invoices, and reports
At Netilligence, as an Odoo Partner, we’ve helped hundreds of businesses set up their Odoo accounting systems. Our experts ensure that your Odoo 19 chart of accounts is not just technically configured, but also optimized for your unique business processes.
What is a Chart of Accounts in Odoo 19?
Before configuring, let’s understand what a Chart of Accounts actually means in the Odoo accounting module.
The Chart of Accounts in Odoo 19 encompasses all financial accounts, assets, liabilities, income, expenses, and equity of your company. Your accounting system depends on this fundamental structure to handle all monetary transactions with exactness.
In simpler words, it’s like your business’s financial dictionary; every debit or credit entry passes through it.
Each account has:
- A unique code
- A name describing its purpose
- An account type (Asset, Liability, Expense, etc.)
- A related journal (Sales, Purchase, Bank, etc.)
This modular approach sets Odoo apart from other ERP systems, as it is easy to use, flexible, and compliant with international accounting standards.
Why Configure the Chart of Accounts in Odoo 19 Matters
Setting up your Chart of Accounts correctly in Odoo 19 on the first day of operation will provide you with precise financial data, simplify audit processes, and enhance operational efficiency.
The following reasons explain why this process stands as a critical step.
Accurate Financial Tracking:
The system automatically links all financial transactions to their designated accounts for customer invoices and vendor bills.
Simplified Tax Reporting:
The system ensures tax authority compliance through its automated reporting system, which generates precise, real-time reports.
Data Consistency:
The implementation of standardized account codes prevents both duplicate entries and account confusion.
Time Savings:
The automated setup process in the Odoo accounting setup tutorial enables your finance team to dedicate their time to analysis instead of performing manual data entry.
Scalability:
The chart of accounts system in Odoo adapts to business expansion by supporting operations across multiple branches.
Step-by-Step: How to Configure the Chart of Accounts in Odoo 19
We will begin by configuring the Chart of Accounts in Odoo 19 from scratch.
The process will be divided into smaller sections, enabling users to understand each step better.
Step 1: Activate the Accounting Module
First, ensure that the Accounting module is installed in your Odoo 19 instance.
- Go to Apps → search for “Accounting.”
- Click Install.
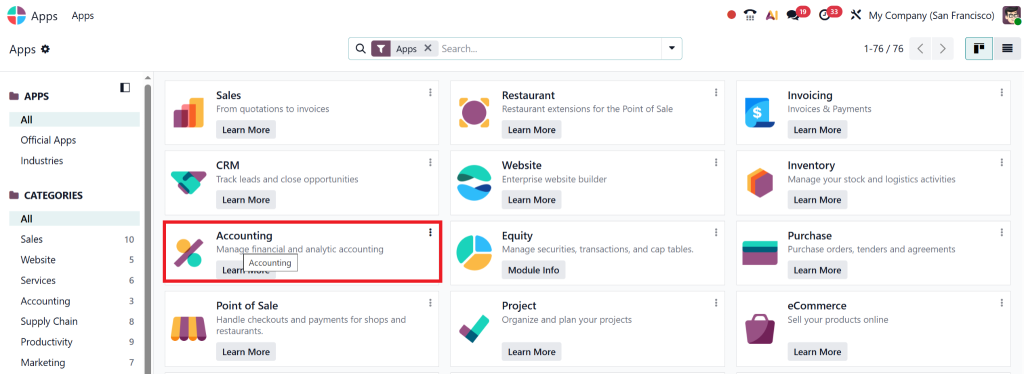
This section is where all your financial accounts will live.
Step 2: Create Accounts Odoo 19
If you need to add custom accounts, Odoo makes it easy:
- Go to Accounting → Configuration → Chart of Accounts
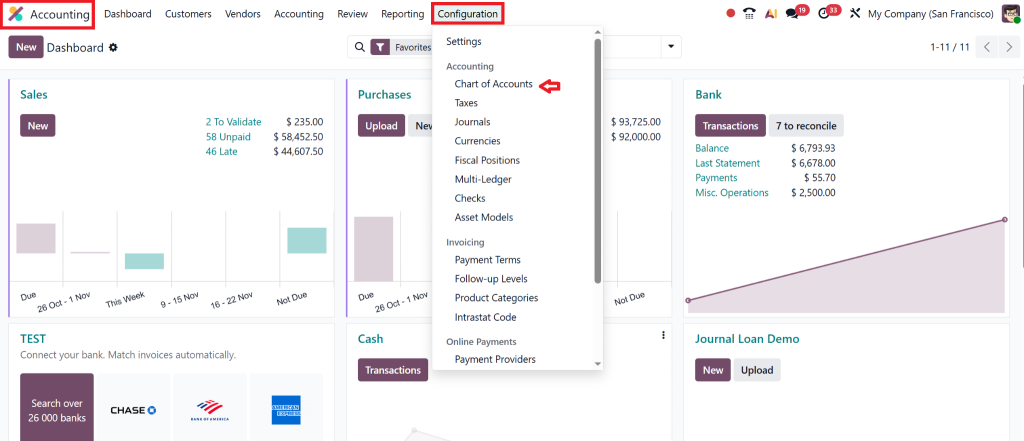
- Click Create New”.
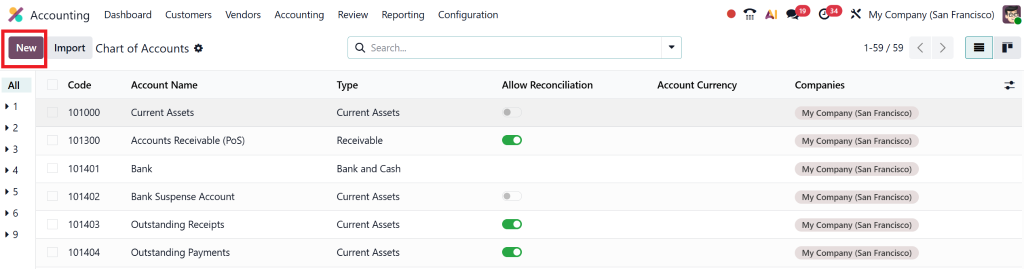
- Fill in these fields:
- Code: A unique number (e.g., 1010000 for Cash)
- Account Name: e.g., Cash in Hand
- Type: Select from predefined categories (Asset, Liability, Income, Expense, etc.)
- Allowed Journal: Choose journals related to this account (Bank, Sales, Purchase, etc.)
- Click Save
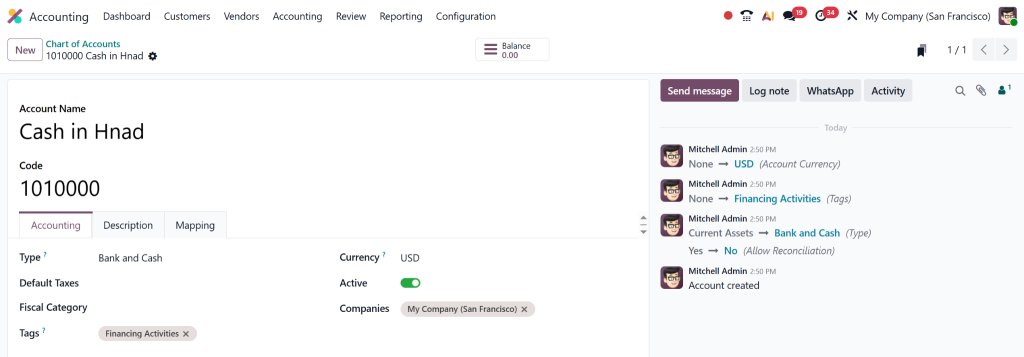
You’ve now successfully added a new account to your Odoo 19 chart of accounts!
Step 3: Use Predefined Templates
One of the best features in Odoo 19 accounting setup is that it comes with predefined templates based on localization (country-specific rules).
For instance, if you select “United States – Chart of Accounts” or “Oman – Chart of Accounts,” Odoo automatically loads standard account codes and types.
To use templates:
- Go to Settings → Accounting → Fiscal Localization
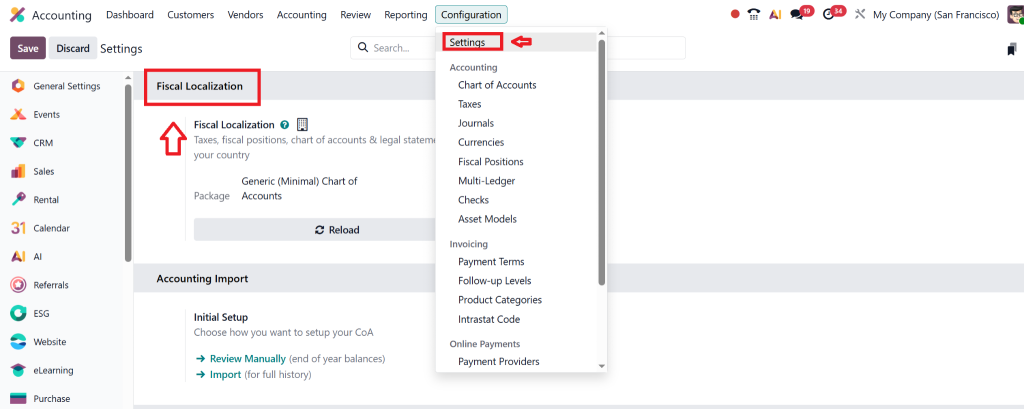
- Select your country and install the localization package.
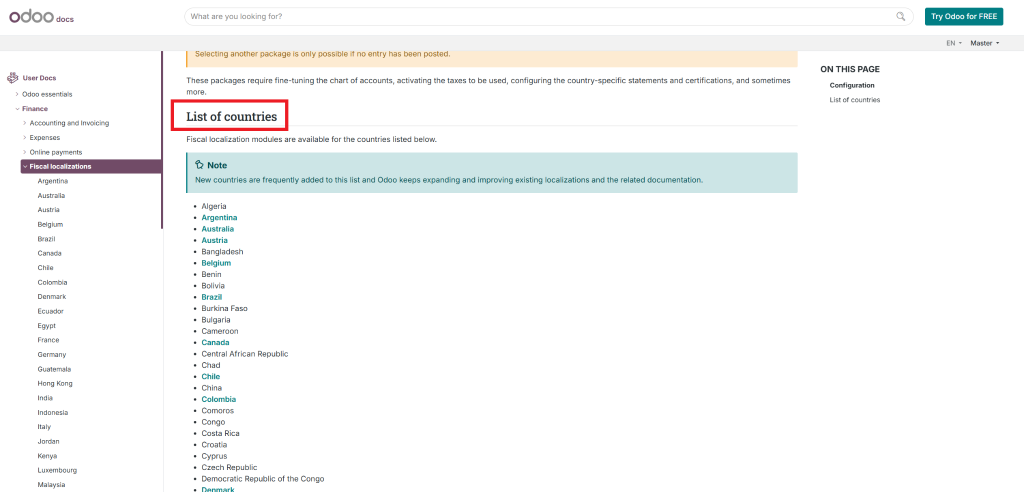
- Odoo automatically imports standard accounts.
This feature saves hours of manual setup and ensures compliance with local accounting laws.
Step 4: Import the Chart of Accounts Odoo
Do you already have your company’s chart of accounts in Excel or CSV format? Odoo makes importing it simple.
- Go to Accounts→ Select Favorites → Import Records from the menu.
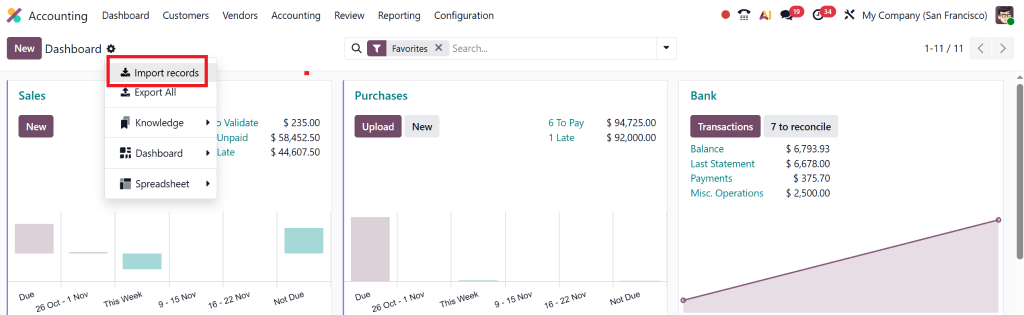
- Choose the file you want to upload from the following steps, which show how to import the chart of accounts into Odoo:
- Access Accounting → Configuration → Chart your system (CSV/XLSX format).
- Ensure your file columns match the corresponding fields in Odoo (e.g., Account Code, Name, Type).
- Start the import process by clicking Import.
The method enables users to transfer their data from previous ERP systems and accounting software systems.
Step 5: Configure Default Accounts
You can assign default accounts for specific financial operations. For example:
- Receivable Account → Customer Invoices
- Payable Account → Vendor Bills
- Expense Account → Purchase transactions
To set defaults:
- Go to Accounting → Configuration → Settings
- Under Default Accounts, assign the relevant accounts for each function
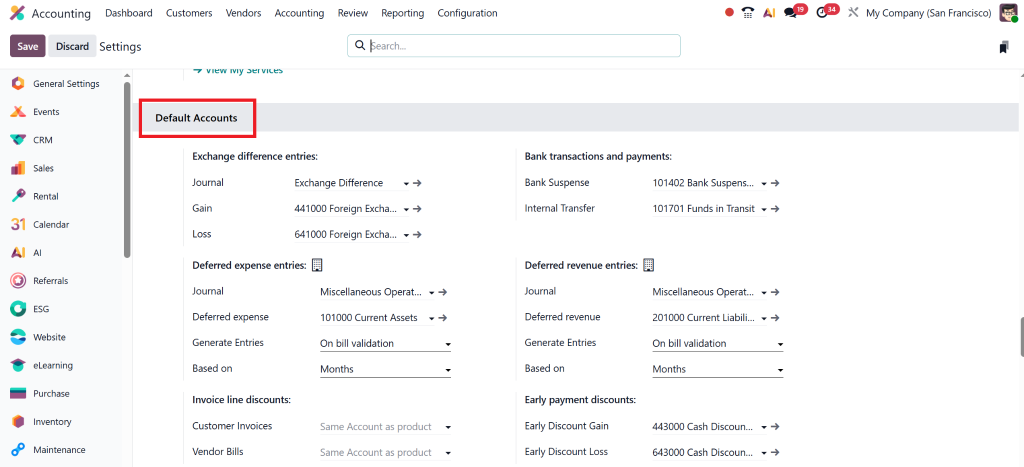
This ensures Odoo automatically selects the correct account every time a transaction occurs.
Once your chart is configured correctly, you can also deepen your financial insights by leveraging invoice-level analytics. For a step-by-step guide on how to perform invoice analysis in Odoo 19, see our detailed blog post How to Perform Invoice Analysis in Odoo 19 Accounting.
Step 6: Group and Classify Accounts
To maintain a clean and structured chart of accounts, Odoo ERP groups accounts.
For example:
- Assets (1000–1999)
- Liabilities (2000–2999)
- Revenue (4000–4999)
- Expenses (5000–5999)
This logical structure facilitates quick reporting and informed decision-making.
Step 7: Verify Your Chart of Accounts Setup
Once your configuration is done, review your setup:
✅ Go to Accounting → Reporting → General Ledger
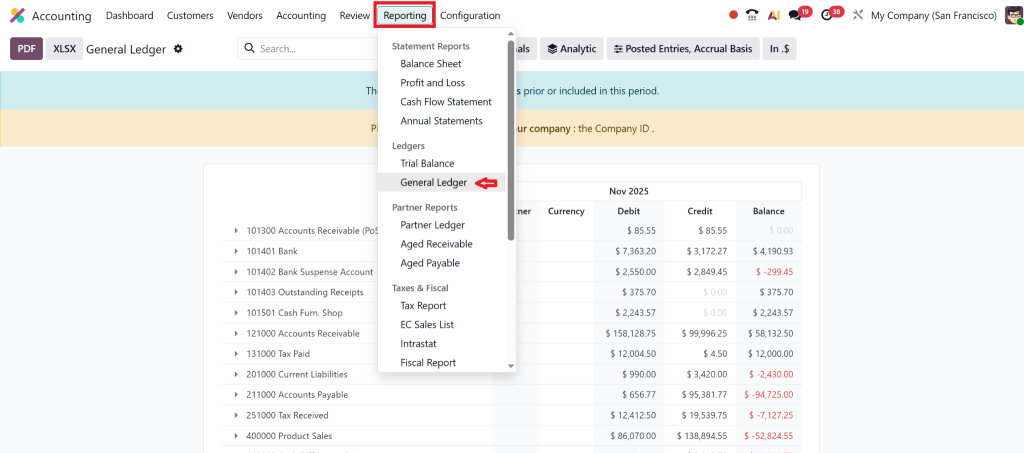
✅ Generate a few sample invoices and payments
✅ Check if the correct accounts are being used automatically
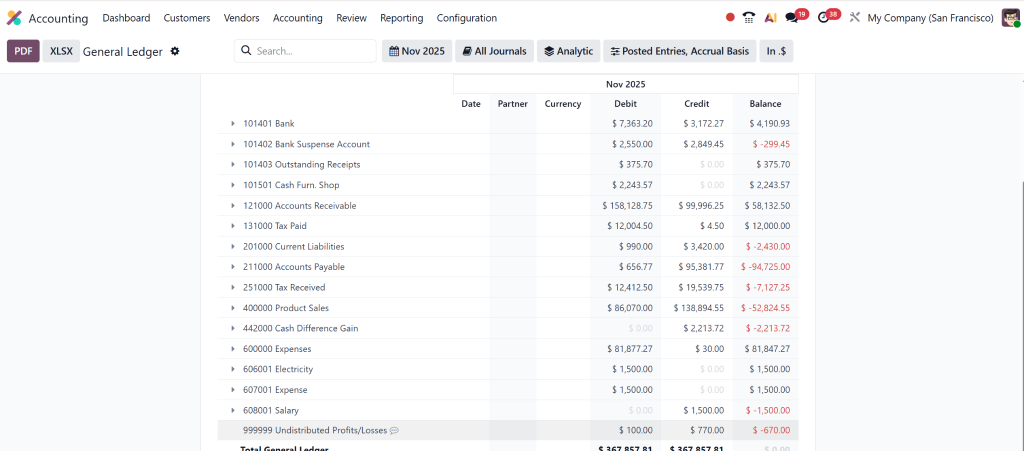
If all looks good, congratulations! You’ve completed your Odoo accounting module configuration.
Best Practices for Managing the Chart of Accounts in Odoo 19
After setting up your Chart of Accounts in Odoo 19, follow these best practices to maintain accuracy and efficiency:
1. Avoid Redundant Accounts
Please don’t avoid creating multiple accounts for the same purpose, as this can complicate reporting.
2. Use Meaningful Codes
Choose codes that reflect hierarchy or function, such as 1000 for “Cash,” 1100 for “Bank,” etc.
3. Regularly Review Accounts
Conduct quarterly audits to identify and close accounts that are unused or inactive.
4. Odoo Reports
Utilize built-in reports, such as Trial Balance, Balance Sheet, and Profit and Loss (P&L), to ensure accuracy.
5. Use Localization Packages
Always install the correct localization for your country to ensure compliance with local regulations.
How Netilligence Can Help You Configure the Chart of Accounts in Odoo 19
At Netilligence, we understand that every business has unique accounting needs. As an Odoo Partner, our certified consultants specialize in customizing and configuring Odoo for diverse industries, ensuring seamless accounting solutions.
Here’s what we offer:
- Complete Odoo accounting module configuration
- Migration from traditional accounting systems
- Country-specific localization setup
- Chart of accounts optimization and automation
- Dedicated post-implementation support
Build a Strong Financial Foundation with Odoo 19
Configuring the Chart of Accounts in Odoo 19 is not just a technical step; it’s a strategic investment in your company’s financial clarity and transparency.
With proper setup, you’ll experience:
- Real-time insights into business performance
- Automated financial operations
- Error-free tax reporting
- Seamless integration with sales, purchase, and inventory
Odoo 19 makes it easier than ever to transform accounting into a growth-driven process.
And with Netilligence, your trusted Odoo Partner, you get the expertise to make that transformation smooth, compliant, and efficient.