Creating and managing rental services has become easier and more structured with Odoo 19. If your business rents products rather than sells them permanently, knowing how to create a rental order in Odoo 19 is no longer optional; it’s essential. Whether you rent equipment, machinery, vehicles, or event items, Odoo provides a smooth system to manage everything from quotations to returns.
In this guide, we will explain how to create a rental order in Odoo 19 in a practical and easy way. This blog is designed for business owners, operations managers, and ERP users who want to understand the Odoo 19 rental module tutorial without confusion. You’ll learn how to create a rental order in Odoo 19 step by step, how rental quotations work, and how rental products are configured.
If you ever felt stuck while trying to create a rental order in Odoo 19, or you didn’t know where to start with the Odoo 19 rental module tutorial, this blog is written exactly for you. By the time you reach the end, you won’t just know how to create a rental order in Odoo 19; you’ll feel confident doing it again and again.
Understanding the Odoo 19 Rental Module Tutorial Before You Start
Before jumping into clicks and screens, let’s slow down for a moment. The Odoo 19 rental module tutorial is not just about creating orders. It’s about understanding how rentals actually move inside the system. Odoo treats rentals differently from sales, and once you understand that difference, everything becomes easier.
The rental module allows you to offer products for a specific time period. Instead of selling a product once, you rent it, get it back, and rent it again. Odoo keeps track of when the product leaves, when it should return, and whether it is available to the next customer. This is the core idea behind every Odoo rental order step-by-step flow.
Rental Product Odoo 19 Setup: The First Problem Most People Face
Most people struggle not because rental orders are difficult, but because the Odoo 19 rental product setup is incomplete. If the product is not prepared correctly, rental orders will never work the way you expect.
When you create a product in Odoo, you must tell the system that this product is meant for rent. This small step changes everything. Once the rental option is enabled, Odoo treats that product as something that moves out and comes back, rather than something that disappears after sale.
In the Odoo 19 rental product setup, you also define how the rental price is calculated. Some businesses charge per day, per week, or per month. Odoo lets you define all of this within the product itself. This way, when you later create a rental quotation, pricing is already handled. This step alone solves a huge problem for businesses that keep recalculating rental prices manually.
Why Creating a Rental Quotation in Odoo 19 Matters
Now let’s talk about something that many people ignore: the Odoo 19 rental quotation. A rental quotation is not just a draft. It serves as the basis for your rental agreement with the customer.
When you create a rental quotation, you define the customer, the rented product, and the rental period. Odoo then calculates the price based on the rental rules you set during the rental product setup in Odoo 19.
The good thing about an Odoo 19 rental quotation is that you can change dates and instantly see how pricing changes. This helps you answer customer questions quickly, without guessing or opening spreadsheets.
Odoo Rental Order Step by Step: From Quotation to Confirmation
Now comes the part everyone searches for: the Odoo rental order step-by-step. Once your rental quotation is ready and the customer agrees, you simply confirm it. That’s the moment when the quotation becomes a rental order. From here, Odoo automatically starts tracking everything.
The system reserves the product for the selected rental dates. This means the same product cannot be rented to someone else during that time. This single feature helps businesses avoid double bookings, a common problem in rental operations.
Understanding this Odoo rental order step-by-step flow shows that Odoo is not just storing data; it is actually managing your rental process.
How to Create a Rental Order in Odoo 19 and What Happens Next
When you finally create a rental order in Odoo 19, many things happen quietly in the background. Inventory gets updated. Availability is blocked for those dates. Delivery orders are prepared.
This is where businesses start feeling relief. Instead of chasing teams and manually updating records, Odoo keeps everything connected.
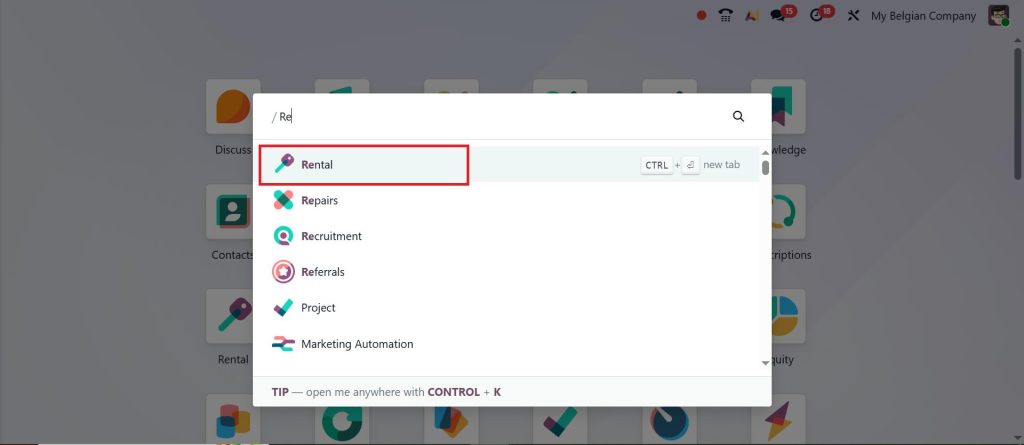
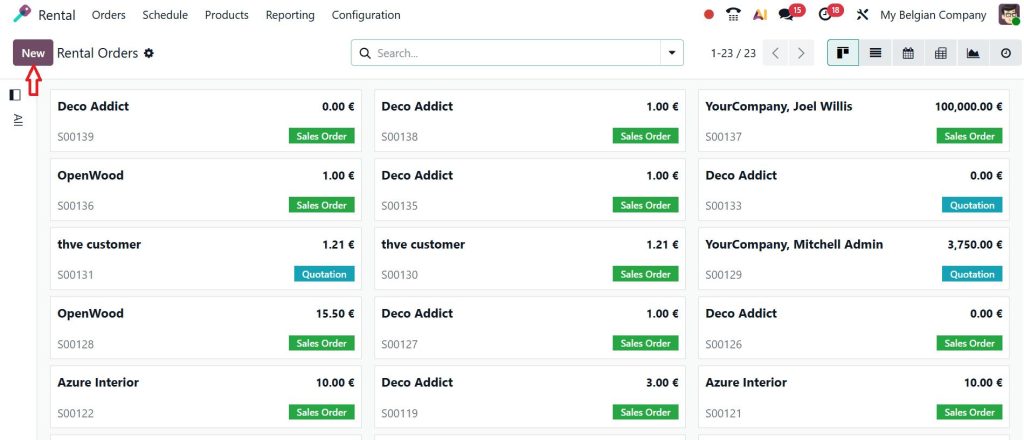
After you create a rental order in Odoo 19, the product is marked as outgoing. Once the product leaves your warehouse, you validate the delivery. Odoo then knows that the rental period has officially started. So, let’s create a rental order in Odoo 19 by clicking on the Rental module.
Click New.
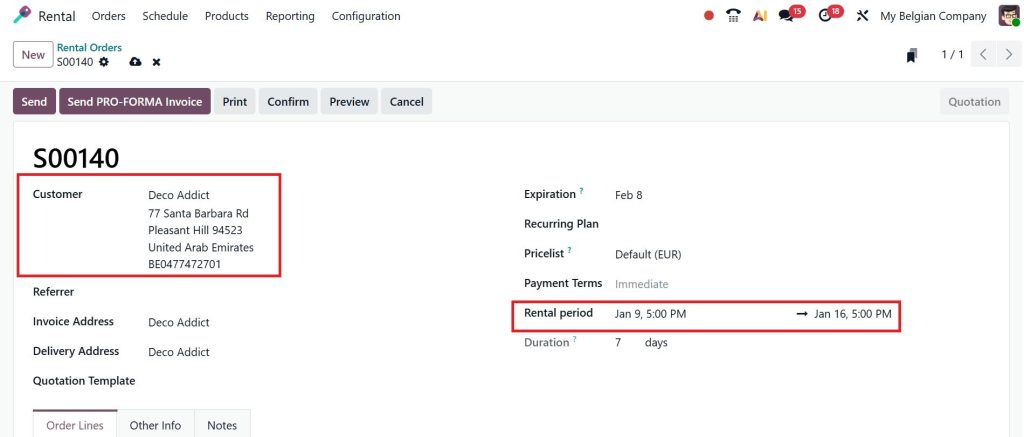
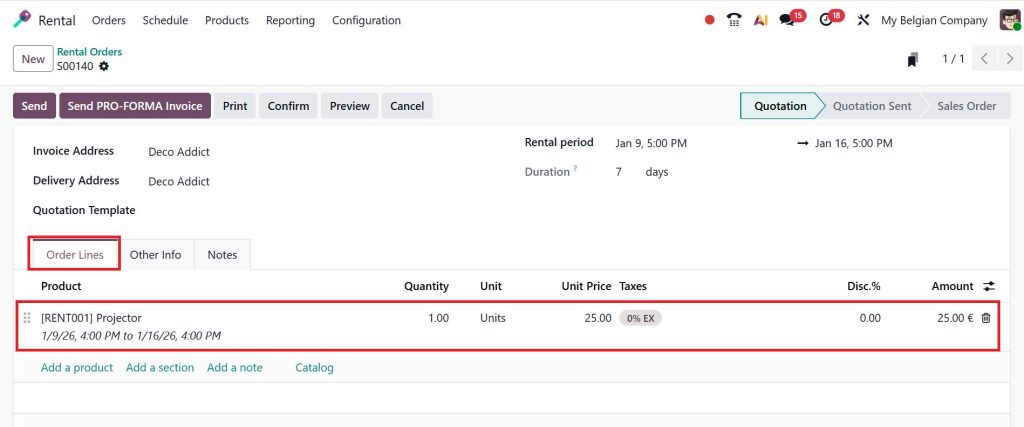
Select the Customer and add the Rental Period.
Scroll down and, under the order line tab, add the product you want to rent.
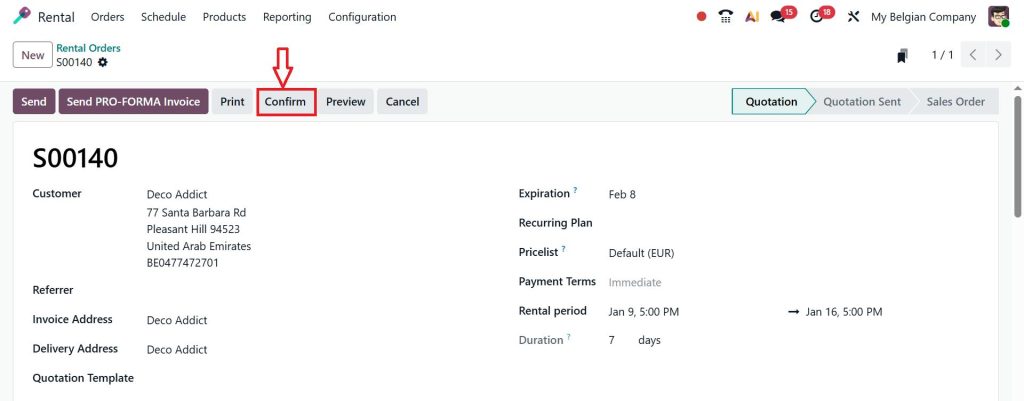
Confirm the rental order.
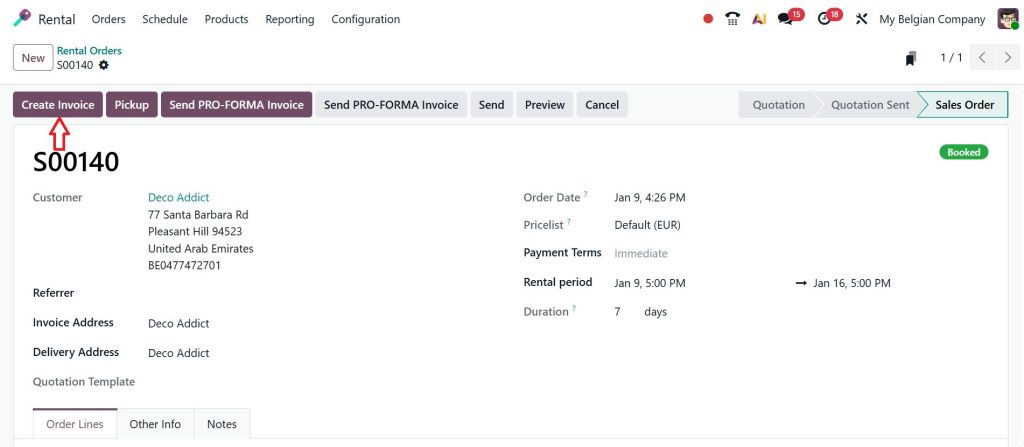
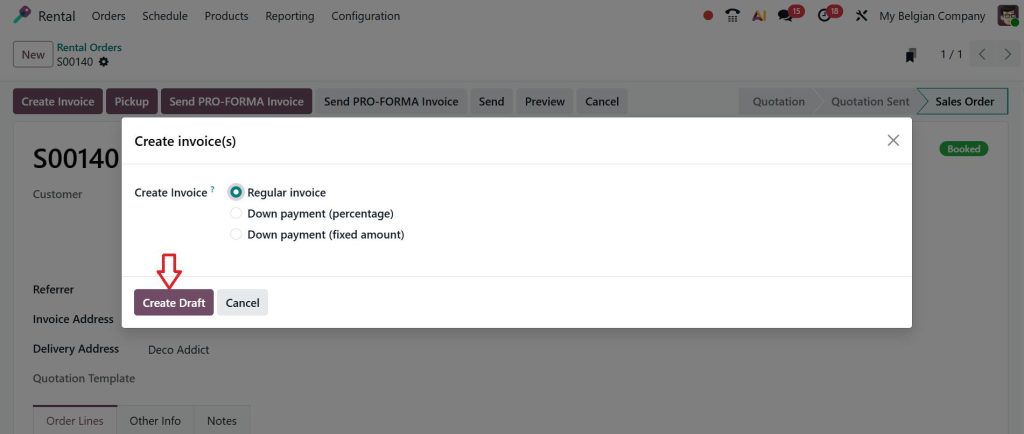
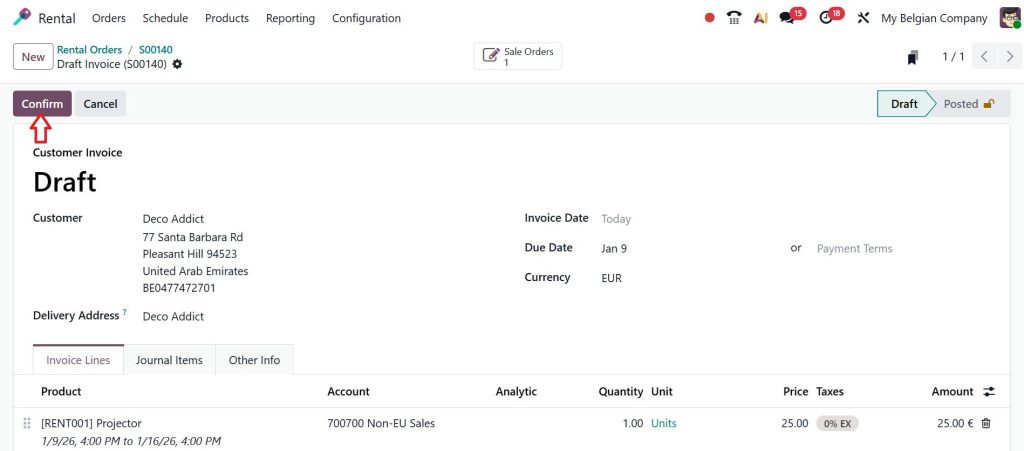
Let’s create an invoice.
Click on Create Draft.
Click the Confirm button.
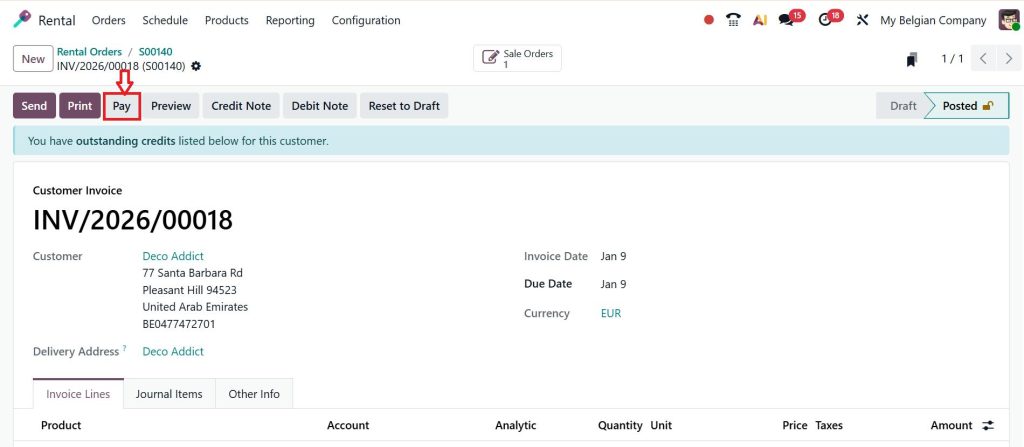
Now let’s create a payment by clicking on Pay.
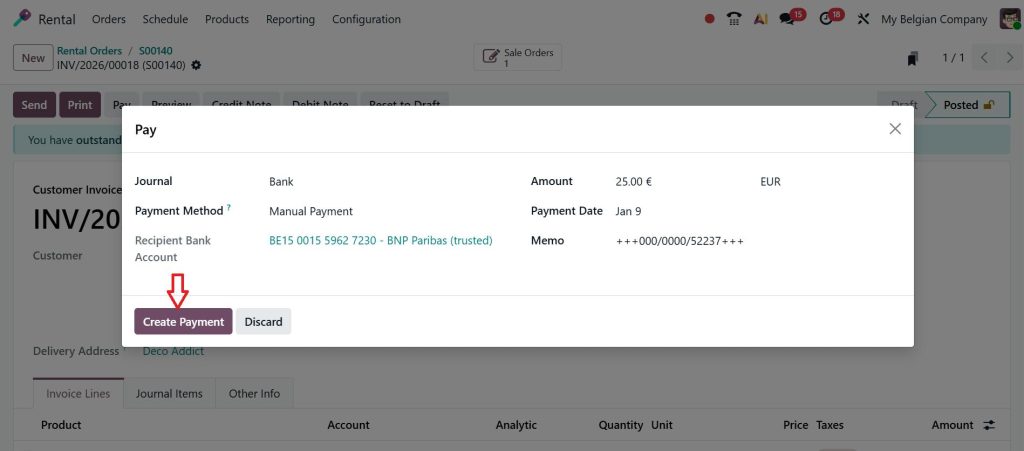
Click on Create Payment.
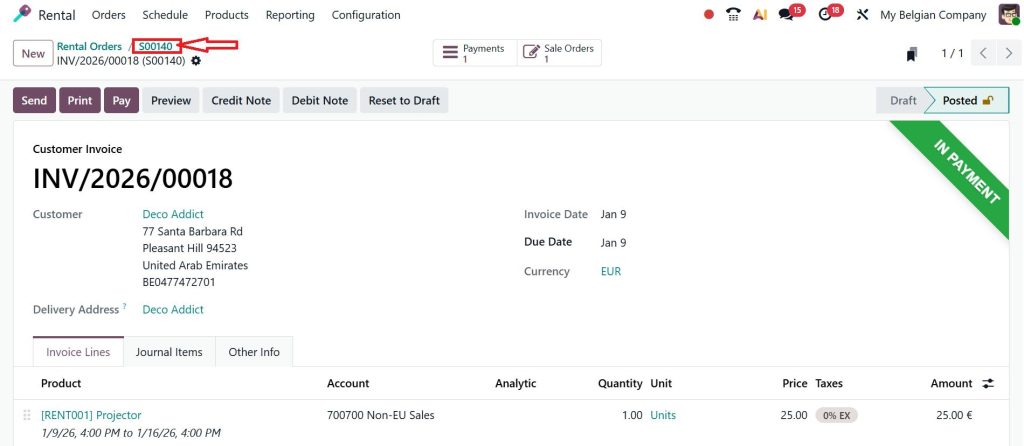
As you can see, this is in the payment state. Now let’s move back to the rental order.
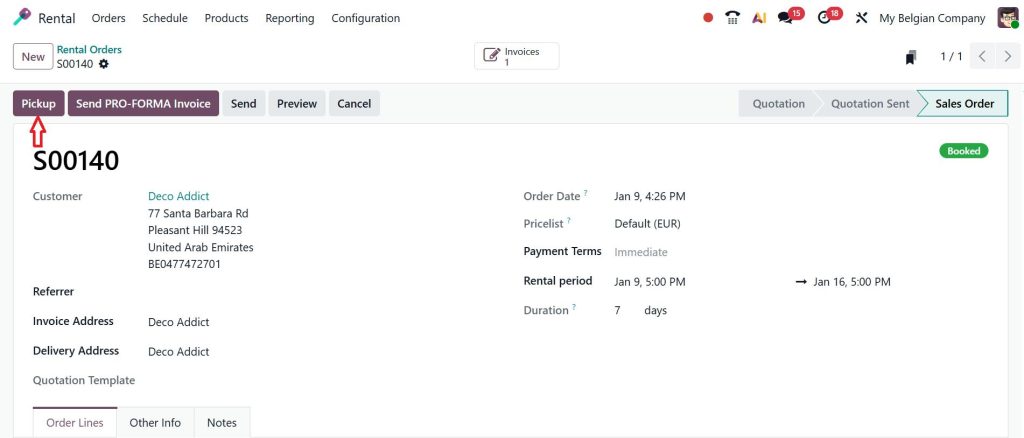
Here, you can find a new button labeled “Pickup.” If you want to pick up the product, click on Pickup.
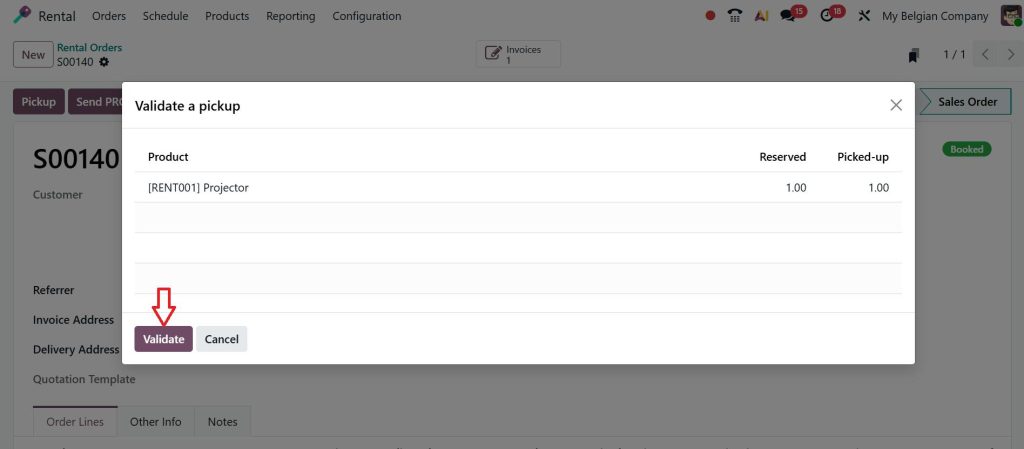
Validate a Pickup.
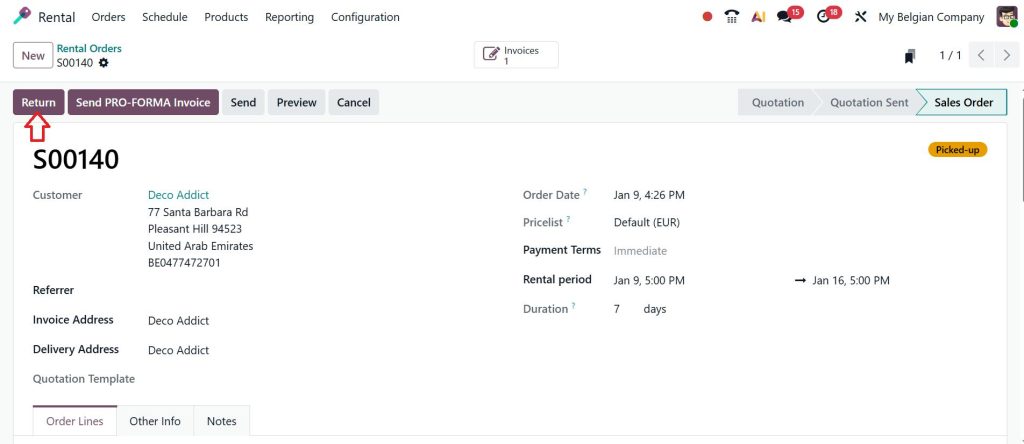
After the pickup is done, you can find the stage moved into the pickup. Now, let’s return the product by clicking the Return button.
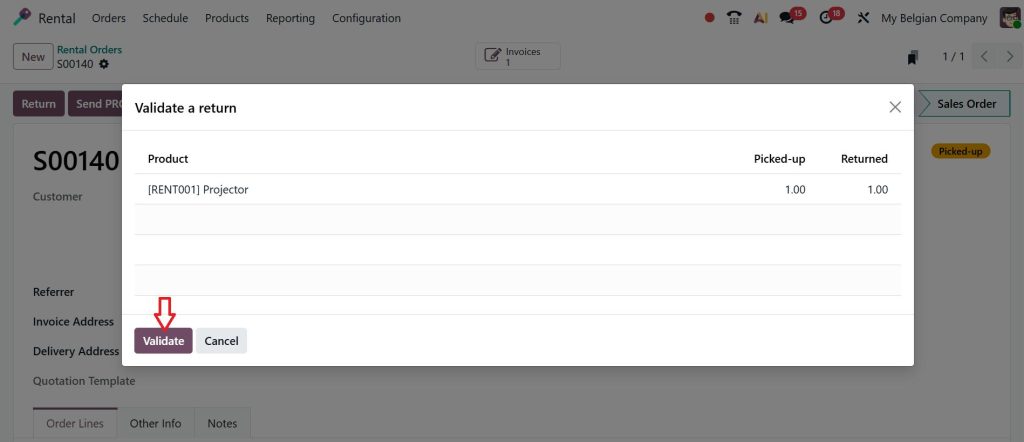
Validate a return.
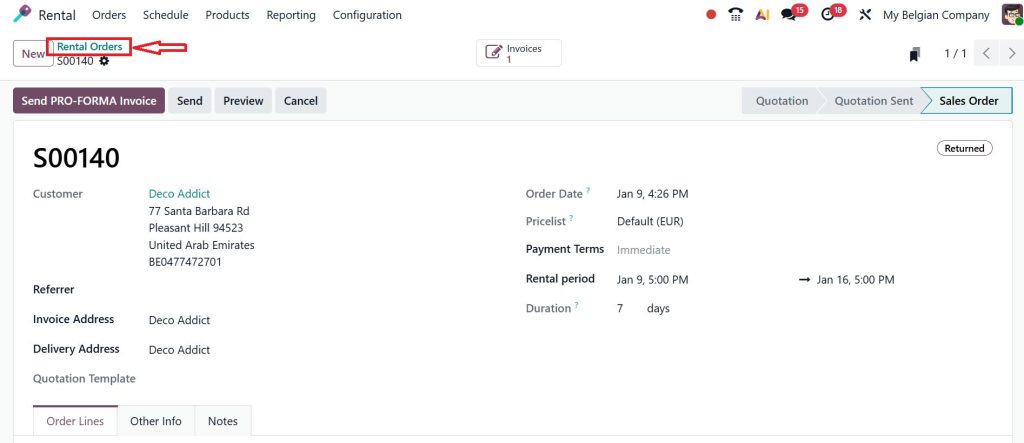
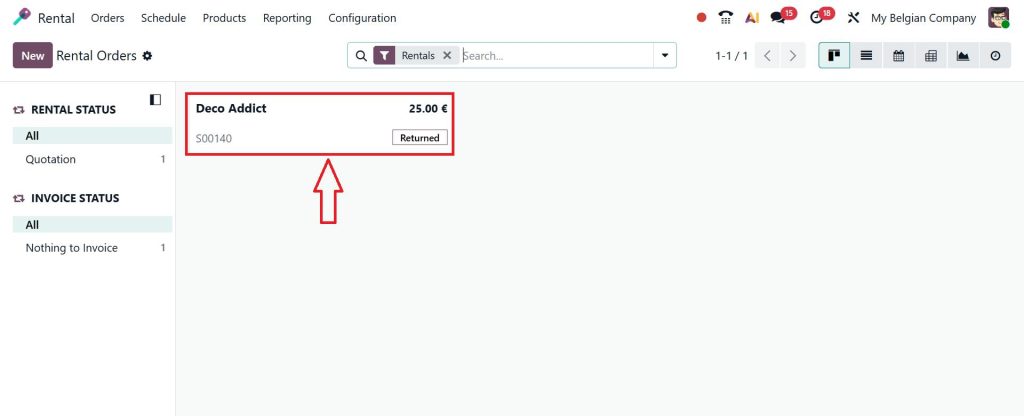
Now that we are done, let’s return to the Rental Orders.
Here, you can find the Deco Addict, which is a product render it is returned.
Managing Rental Duration Without Confusion
Rental duration is one of the biggest causes of mistakes in rental businesses. A single wrong date can lead to lost revenue or customer complaints.
Odoo handles this smartly. When you set start and end dates during the rental quotation, those dates are automatically carried over to the rental order. If dates change, pricing updates. If dates overlap, Odoo alerts you.
This is another reason why learning to properly create a rental order in Odoo 19 is so important. When done correctly, date-related problems almost disappear.
Handling Rental Returns in Odoo 19 Without Stress
Now let’s talk about returns, because rentals don’t end when products go out. They end when products come back.
When a customer returns a rented item, you simply open the rental order and process the return. Odoo updates inventory instantly. The product becomes available again for future rentals.
If a return is late, you can see that too. This gives you the option to charge extra if your business policy allows it. This level of control is something manual systems fail to provide.
Invoicing After You Create a Rental Order in Odoo 19
Another common problem businesses face is billing. Some invoice upfront, some invoice after return, and some do partial billing.
Odoo supports all these cases. Once you create a rental order in Odoo 19, invoicing becomes part of the same workflow. You don’t need a separate system or extra steps. Invoices are linked directly to the rental order, which means fewer mistakes and clear records.
Why the Odoo 19 Rental Module Tutorial Makes Daily Work Easier
The real value of following an Odoo 19 rental module tutorial is not just learning features, but reducing daily confusion. When rental products, quotations, orders, deliveries, returns, and invoices all talk to each other, work becomes calmer.
You stop worrying about missed dates. You stop guessing availability. You stop fixing errors caused by manual handling.
Common Issues People Face While Creating Rental Orders
Most issues happen when people skip steps. They forget the Odoo 19 rental product setup, rush through the Odoo 19 rental quotation, or don’t follow the Odoo rental order step-by-step flow.
When these steps are followed in order, rental management becomes predictable and controlled.
How Netilligence Helps You Create a Rental Order in Odoo 19 the Right Way
At Netilligence, we work closely with businesses that want to use Odoo for rentals but feel overwhelmed at the start. We help you understand how to create a rental order in Odoo 19 that fits your daily operations.
From proper product setup to rental workflows and reporting, our focus is always on ensuring the system supports your work rather than slowing you down.
A Clear Way to Create a Rental Order in Odoo 19
Now you’ve seen that creating a rental order doesn’t have to feel confusing or heavy. When you understand how rental products are set up, how rental quotations work, and how the rental order moves step by step, everything starts to feel more controlled and clear. Odoo 19 provides a robust structure for managing rental dates, availability, returns, and billing without relying on manual follow-ups or scattered records.
If you want your rental process in Odoo 19 to work smoothly from day one, the right setup and guidance make a real difference. At Netilligence, we help businesses configure rental workflows that actually match how they work on a daily basis.
If you’re planning to set up rentals in Odoo 19 or want to improve how your current rental orders are handled, get in touch with Netilligence today, and let’s discuss how we can support your rental operations the right way.
Hi, I'm Ilsa Shabbir, an Odoo ERP content writer specializing in functional blogs on Odoo modules. I simplify complex Odoo features, creating clear and engaging content to help businesses understand and optimize their ERP solutions.
We use cookies to ensure that we give you the best experience on our website. If you continue to use this site we will assume that you are happy with it.