Why Most Restaurant Floor Plan in Odoo 19 Point of Sale Setups Fail During Rush Hours
Let me start with something you’ve probably experienced. Everything looks fine when the restaurant is half empty. Staff is relaxed, orders are going smoothly, and you feel like your system is working. Then rush hour hits.
Suddenly, one waiter is asking which table is free, another is trying to remember where an order belongs, and someone at the counter is double-checking everything again. And you’re standing there thinking, “Why is this getting so messy?” In most cases, the issue is not your team. It’s how your restaurant floor plan in Odoo 19 Point of Sale is set up.
I’ve seen restaurants using Odoo, but still struggling, not because the system is complicated, but because the layout inside it doesn’t match what’s happening on the floor. So instead of helping, it creates more confusion.
How to Design Restaurant Layout in Odoo 19 POS Before Even Opening Odoo
Before you open Odoo, take a step back. Please, don’t jump into the system yet. When you think about how to design a restaurant layout in Odoo 19 POS, the biggest mistake is starting directly on the screen. Instead, think about your actual space.
- Which tables are used the most?
- Where do customers prefer to sit?
- Where does your staff face the most difficulty moving around?
Because if your digital layout doesn’t reflect your real setup, your staff will never fully rely on it. Once you’re clear on this, then go into Odoo and create floors based on real sections, indoor, outdoor, family area, or anything that makes sense for your restaurant. This small step changes everything later.
What People Miss When They Configure Restaurant Floor Plan Odoo 19 & Regret Later
When you configure the restaurant floor plan in Odoo 19, it’s tempting to just add tables quickly and move on. But this is where problems start. Let me explain why.
If your table names are unclear, your staff will keep asking each other instead of trusting the system. If capacities are not set, seating decisions become guesswork. And during busy hours, guesswork slows everything down.
So, keep it simple:
- Clear table names.
- Correct seating capacity.
- Logical placement.
Also, Odoo shows table status visually. This is something you should actually rely on. Instead of asking around, your team should be able to glance at the screen and know what’s happening. When this part is done right, your system starts supporting your team instead of confusing them.
How to Design Your Restaurant Floor Plan in Odoo 19 Point of Sale: A Step-By-Step Guide
Think of your POS screen as a digital version of your restaurant. Everything you create here should match your real-world setup. Open the Point of Sale module from your Odoo 19 dashboard.
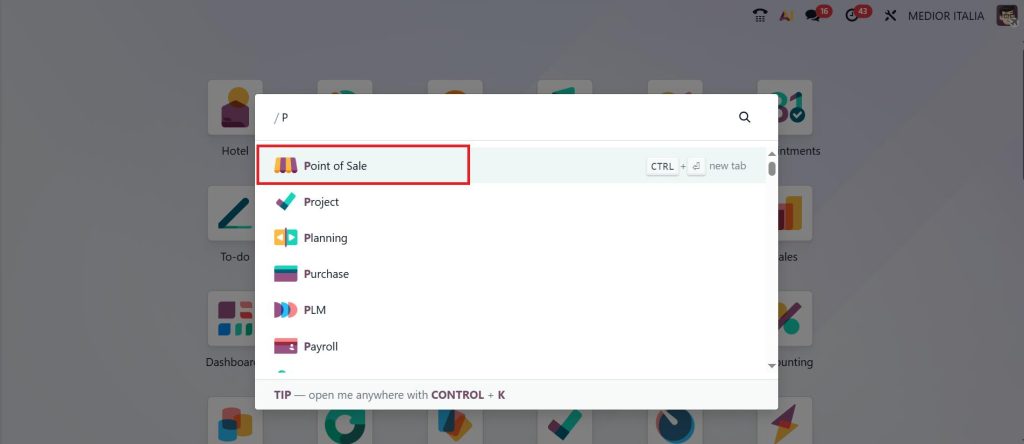
Go to Configuration > Floor Plans.
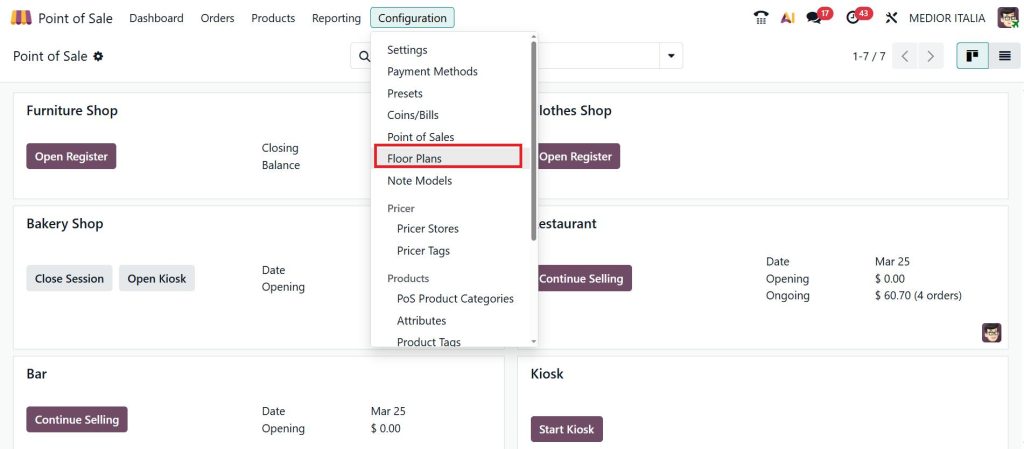
Click on the New button.
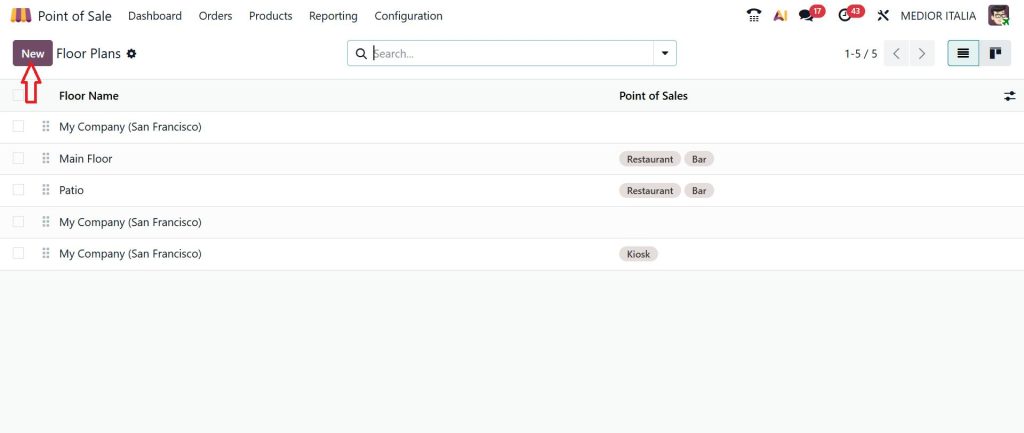
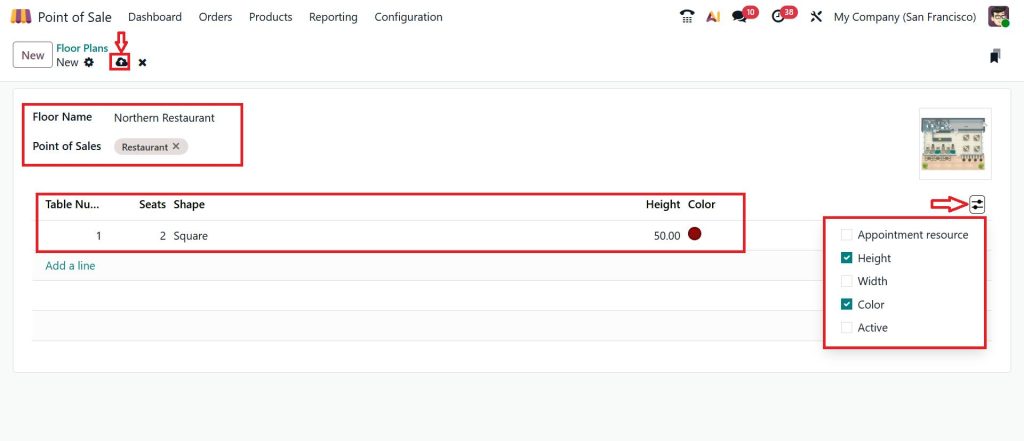
First, we will give our new floor plan a name called Northern Restaurant. Then, we will select the related point of sale that this floor will be linked to. Also, you can upload the background image that represents the restaurant layout. Next, we will set the table details such as table number, number of seats, table shape and colour, etc. For this example, let’s create table number one with two seats, select a square shape and red colour. You can also activate additional settings by clicking on the settings icon and selecting table height, width and colour. Now, let’s Save the changes.
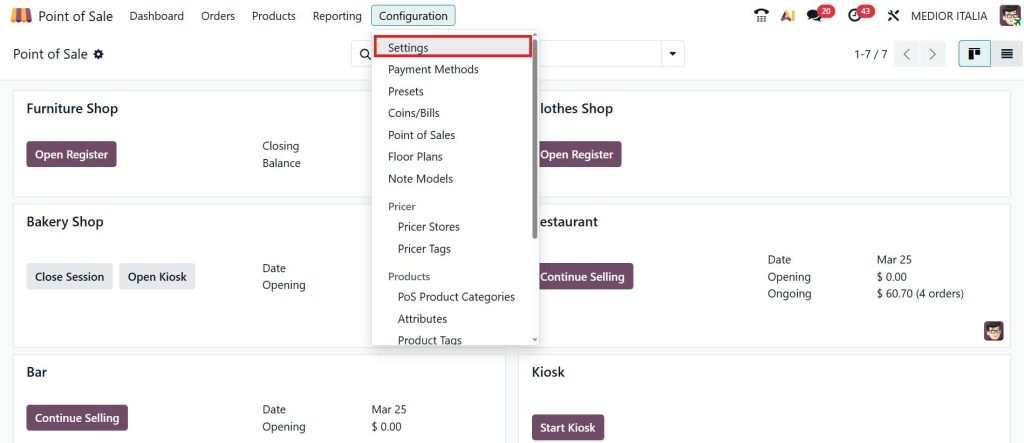
Let’s apply our newly created northern restauran floor into our restaurant. Direct to the Configuration > Settings.
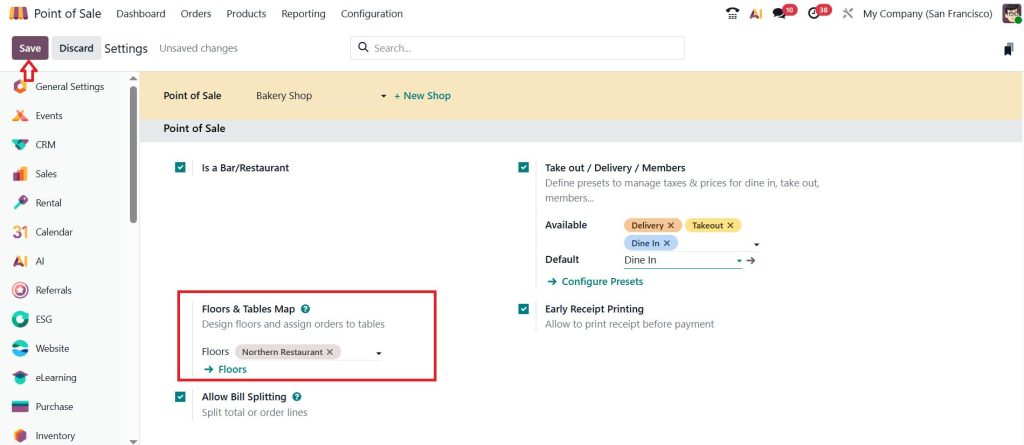
Under the POS section click on the arrow button to select our Northern Restaurant floor and click Save.
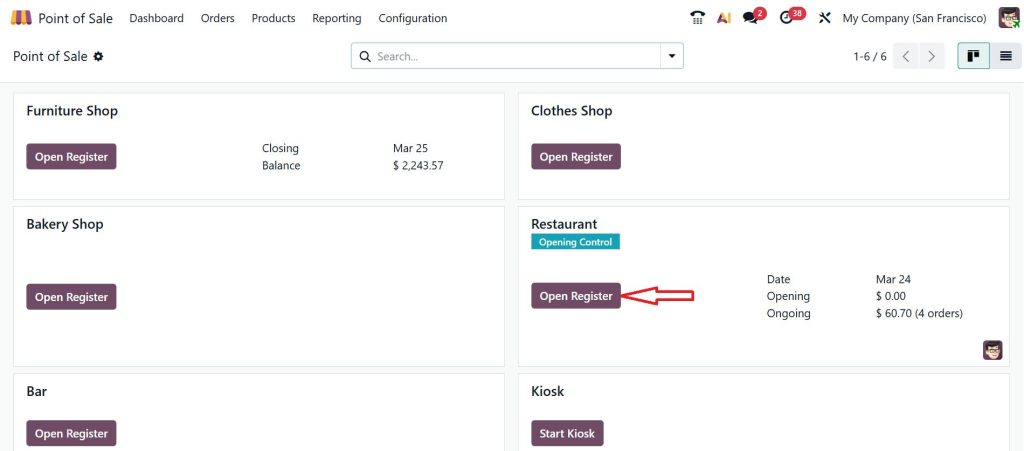
The new floor plan is assigned to our restaurant. Click on Open Register.
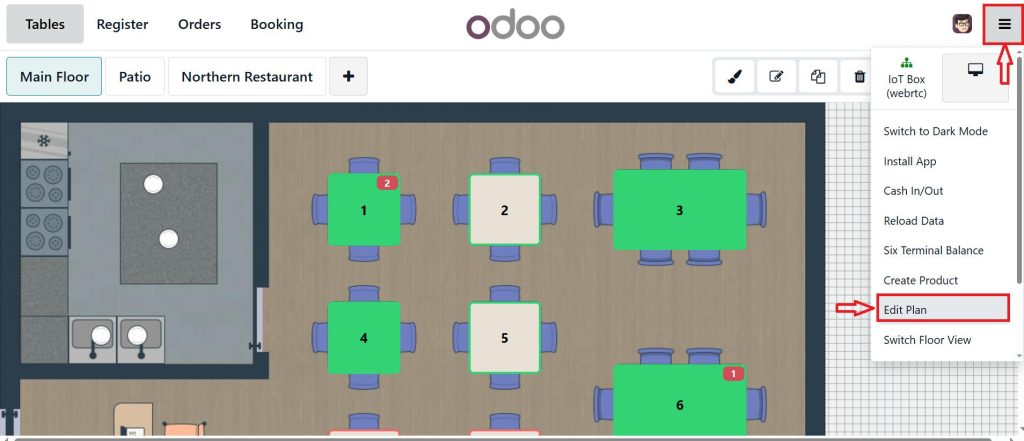
We can switch to the front end to customize the floor plan layout. On the floor plan screen click the four-lines (☰) menu in the top right corner of the view, then select Edit Plan.
From here, we will position our created shapes into the template tables by adjusting the size of each shape, updating the number of guests and changing the colors. In the top right corner of the screen, the additional buttons appear such as table, color, seats, shape,clone etc. Once all tables are properly arranged and customized, we can click Save button to preserve our changes.
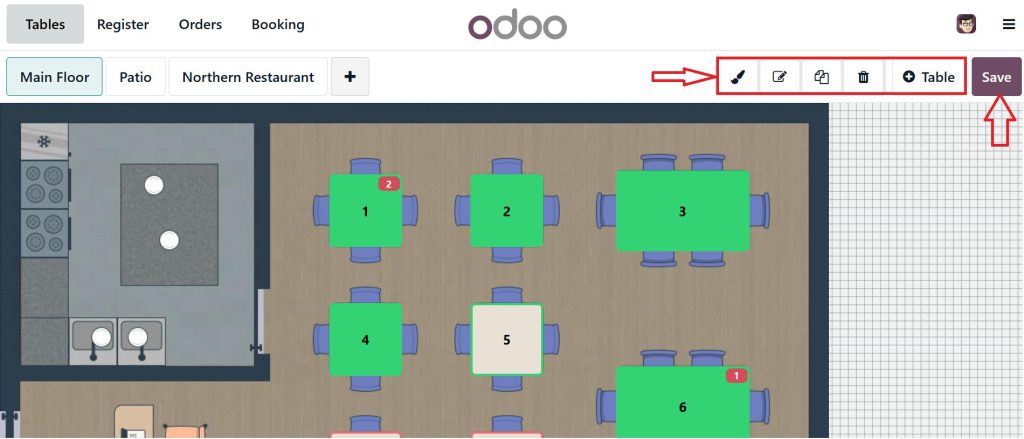
And that’s how you can create a brand new floor plan and customize your tables for smooth table selection and management.
Why Your Odoo 19 POS Table Setup and Seating Plan is Affecting Service Speed
Your Odoo 19 POS table setup and seating plan directly affect how fast your team works. And this is something many restaurant owners don’t realize.
- If tables are too close, movement becomes difficult.
- If placement is random, staff waste time figuring things out.
- If there’s no structure, everything feels slower.
Now think about the opposite.
- Tables are spaced properly.
- Similar tables are grouped.
- Paths are clear.
Suddenly, everything feels easier. Waiters don’t have to think twice. Orders move faster. Customers don’t feel delays. This is not about making your layout look good. It’s about making your daily operations smoother.
Small Changes That Make a Big Difference When You Customize POS Layout Odoo 19 Restaurant
You don’t need to redesign everything from scratch. Sometimes, small adjustments are enough. When you customize the POS layout of an Odoo 19 restaurant, try simple changes first.
- Move tables slightly to create better space.
- Resize tables so they match real capacity.
- Create small sections inside bigger areas.
These changes might feel minor, but your staff will notice the difference immediately. Also, don’t be afraid to update your layout regularly. Your restaurant is not static, so your system shouldn’t be either.
What a Smart Restaurant Seating Arrangement Odoo 19 POS Actually Looks Like in Real Life
Let’s talk about something your customers feel instantly, which is seating. A good restaurant seating arrangement is not just about fitting more tables. It’s about balance.
Customers don’t want to sit too close to others. They also don’t want to feel isolated in an empty corner. So, you need to think from their perspective.
- Place high-demand tables where access is easy.
- Keep quieter tables in corners.
- Use smaller tables near the entrance for quick seating.
These small decisions improve the overall experience without needing extra effort. And when customers feel comfortable, everything else becomes easier.
A Simple and Practical Odoo 19 Floor Plan Tutorial for Restaurants You Can Actually Follow
If you’re feeling like this is a lot, don’t worry. Let’s simplify it. Here’s a practical Odoo 19 floor plan tutorial for restaurants you can follow:
- Start with your real layout in mind.
- Create floors based on actual sections.
- Add tables with the correct sizes.
- Leave space for movement.
- Set names and capacities properly.
- Review everything as if it’s a busy hour.
That’s it. No complicated steps. Just a clear approach.
Ready to Fix Your Restaurant Floor Plan in Odoo 19 Point of Sale? Start with These Simple Changes Today
At this point, you don’t need more theory. You already know where things start going wrong, especially during busy hours when your team depends on the system, and it doesn’t support them properly. So, instead of delaying it, start small. Open your current restaurant floor plan in Odoo 19 point of sale and review it honestly.
Ask yourself:
- Does this layout match my real restaurant?
- Can my staff understand it without asking again and again?
- Is there enough space for smooth movement?
- Are table names and seating capacity clearly defined?
If even one of these feels off, that’s exactly where you should begin. You don’t need to redesign everything in one go. Make small improvements. Adjust table placement. Fix naming. Improve spacing. Then test it during your next busy shift and observe the difference.
This is how practical systems are built step by step, based on real usage. And if you feel like you need proper guidance or want to set everything correctly from the start, this is where Netilligence can support you.
At Netilligence, we don’t just set up Odoo features; we help you align them with your actual business flow, so your team can use the system without confusion.
If you want a properly structured setup for your restaurant floor plan in Odoo 19 Point of Sale, reach out to Netilligence.
- Get your POS configured in a way that actually supports your daily operations.
- Let your team work with clarity instead of guesswork.
Start today. Because even a small improvement in your layout can make your next busy shift feel much more controlled.