Understanding the Restricted Categories Feature in Odoo 19 POS
If you run a retail store, a pharmacy, a restaurant, or any multi-department outlet, you already know the headache of managing what products your cashiers can see and sell at any given time. Too many products visible on the POS screen leads to confusion, errors, and slow checkouts. That is exactly why the Restricted Categories feature in Odoo 19 POS was built: to give business owners, managers, and system administrators sharp, precise control over which product categories appear on each Point of Sale terminal.
With Odoo 19 POS restricted categories, you can define exactly which categories of products a particular POS session or shop should handle. Whether you want to restrict an outlet to selling only beverages or ensure that age-restricted items like tobacco or alcohol are hidden from certain terminals, this feature handles it all with a few simple clicks. Understanding how to use restricted categories in Odoo 19 POS can genuinely transform the way your team operates at the counter.
Why does this matter right now? Odoo 19 brings a cleaner UI and a more powerful configuration engine for POS. The Odoo 19 POS category configuration has been redesigned so that even non-technical users can set up and manage restrictions without IT support, saving you hours of training and maintenance time.
In this comprehensive guide, we will walk you through everything, from the basics of Odoo POS categories to advanced setup tips that most businesses never discover. Whether you are a first-time Odoo user or an experienced operator looking to tighten your workflows, this article is written for you.
What is the Restricted Categories Feature in Odoo 19 POS?
The Restricted Categories feature in Odoo 19 POS allows businesses to control which product categories are visible in a specific Point of Sale session or POS configuration.
Instead of displaying all products, Odoo allows you to limit visibility to selected categories only. This creates a more focused and efficient POS environment.
For example:
Bakery Counter | Cakes, Bread, Pastries |
Beverage Counter | Drinks, Juices, Coffee |
Electronics POS | Mobiles, Accessories |
Pharmacy POS | Medicines, Health Products |
This feature improves operational accuracy and reduces unnecessary product access.
The latest Odoo 19 POS category configuration system gives businesses greater flexibility for category-based restrictions.
Why Businesses Need Restricted Categories in Odoo POS
Many businesses operate with multiple departments, counters, or specialized sales teams. Showing every product category to every POS operator can create several problems.
1. Faster Billing Process
When employees only see relevant products, they can process sales much faster.
A clean POS screen means:
- Faster product selection
- Reduced search time
- Better customer service
- Shorter queues
This is one of the biggest benefits of using restricted categories in Odoo POS.
2. Better Employee Control
Not every employee should access all products.
For example:
- Cashiers at a snack counter should not sell electronics
- Bar staff should not access kitchen inventory
- Temporary staff may require limited visibility
The Odoo POS restricted category setup improves internal control and reduces operational mistakes.
3. Cleaner POS Interface
A crowded POS interface can confuse employees.
Using Odoo 19 POS restricted categories helps create a minimal and organized layout.
This becomes even more important for businesses with:
- Thousands of products
- Multiple departments
- Seasonal products
- Franchise operations
4. Improved User Experience
Employees can work more confidently when they only see relevant products.
This reduces:
- Wrong product selection
- Billing mistakes
- Employee training time
The Odoo POS categories system helps businesses maintain a smooth workflow.
How to Use Restricted Categories in Odoo 19 POS
Now let’s understand how to use restricted categories in Odoo 19 POS step by step.
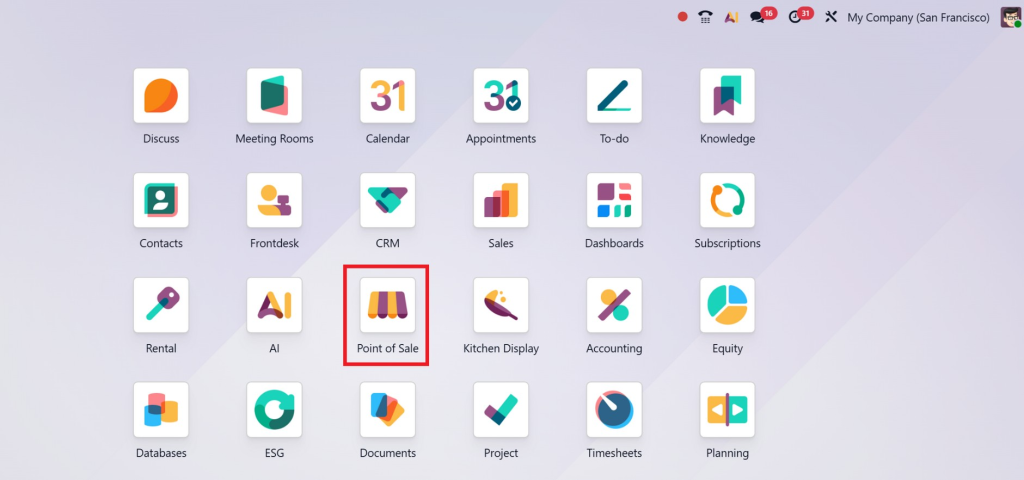
Step 1: Open the Odoo POS Module
First, log in to your Odoo 19 dashboard.
Navigate to:
Point of Sale →
Configuration → Settings
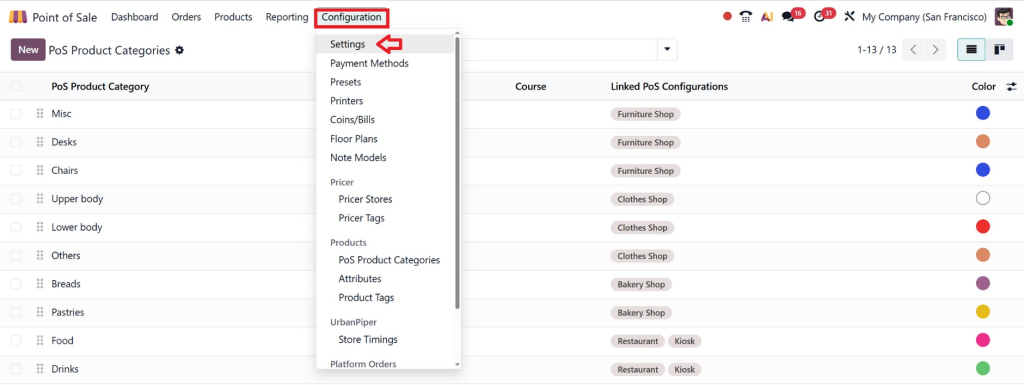
Choose the POS session where you want to apply category restrictions.
Step 2: Configure Product Categories
Before applying restrictions, make sure your products are properly organized.
Go to:
Point of Sale → Products → Product Categories
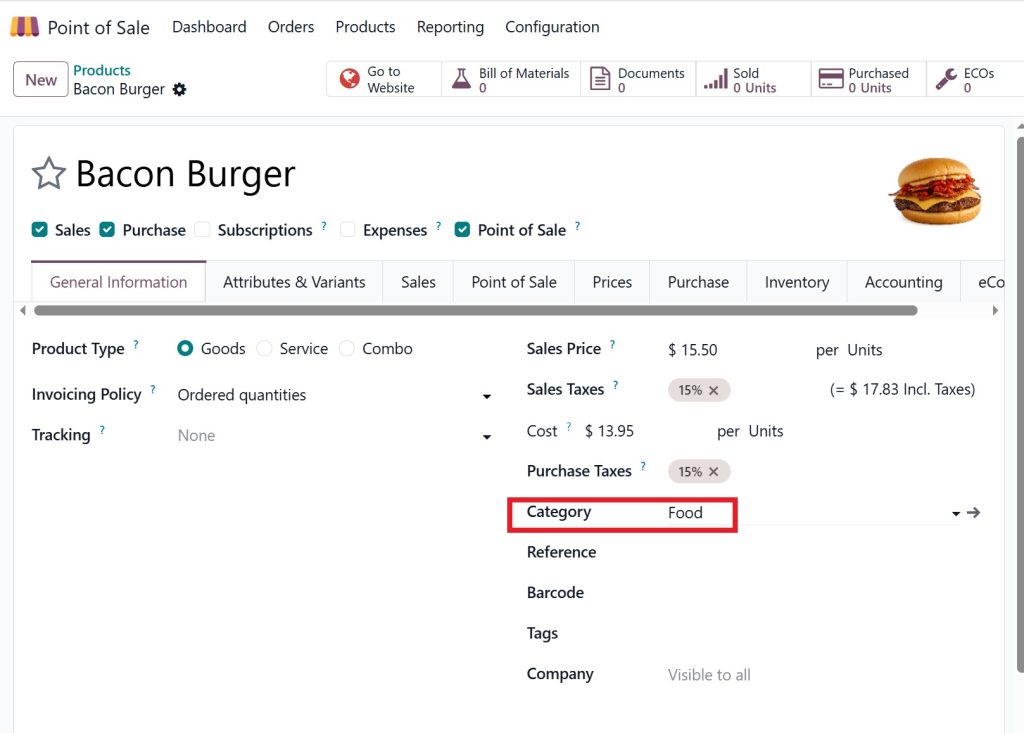
Create categories such as:
- Beverages
- Electronics
- Grocery
- Medicines
- Fashion
- Accessories
Proper organization is very important for effective Odoo POS category management.
Step 3: Assign Products to Categories
Now assign products to their relevant categories.
Example:
Coffee | Beverages |
Laptop | Electronics |
T-Shirt | Fashion |
Accurate category assignment improves the overall Odoo 19 POS category configuration.
Step 4: Enable Category Restrictions
Inside the POS configuration settings, enable restricted category settings if available through your configuration or custom module.
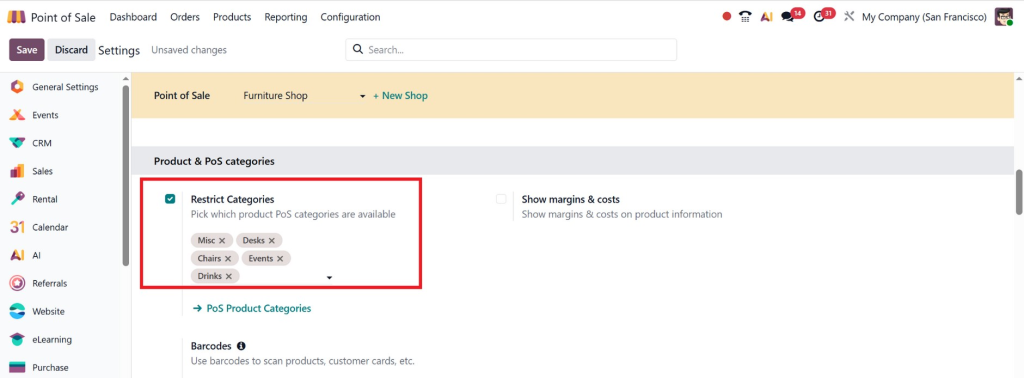
This allows you to:
- Hide categories
- Limit category access
- Assign category permissions
- Restrict cashier visibility
Businesses often customize this feature according to operational requirements.
Step 5: Assign User Permissions
Now assign permissions based on employee roles.
For example:
Cashier A | Grocery |
Cashier B | Fashion |
Manager | All categories |
This is the core part of the Odoo POS restricted category setup.
Step 6: Test the POS Interface
After configuration:
- Open the POS session
- Log in as different users
- Verify category visibility
- Confirm restrictions are working properly
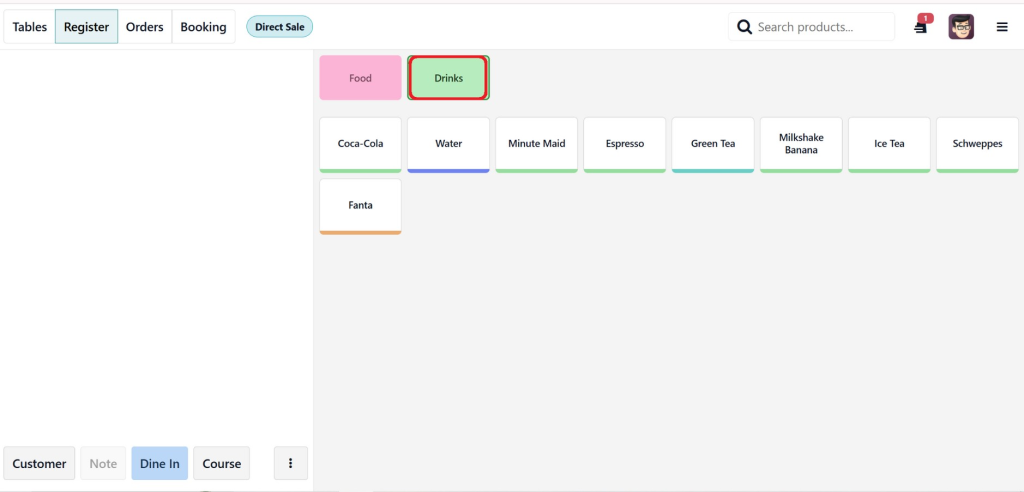
Testing helps avoid operational issues later.
⭐ Pro Tip: In Odoo 19, changes to the Odoo 19 POS category configuration do not require a system restart or any technical intervention. Simply saving settings and starting a new POS session is all it takes. This makes it easy to adapt on the fly, for example, enabling a “Holiday Specials” category only during festive seasons.
Advanced Configuration Options in Odoo 19 POS Category Configuration
Once you have the basics of Odoo 19 POS category configuration working, there are several advanced options worth exploring. These features help larger businesses and multi-branch retailers get even more granular control over their POS experience.
Hierarchical Category Restrictions
Odoo 19 supports parent-child category structures. When you restrict a parent category (like “Food & Beverages”), all subcategories under it (Coffee, Juice, Snacks, etc.) are automatically included. This saves you time; you don’t have to individually select every sub-category if they all fall under one parent group.
Conversely, you can allow a parent category but explicitly exclude certain sub-categories. For example, allow “Pharmacy” but exclude “Controlled Substances” if that terminal is not authorized to sell them.
Per-Cashier vs. Per-Terminal Restrictions
The Odoo POS category restriction system works at the POS shop/terminal level by default. However, when combined with Odoo’s employee POS login feature, you can create workflows where different cashier profiles trigger different visible product sets. This is particularly powerful for businesses where some staff members are authorized to sell premium or restricted items while others are not.
Category Display Order and UI Customization
Beyond restriction, Odoo 19 also allows you to reorder how Odoo POS categories appear on the POS screen. You can set a display sequence for each category so that your most popular or high-margin categories appear at the top, making it even faster for cashiers to navigate. This is done through Configuration → POS Product Categories, where you can drag and rearrange categories.
Combining with POS Price Lists
A powerful combination: apply category restrictions together with customer-specific price lists. For instance, a wholesale terminal in your store can be restricted to show only the “Bulk Items” category while simultaneously applying wholesale pricing. This combination turns a single Odoo instance into a sophisticated multi-channel retail platform.
Did You Know? Netilligence has helped over 150 businesses configure Odoo POS setups, including complex multi-branch, multi-currency, and multi-category environments. Our certified Odoo consultants can get your setup done right the first time, with zero downtime.
Real-World Use Cases for Odoo POS Category Restriction
Understanding the feature is one thing, seeing how real businesses use it is another. Here are the most impactful applications of Odoo 19 POS restricted categories across different industries:
Retail Supermarkets
- Express checkout lanes are restricted to “Grocery Essentials” only, no electronics or seasonal items.
- Self-checkout kiosks are limited to pre-packaged goods, and no fresh produce requires manual weight entry.
- Customer service desk POS is restricted to “Gift Cards” and “Returns” processing only.
Pharmacies & Healthcare Outlets
- Front counter POS shows only OTC (over-the-counter) medications and wellness products.
- The pharmacist’s terminal is the only one with access to prescriptions and controlled categories.
- Compliance is built into the workflow, junior staff physically cannot ring up restricted medicines.
Restaurants & Food & Beverage
- Bar terminal restricted to “Beverages & Cocktails” only, no food items to avoid confusion.
- Kitchen display POS shows only “Food Items,” so chefs never see irrelevant billing data.
- Drive-through terminal configured with a limited “Quick Menu” category for speed.
Hotels & Hospitality
- Spa POS restricted to “Spa Services & Products” only.
- Restaurant POS at the poolside is configured for “Poolside Menu” items exclusively.
- Front desk POS handles only “Room Services” and “Amenity Add-ons” categories.
Each of these scenarios demonstrates how thoughtfully using the Restricted Categories feature in Odoo 19 POS is not just a technical configuration; it is a business intelligence decision that directly impacts your bottom line.
Pro Tips to Maximize the Restricted Categories Feature in Odoo 19 POS
After working with dozens of businesses on their Odoo POS setups, the Netilligence team has collected a list of expert tips that go beyond the basic documentation. These insights will help you get the absolute most out of Odoo 19 POS product categories management.
Tip 1: Plan Your Category Architecture First
Before you touch a single setting, draw out your category tree on paper or a whiteboard. Decide on parent categories and subcategories. A clean, well-thought-out hierarchy makes the restriction setup ten times easier and prevents you from having to redo it later. Remember, if you restrict at the parent level, all children follow automatically.
Tip 2: Use Descriptive, Consistent Category Names
Category names like “CAT01” or “Type A” will confuse your team. Name them clearly: “Frozen Foods,” “Prescription Drugs,” “Alcoholic Beverages.” This makes the multi-select field in POS settings easy to use, especially when you have 30+ categories and need to find the right ones quickly.
Tip 3: Test Before Going Live
Always create a test POS session after configuring category restrictions. Go through the cashier screen yourself and verify that only the intended categories appear. Click through a full sale transaction to make sure the restriction does not block any required products by accident.
Tip 4: Combine With Access Rights for Maximum Security
Odoo POS category restriction works even better when paired with Odoo’s role-based access controls. Set up POS manager roles carefully so that only authorized personnel can change category restriction settings. This prevents staff from bypassing restrictions by tweaking settings themselves.
Tip 5: Review and Update Seasonally
Your product catalog evolves. New categories get added during holiday seasons, special promotions, or supplier changes. Set a quarterly reminder to review your Odoo 19 point of sale categories restrictions across all terminals and update them to match your current inventory strategy.
🚀 Netilligence Advantage: When you work with our team, we do not just configure the feature and walk away. We document your entire category structure, create a maintenance guide specific to your business, and provide ongoing support so your POS keeps running flawlessly as your catalog grows.
Final Thoughts on the Restricted Categories Feature in Odoo 19 POS
The Restricted Categories feature in Odoo 19 POS is a powerful tool for businesses that want more control, better organization, and improved security within their POS operations.
By using proper Odoo POS restricted category setup, businesses can:
- Improve cashier efficiency
- Reduce billing mistakes
- Protect sensitive inventory
- Organize products better
- Enhance customer experience
- Simplify employee management
As retail operations continue to grow more complex, proper Odoo 19 POS category configuration becomes increasingly important.
If your business wants to unlock the full potential of Odoo POS, professional implementation and customization can make a huge difference.
At Netilligence Official Website, we help businesses transform their operations with smart Odoo ERP solutions personalized to their exact needs.
Start building a more secure, organized, and efficient POS system today with expert Odoo customization services.